• Ciao Guest - You’ve landed at the ultimate Guzzi site. NEW FORUM REGISTRATIONS REQUIRE EMAIL ACTIVATION - CHECK YOUR SPAM FOLDER - Use the CONTACT above if you need help. New to the forum? For all new members, we require ONE post in the Introductions section at the bottom, in order to post in most of the other sections. ALWAYS TRY A SEARCH BEFORE STARTING A NEW TOPIC - Most questions you may have, have likely been already answered. DON'T BE A DRIVE-BY POSTER: As a common courtesy, check back in and reply within 24 hours, or your post will be deleted. Note there's decades of heavily experienced Guzzi professionals on this site, all whom happily give endless amounts of their VALUABLE time for free; BE COURTEOUS AND RESPECTFUL!
  • There is ZERO tolerance on personal attacks and ANY HYPERLINKS to PRODUCT(S) or other competing website(s), including personal pages, social media or other Forums. This ALSO INCLUDES ECU DIAGnostic software, questions and mapping. We work very hard to offer commercially supported products and to keep info relevant here. First offense is a note, second is a warning, third time will get you banned from the site. We don't have the time to chase repeat (and ignorant) offenders. This is NOT a social media platform; It's an ad-free, privately funded website, in small help with user donations. Be sure to see the GTM STORE link above; ALL product purchases help support the site, or you can upgrade your Forum profile or DONATE via the link above.
  • Be sure to see the GTM STORE link also above for our 700+ product inventory, including OEM parts and many of our 100% Made-in-SoCal-USA GTM products and engine kits. In SoCal? Click the SERVICE tab above for the best in service, tires, tuning and installation of our products or custom work, and don't miss our GT MotoCycles® (not) art on the BUILDS tab above. WE'RE HERE ONLINE ONLY - NO PHONE CALLS MADE OR RECEIVED - DO NOT EMAIL AND ASK QUESTIONS OR ASK TO CALL YOU.
  • Like the new V100, GuzziTech is full throttle into the future! We're now running on an all-new server and we've updated our Forum software. The visual differences are obvious, but hopefully you'll notice the super-fast speed. If you notice any glitches or have any issues, please post on the Site Support section at the bottom. If you haven't yet, please upgrade your account which is covered in the Site Support section or via the DONATE tab above, which gives you full site access including the DOWNLOADS section. We really appreciate every $ and your support to keep this site ad-free. Create an account, sign in, upgrade your account, and enjoy. See you on the road in 2024.

Removing charcoal canister, etc.

cgalardi

Cruisin' Guzzisti
GT Contributor
Joined
Nov 16, 2008
Messages
104
Hi,

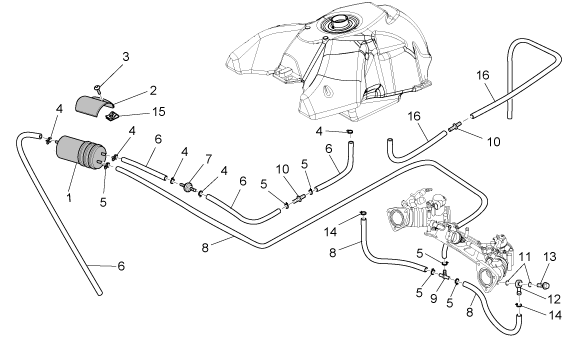
Just wondering if anyone has a diagram of the charcoal canister and associated tubing on a Stelvio.

Here is what I have done so far but I don't know if I am doing this correctly to rid my bike of this extraneous junk:

-Removed charcoal canister
-Plugged the 5/16" inch line connected to left side of canister
-Connected together the two 1/4" lines (one on each side of the canister)
-Removed the grey/black plastic valve connected to the 1/4" fuel line located next to the right side throttle body and replaced it with a straight thru brass fitting

I am just not sure if this is appropriate or need I do something more/different.

Thank you for any input.

Chris G
 
You have to disconnect and plug the two lines going to the throttle bodies (the one's that connect where you attach the carb tool to synch the TB's). If you did that, it sounds o.k. (you could remove some of the plumbing but I don't think you don't have to).
 
GU09000_66.gif
 
Thanks Ben! Then just reconnect them when synching/balancing the throttle bodies?

Or disconnect plug the existing lines going to the throttle bodies and just run another line straight across to attach the two throttle bodies ?
 
You could disconnect and plug them or run a light straight across (I did the latter). And then, when you sync the tb's, you would disconnect the plug or the line, and attach the vacum tool to each TB.

I was just looking at Pete's diagram and thinking you should also make sure you don't plug the line from the gas tank. You could plug the line to the TB's, or just rip all that tubing out. But I think you essentially want to convert the line from the gas tank to the evap can to a vent line, so the tank will vent better.

Right?
 
Based on Pete's diagram, I have done the following:

Removed Canister #4
Removed Valve #7 and replaced it with a brass straight thru connector valve
Connected #6 on each side of the canister with a brass straight thru connector
Plugged #8 where it was connected to the canister


Next what I plan to to is plug #8 where it connects to each throttle body.
Then I will run a new line from one throttle body straight across to the other.
 
That sounds right. I have mine disconnected, but left the plumbing in. But I think I'm going to do what you did and remove the can too....
 
Back
Top