• Ciao Guest - You’ve landed at the ultimate Guzzi site. NEW FORUM REGISTRATIONS REQUIRE EMAIL ACTIVATION - CHECK YOUR SPAM FOLDER - Use the CONTACT above if you need help. New to the forum? For all new members, we require ONE post in the Introductions section at the bottom, in order to post in most of the other sections. ALWAYS TRY A SEARCH BEFORE STARTING A NEW TOPIC - Most questions you may have, have likely been already answered. DON'T BE A DRIVE-BY POSTER: As a common courtesy, check back in and reply within 24 hours, or your post will be deleted. Note there's decades of heavily experienced Guzzi professionals on this site, all whom happily give endless amounts of their VALUABLE time for free; BE COURTEOUS AND RESPECTFUL!
  • There is ZERO tolerance on personal attacks and ANY HYPERLINKS to PRODUCT(S) or other competing website(s), including personal pages, social media or other Forums. This ALSO INCLUDES ECU DIAGnostic software, questions and mapping. We work very hard to offer commercially supported products and to keep info relevant here. First offense is a note, second is a warning, third time will get you banned from the site. We don't have the time to chase repeat (and ignorant) offenders. This is NOT a social media platform; It's an ad-free, privately funded website, in small help with user donations. Be sure to see the GTM STORE link above; ALL product purchases help support the site, or you can upgrade your Forum profile or DONATE via the link above.
  • Be sure to see the GTM STORE link also above for our 700+ product inventory, including OEM parts and many of our 100% Made-in-SoCal-USA GTM products and engine kits. In SoCal? Click the SERVICE tab above for the best in service, tires, tuning and installation of our products or custom work, and don't miss our GT MotoCycles® (not) art on the BUILDS tab above. WE'RE HERE ONLINE ONLY - NO PHONE CALLS MADE OR RECEIVED - DO NOT EMAIL AND ASK QUESTIONS OR ASK TO CALL YOU.
  • Like the new V100, GuzziTech is full throttle into the future! We're now running on an all-new server and we've updated our Forum software. The visual differences are obvious, but hopefully you'll notice the super-fast speed. If you notice any glitches or have any issues, please post on the Site Support section at the bottom. If you haven't yet, please upgrade your account which is covered in the Site Support section or via the DONATE tab above, which gives you full site access including the DOWNLOADS section. We really appreciate every $ and your support to keep this site ad-free. Create an account, sign in, upgrade your account, and enjoy. See you on the road in 2024.

Rust in cylinder

YellowCX100

Just got it firing!
Joined
Jul 17, 2011
Messages
21
Location
Campbell
I took the heads off of my 1980 CX100 for new guides. The smoke on startup was usually annoying and embarassing, but occasionally it was impressive, and not in a good way.

One other issue I've been having is that the breather would occasionally puke oil, but only under specific circumstance: when ridden fast for a long period of time. I ride the bike all year to work, or back roads, sometimes for a few hours and have no issues. But if I go on a long trip (200+ miles) on the interstate (70+ mph) it will put oil out the breather (and all over the rear of the bike, etc.). I've checked the breather box and it seems fine, but I have not yet checked the return line to make sure I don't have a partial blockage. This is on the to-do list. I mention this because...

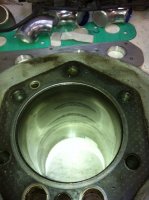
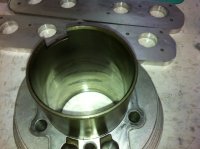
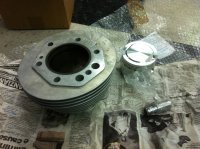
When I pulled one of the heads off I found corrosion in the bore. It looks like sometime in the past water sat in the cylinder for some time. The marks are as smooth as the rest of the bore, I can't feel them at all. I don't really have the tools to measure for out of round, etc. I can feel minor wear at the bottom of the cylinder where the rings stop. I now suspect this is related to my breather issue.

Thoughts or suggestions?
 

Attachments

  • low res 3.JPG
    low res 3.JPG
    79.1 KB · Views: 753
  • low res 4.JPG
    low res 4.JPG
    111.8 KB · Views: 753
What are the odds of there being at least two yellow CXs in the world that both smoke? I can't tell you, I'm not good a math. Just know it's true, unless you're the guy I know. I still couldn't calc the odds. :huh:

Not sure if the two issues are related, it's possible.

Do you still have the stock breather box? The CX came with the ball bearing breather check valve and may have rusted shut forcing the oil build up high enough to discharge through the dump tube on long rides. Did your valve covers have emulsified oil stuck to the underside?

Rust in Cyl: I'm taking a wild guess here, but if your PVC is stuck shut then the trapped moisture in the crank emulsifys, then may separate between the rings when cooled off, if stored for a long enough period would the rust liner. The engine rotation, or partial rotation after the engine is cut would introduce oxygen into the combustion chamber. :S

check valve: http://www.mgcycle.com/product_info.php?products_id=1007
Should be made of SS and have a symmetrical ball retainer. I bet with all the banging forth and back, the circlip damages the bearing surface and starts the corrosion. Oh well, just buy a new one every 10 years or so
 
No, Raphael, it's me.
The breather has a spring loaded disc. It seems fine. The underside of the valve covers looked perfect. I've never seen any signs of moisture in the covers. The cylinder corrosion looks old. I bought the bike from someone who lived on the coast in Santa Barbara. I'd guess that there was plenty of opportunity for moist cool air to get in. I suppose that I've washed the bike a few times as well, but I doubt I got water that far in.Other than the discoloration, I don't think I could tell by feel that it was even there.

I'm guessing that either the rings are toast from scraping off the rust or the breather return is clogged. Or both.
 

Attachments

  • low res 1.JPG
    low res 1.JPG
    96.3 KB · Views: 733
Guess there's only one yellow CX! Didn't recognize your bike w/o the gutters. :?: Hopefully you'll get comments from a real expert. :S
Anywhoo, so much for my speculation. So you have a T or T-3 breather. Are your valve covers connected to the box? Make sure the stock check valve is out, it's hard to see if you're not looking for it.

Get that motor rebuilt for the Idaho rally next month! Tentatively there are 4 bayarea guys so far headed to Idaho.
 
What John said.

Also, I notice your bike doesn't have a sump extension. While it isn't *always* the case almost all of the models with a bore bigger than 83mm will tend to pressurise their crankcases to the point where il will be expelled out of the breather especially if they run cast iron bores. Guzzi started using the sump extension on the Mk III Le Mans which although an 83mm bore engine was expected to run harder than the 'Touring' models. From then on all of the big blocks wore a sump extension until the change to the deeper sump casting used on the 1100 Calis on.

It should be realized that the use of a sump extension or a deeper sump is NOT to allow the addition of more oil but to increase the volume of the crankcase. This reduces the 'Pumping' action of the pistons as they rise and fall as the overall ratio between maximum crancase volume and minimum crancase volume is lessened. Use the extension, add the requisite 3.4 litres of oil and mark the stick accordingly.

With the breather sytsem? The spring loaded 'Flapper' valve in the breather box is a bit of shit. My 'Sollution' for this is to disable it by biffing it with a punch to bend the pin the disc sits on. The disc can then be shaken to one side and the spring shaken out, (The disc itself can stay inside, it won't fall out of the tube.). The later type ball PCV Valve as used on later models can be installed in the breather pipe from the crankcase. It is generally a much happier thing than the horrid flapper valve. Do use only ONE OR THE OTHER, not both.

Was yours the yellow CX that was at John DAy last year for the National? It's a very pretty bike.

Pete
 
I do have a sump extender on it (the side stand is just hiding it in the photo) and a windage tray that is really more of a seperator between the sump and crank, no scraping fingers for the crank or anything. I made a longer dipstick to keep the correct amount of oil in the sump, it is not filled to same distance from the crank.

So best bet is to replace the cylinder and piston? Here's where it put on my el-cheapo red Guzzi suspenders. Do I have to replace both sides? The other side looks fine. If I go with the Gilardoni replacements do I have to disassemble the entire engine and have stuff balanced? It seems like I've read stuff about that in the past.

When I got the bike it did have both the ball bearing and the flapper. I didn't discover that until I started chasing down the oil issue. I figured "AHA!" and removed the ball. No difference. I guess next I can punch out the flapper. Should I put the ball back in?

Raphael - I can't make it to Idaho this year, but I'm planning on getting to the Nevada rally. We'll see how the rest of this pans out.

Pete - yes, I took my bike to John Day last year, it was the only CX100 there and it is very yellow. Thanks! It ran fine for 1800 miles and because I was almost always on secondary roads I had no serious breather issues.

Brian
 

Attachments

  • D sump.jpg
    D sump.jpg
    1.5 MB · Views: 706
I assumed you were replacing both cylinder and pistons to go along with the valve job. The second photo shows, what appears to be, a new piston and those usually come with the cylinder as a set.

I have an Agostini breather box in my SP, works great, unfortunately they are no longer available at MG Cycle. But someone else might carry them or have one left over from a junked race bike. Like John said, the oil discharge probably goes hand in hand with the worn motor. I don't think a malfunctioning flapper would cause the oil problem, its the design of the breather box in conjunction with the worn motor. The Agostini has a bigger volume and the discharge to the atmosphere exit the box much higher/farther from the incoming line from the PCV than the original LMs 1 breather box. The check ball type PCV doesn't allow less oil to get by than a flapper type; the Breva 1100 uses no PCV valve at all.
 
YellowCX100 said:
So best bet is to replace the cylinder and piston? Here's where it put on my el-cheapo red Guzzi suspenders. Do I have to replace both sides?

It would be foolish not to. You would have a fresh side, and a worn side. Only a matter of a short time before the worn side would fail. Just bite the bullet and do them both.

YellowCX100 said:
If I go with the Gilardoni replacements do I have to disassemble the entire engine and have stuff balanced? It seems like I've read stuff about that in the past.Brian

I don't think it would be necessary for street use. The pistons from Gilardoni are probably very close to the factory weight so a re-balance I don't think would be necessary. I've installed them recently into a guys Eldorado and there were no balance/vibration issues.
 
YellowCX100 said:
If I go with the Gilardoni replacements do I have to disassemble the entire engine and have stuff balanced? It seems like I've read stuff about that in the past.

Brian

I recently put a big bore cylinder on a 750 smallblock. Instead of a complete engine re-balance I had the new pistons lightened to get close to the weight of the originals.

A real balance job (crankshaft et al) is best, but this was okay, and a lot less work.
 
I fitted a set of new Gilardonis to my big block with no subsequent issues. Vibration issues seem to occur only when boosting capacity e.g. 850 to 950. New Gilardoni kits are cost effective and you virtually have a new engine. MG Cycle are currently out of stock so try Teo Lamers. I recommend you get the valves and guides checked while they're off.
 
OK, I bit the bullet today and ordered two of the Gilardoni kits. UPS says they will be on my doorstep on Tuesday.
 
The stuff arrived on the porch today just as UPS promised. Packed in Italian newspapers from October 2008. I measured the rings and the gap seems to be good, maybe even a bit on the loose side. Should be fine. These cylinders are different from what I removed and thus the rings are different. I'm not sure which ring is the top ring. The two compression rings are the same thickness, so either one could go in the top or second land. One ring has a square profile the other ring has a notch from the outer profile. Which is the top? Which direction does the notch go -up or down? I could find no markings on the rings indicating for sure which side was the top.

I polished up the tops of the pistons to slow carbon build up even though that benefit is dubious. Hopefully the rings go on tomorrow and I'll get the jugs on. No word on progress on the heads yet but they said it would be a few weeks and it has only been one week so far.
 

Attachments

  • IMG_0886.JPG
    IMG_0886.JPG
    2 MB · Views: 493
  • IMG_0892.JPG
    IMG_0892.JPG
    1.6 MB · Views: 493
  • IMG_0889.JPG
    IMG_0889.JPG
    1.7 MB · Views: 493
I'll need to wrack my memory about which way the rings go. When I got mine there was a leaflet explaining the orientation. I think the solid ring is the top one and the notch faces downward on the second ring but don't take that as gospel
 
You gonna relseeve the small end of the con rods for the new wrist pins? If you do you'll have a chance to check out the end. New end cap bolts would be in order.
 
Usually instructions come wih the kit but.....

Top ring should have some arks on the upper face. It is the ring with no step. If no marks all you can assume is it is 'Ambesidestrous'.

Second ring is a torsional semi-scraper. This is the one with the step and the step should be installed towards the BOTTOM of the piston.

Oil ring is probably marked. If not look at it in profile and install it with whichever face you think looks flatter towards the bottom of the piston. If all chamfers look identical it is probably unimportant.

I take it the oil ring is a one piece?

Pete
 
The oil ring is one piece.

All the rings are on in the orientation noted above. The top ring has no marks on it, I'm 100% sure. The middle ring went on with the notch down. The oil scraper went on with the flat side down - the taper is tough to see!

First I practiced with the old pistons with the old rings in the old cylinders on the bench. It has been many years since I've done any rings. I worked all the rings in carefully. It went pretty easily. But on the bike it is all different. The studs are in the way, it is upside down, the side in the Vee is hard to see and reach. And this after just hearing about someone else with way more experience than me breaking an oil ring. But I got one cylinder on. I'll work on the other side tomorrow night.

Thanks!
 
Rafael said:
You gonna relseeve the small end of the con rods for the new wrist pins? If you do you'll have a chance to check out the end. New end cap bolts would be in order.
The goal is to not do that. And the new pins feel real good in the bushes. They slide in nicely and the clearance is minimal, feels real good, no slop. I'll change them next time I replace the wrist pins. :D
 
I use a tool like this http://www.toolsource.com/piston-ring-c ... 69800.html The one I used I purchased years ago and has the band sizes (2) for VW pistons. A full set might be nice to have. You compress the rings, then slide the cylinder down. Once the rings are in the cylinder, you can release the tool and work the band out through the studs. An alternative method is to use a large hose clamp (smooth surface type) to compress the rings and remove the clamp once the rings are in the cylinder.
 
Back
Top