• Ciao Guest - You’ve landed at the ultimate Guzzi site. NEW FORUM REGISTRATIONS REQUIRE EMAIL ACTIVATION - CHECK YOUR SPAM FOLDER - Use the CONTACT above if you need help. New to the forum? For all new members, we require ONE post in the Introductions section at the bottom, in order to post in most of the other sections. ALWAYS TRY A SEARCH BEFORE STARTING A NEW TOPIC - Most questions you may have, have likely been already answered. DON'T BE A DRIVE-BY POSTER: As a common courtesy, check back in and reply within 24 hours, or your post will be deleted. Note there's decades of heavily experienced Guzzi professionals on this site, all whom happily give endless amounts of their VALUABLE time for free; BE COURTEOUS AND RESPECTFUL!
  • There is ZERO tolerance on personal attacks and ANY HYPERLINKS to PRODUCT(S) or other competing website(s), including personal pages, social media or other Forums. This ALSO INCLUDES ECU DIAGnostic software, questions and mapping. We work very hard to offer commercially supported products and to keep info relevant here. First offense is a note, second is a warning, third time will get you banned from the site. We don't have the time to chase repeat (and ignorant) offenders. This is NOT a social media platform; It's an ad-free, privately funded website, in small help with user donations. Be sure to see the GTM STORE link above; ALL product purchases help support the site, or you can upgrade your Forum profile or DONATE via the link above.
  • Be sure to see the GTM STORE link also above for our 700+ product inventory, including OEM parts and many of our 100% Made-in-SoCal-USA GTM products and engine kits. In SoCal? Click the SERVICE tab above for the best in service, tires, tuning and installation of our products or custom work, and don't miss our GT MotoCycles® (not) art on the BUILDS tab above. WE'RE HERE ONLINE ONLY - NO PHONE CALLS MADE OR RECEIVED - DO NOT EMAIL AND ASK QUESTIONS OR ASK TO CALL YOU.
  • Like the new V100, GuzziTech is full throttle into the future! We're now running on an all-new server and we've updated our Forum software. The visual differences are obvious, but hopefully you'll notice the super-fast speed. If you notice any glitches or have any issues, please post on the Site Support section at the bottom. If you haven't yet, please upgrade your account which is covered in the Site Support section or via the DONATE tab above, which gives you full site access including the DOWNLOADS section. We really appreciate every $ and your support to keep this site ad-free. Create an account, sign in, upgrade your account, and enjoy. See you on the road in 2024.

Shimming timing gear to advance cam

Tonerjockey

High Miler
GT Contributor
Joined
Oct 28, 2008
Messages
788
Location
San Jose
On a '73 750 engine:

Looking to advance a cam while using "stock" cam/crank/oilpump gears (not chain)

The timing gear has 52 teeth ... each tooth = about 6.92 degrees.

about 3 degrees or so desired ... about 1/2 or so tooth rotation.

Looks like the helical gears have the spiral in a convienient direction to shim between cam and gear to advance the cam (relative to crank).

Has anyone stablished the shim thickness to degree ratio?

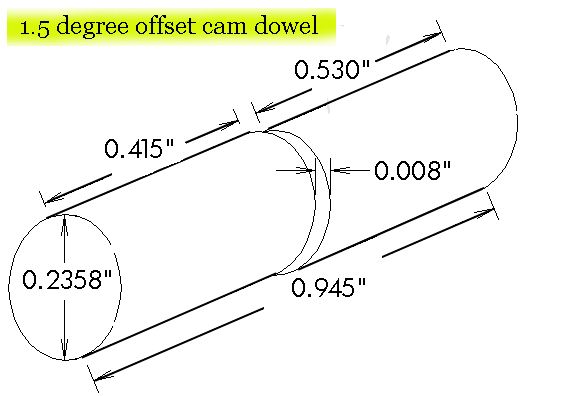
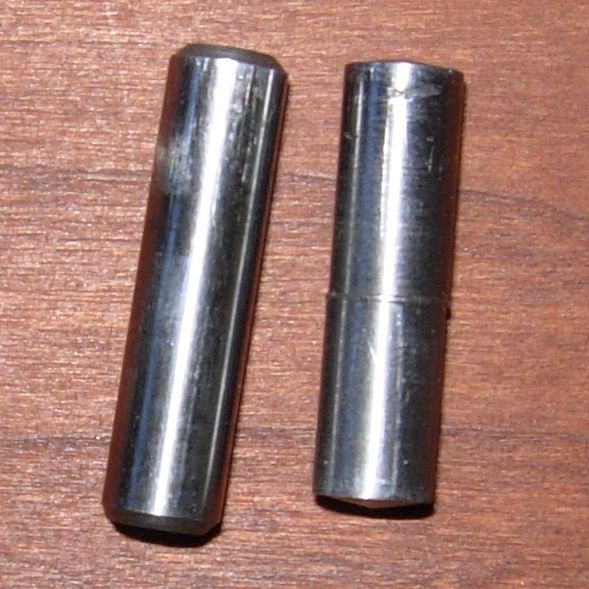
Or I could start looking for an offset pin I spoze. Or figure out how to make one... :unsure:

Alex
 
Long time ago we used an offset bushing to dial in the cam on small block chevy's. The timing gear had to be drilled out to accept the bushing.
 
it's also common to use an offset key on the crank sprocket or gear to alter timing on most OHV V-8 car engines..
You want to advance the cam to increase low end power?
 
yeah thats the idea... I wanted to use shims because they were easier to make than offset pins for me.

So, I set up the 4 jaw chuck and turned down a nice 5/16 rod. Did one end to 6mm and turned it over to offset the jaws and damn the jaws won't go down to 6mm ! ! ! Back to the drawing board. Now I gotta ask the real machinists tomorrow at breakfast to let me use one of their lathes to finish this pin...

When does the easy stuff happen?

Alex
 
I've messed around with cam timing on modified engines.Generally speaking, on a 2 valve engine, advancing the timing about 4 degrees will lower peak torque about 300-400 rpm and take a bit off top end. It will also reduce intake valve to piston clearance and make the engine more likely to detonate.Opening up intake valve lash will often have the same results. You may have to adjust the ignition timing advance curve and exhaust to get full benefits... Let us know how it work out...
 
Made a bushing, drilled 6mm hole and 3 set screws to hold pin staedy. Set up in 4 jaw chuck and indicated 0.008" offset. Cut pin and cleaned it up.

1point5degreeoffsetdowel_zps562c41cc.jpg


pins_zpsd63d8a0b.jpg


Now need to cut screw driver slot in gear end of pin so I can rotate the pin while attempting to install the cam gear.

Sheesh 0.008" offset sure ain't much.

Alex
 
Alex, I made a series of offset bushings, drill press and lathe ( running two pins instead of one for added insurance against pin breakage, ( don't ask ) so I could use the standard pin diam. As mentioned, drilled out the existing pin hole in the alloy gear to accomodate the new larger bushings. It takes a fair amount, Much much more than .008 to effectively rock the powerband 300 to 500 rpm. Some companies like Crower even offer such a kit. I retard the timing about 4 to 5 degrees in search of top end, which brings the ex valve very close to the pocket. Clay fit the engine for sure ! Missed seeing you at Speedweek, You were pre-registered yeah ?
 
Hey Bill,

I was pre-registered for Speed Week 2013 but the heads took longer than hoped for. I was able to sell my ticket via posting with SCTA.

Mike R. has done an outstanding job on these heads and I can't wait to get this version on the dyno.

Yer breaking records in Hyabusa Territory !! Far out indeed. 173MPH+ is deliverin the mail!!!

..... 200MPH in the cards?

Hopefully I will be at World finals, back in P-PP class.

Alex
 
Back
Top