• Ciao Guest - You’ve landed at the ultimate Guzzi site. NEW FORUM REGISTRATIONS REQUIRE EMAIL ACTIVATION - CHECK YOUR SPAM FOLDER - Use the CONTACT above if you need help. New to the forum? For all new members, we require ONE post in the Introductions section at the bottom, in order to post in most of the other sections. ALWAYS TRY A SEARCH BEFORE STARTING A NEW TOPIC - Most questions you may have, have likely been already answered. DON'T BE A DRIVE-BY POSTER: As a common courtesy, check back in and reply within 24 hours, or your post will be deleted. Note there's decades of heavily experienced Guzzi professionals on this site, all whom happily give endless amounts of their VALUABLE time for free; BE COURTEOUS AND RESPECTFUL!
  • There is ZERO tolerance on personal attacks and ANY HYPERLINKS to PRODUCT(S) or other competing website(s), including personal pages, social media or other Forums. This ALSO INCLUDES ECU DIAGnostic software, questions and mapping. We work very hard to offer commercially supported products and to keep info relevant here. First offense is a note, second is a warning, third time will get you banned from the site. We don't have the time to chase repeat (and ignorant) offenders. This is NOT a social media platform; It's an ad-free, privately funded website, in small help with user donations. Be sure to see the GTM STORE link above; ALL product purchases help support the site, or you can upgrade your Forum profile or DONATE via the link above.
  • Be sure to see the GTM STORE link also above for our 700+ product inventory, including OEM parts and many of our 100% Made-in-SoCal-USA GTM products and engine kits. In SoCal? Click the SERVICE tab above for the best in service, tires, tuning and installation of our products or custom work, and don't miss our GT MotoCycles® (not) art on the BUILDS tab above. WE'RE HERE ONLINE ONLY - NO PHONE CALLS MADE OR RECEIVED - DO NOT EMAIL AND ASK QUESTIONS OR ASK TO CALL YOU.
  • Like the new V100, GuzziTech is full throttle into the future! We're now running on an all-new server and we've updated our Forum software. The visual differences are obvious, but hopefully you'll notice the super-fast speed. If you notice any glitches or have any issues, please post on the Site Support section at the bottom. If you haven't yet, please upgrade your account which is covered in the Site Support section or via the DONATE tab above, which gives you full site access including the DOWNLOADS section. We really appreciate every $ and your support to keep this site ad-free. Create an account, sign in, upgrade your account, and enjoy. See you on the road in 2024.

Swingarm Bearings

goozy

Tuned and Synch'ed
Joined
Jul 15, 2010
Messages
30
Location
Dunnville, ON
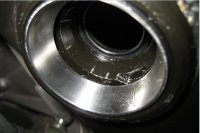
While down for the winter and on holidays :D , I took Ropers advice and pulled apart the rear end and swingarm to grease things up. Sure enough, rust just starting to show in the tiny amount of grease in there! Got it just in time.
2007 G1100 with 23,000 km on the clock, hasn't seen much rain and only occasional washing with a low pressure hose.

Thanks for the tip Peter
 
Stoopid innit? Just out of interest were the inner seals loose on yours? I've started ecommending to customers they address this early in their ownersship and I've found that the seals in the frame are usually pretty loose and will tend to come off their registers easily. Means care has to br taken re-installing the spindle.

Pete
 
Hi Pete, nope, inner seals are nice and tight in the seats I'll be careful putting the shaft back in. Funny thing though, the shock linkages were as skint with the grease as the bearings but no rust. You would think that being out in the open compared to the swingarm that they'd pick up more water. Go figure eh?
Peter
 
Is there a thread on what to do here and how to do it? I have my Griso off the road for the next three months. My only project planned right now is fork oil change, as it still has stock oil from 2007?

I could fit in this maintenance if I can just get an idea of what is involved. I have the service manual. Any special tools or expertise?

Pete mentioned something about the rear shock too. Does the CARC bearing need greasing? How can I keep that sucker in tip top shape?

Thanks,

Jon D.
 
Hi Jon, it's a straight forward disassembly, wheel off, CARC off, swingarm off. Hardest part is taking the foot peg holders off mainly because unplugging the rear brake light switch is a bugger(the plug is on the right side of the air box)

If you are down for the winter like I am I'd recommend doing it.

Peter
 
You guys got me all worried now...
I have about 28K miles and I think I'll inspect those bearings.
But I will order them first, just in case they're needed. Can't be without the ride for more than 2 days. :laugh:
 
I decided to replace the swingarm bearings on my B1100 but was reluctant to grind the old bearings out or to use heat or to hammer them. I therefore made up a very crude adaptor using some materials that I already possessed. Having proved the principle, the device needs more work as it's a real fiddle to assemble it to the bearing. I have, however, used it to extract the left side bearing up to the point where it is flush with the bike frame (i.e. it has moved by approximately 4mm). I now need to buy a simple engineering collar to act as a spacer between the puller and the bike frame so that the bearing can be removed further.

Pictures are shown below. The coach bolts are 6mm (1/4 inch). Please note that there is a distance piece which keeps the heads of the coach bolts pushed against the bearing ring also prevents the coach bolt heads from bending too much. It locates on the squares on the bolt heads and thus prevents them rotating when the nuts are tightened. This spacer needs to be positioned after the bolts have been placed into the bearing ring. Obviously, care needs to be taken to ensure that the nuts are tightened evenly.

I can only state that this is working for me but, if you do try this approach yourself, please be careful (use goggles etc).

MickE
 

Attachments

  • Bearing ring partly removed.JPG
    Bearing ring partly removed.JPG
    102.2 KB · Views: 634
  • Extractor 2.JPG
    Extractor 2.JPG
    66.4 KB · Views: 633
MickE said:
I decided to replace the swingarm bearings on my B1100 but was reluctant to grind the old bearings out or to use heat or to hammer them. I therefore made up a very crude adaptor using some materials that I already possessed. Having proved the principle, the device needs more work as it's a real fiddle to assemble it to the bearing. I have, however, used it to extract the left side bearing up to the point where it is flush with the bike frame (i.e. it has moved by approximately 4mm). I now need to buy a simple engineering collar to act as a spacer between the puller and the bike frame so that the bearing can be removed further.

Pictures are shown below. The coach bolts are 6mm (1/4 inch). Please note that there is a distance piece which keeps the heads of the coach bolts pushed against the bearing ring also prevents the coach bolt heads from bending too much. It locates on the squares on the bolt heads and thus prevents them rotating when the nuts are tightened. This spacer needs to be positioned after the bolts have been placed into the bearing ring. Obviously, care needs to be taken to ensure that the nuts are tightened evenly.

I can only state that this is working for me but, if you do try this approach yourself, please be careful (use goggles etc).

MickE

Great idea Mick, but i just whacked mine out from the opposite side with a very long chisel, I figured was going to replace them whatever, so wasn`t too fussed about how they came out. The drive side swing arm bearing was totally shot with less than 22,000 mikes on it.Finished that job and then stripped the steering bearings out. They actually had some grease on them, but as I had gone to the trouble of dismantling them anyway, I replaced them with a kit from All Balls Racing. Kit comes with top and bottom taper roller bearings and top and bottom seals. Very good value for money IMHO.
 
Thanks Commando Tod.

My swingarm bearings (together with the linkage bearings) had plenty of grease. I did notice, however, some marking on the RHS race and decided to change them.

I'm glad you managed to remove your bearings successfully by hammering. I will keep on using the extractor method, however, as it seems to be working well with no drama.

I noticed some minor galling at the interface between the RHS bearing and the swingarm. This seemed to have been caused by a small amount of play between the inside diameter of the bearing and the outside diameter of the swing arm pin. I wondered if this would have caused impacts at the bearing during accelerating and braking. I have, therefore, acquired a new pin which happens to have a slightly larger diameter (by 0.001in!). It probably will make very little difference.

I aim to inspect the fork bearings later and at the same time change the fork oil and the seals if only because that's specified in the maintenance book.

Cheers, MickE.
 
Excellent tool Mick.

A 2cm length of pipe that is wide enough to sit on the frame but and be clear of the bearing, (60mm diameter?) will allow your tool to pull the shell all the way out.
 
Thanks, Iainw,

I will try that if I cannot find a shaft collar this weekend. I'm been busy at work all week so I've been unable to make any progress.

Cheers, MickE
 
Back
Top