• Ciao Guest - You’ve landed at the ultimate Guzzi site. NEW FORUM REGISTRATIONS REQUIRE EMAIL ACTIVATION - CHECK YOUR SPAM FOLDER - Use the CONTACT above if you need help. New to the forum? For all new members, we require ONE post in the Introductions section at the bottom, in order to post in most of the other sections. ALWAYS TRY A SEARCH BEFORE STARTING A NEW TOPIC - Most questions you may have, have likely been already answered. DON'T BE A DRIVE-BY POSTER: As a common courtesy, check back in and reply within 24 hours, or your post will be deleted. Note there's decades of heavily experienced Guzzi professionals on this site, all whom happily give endless amounts of their VALUABLE time for free; BE COURTEOUS AND RESPECTFUL!
  • There is ZERO tolerance on personal attacks and ANY HYPERLINKS to PRODUCT(S) or other competing website(s), including personal pages, social media or other Forums. This ALSO INCLUDES ECU DIAGnostic software, questions and mapping. We work very hard to offer commercially supported products and to keep info relevant here. First offense is a note, second is a warning, third time will get you banned from the site. We don't have the time to chase repeat (and ignorant) offenders. This is NOT a social media platform; It's an ad-free, privately funded website, in small help with user donations. Be sure to see the GTM STORE link above; ALL product purchases help support the site, or you can upgrade your Forum profile or DONATE via the link above.
  • Be sure to see the GTM STORE link also above for our 700+ product inventory, including OEM parts and many of our 100% Made-in-SoCal-USA GTM products and engine kits. In SoCal? Click the SERVICE tab above for the best in service, tires, tuning and installation of our products or custom work, and don't miss our GT MotoCycles® (not) art on the BUILDS tab above. WE'RE HERE ONLINE ONLY - NO PHONE CALLS MADE OR RECEIVED - DO NOT EMAIL AND ASK QUESTIONS OR ASK TO CALL YOU.
  • Like the new V100, GuzziTech is full throttle into the future! We're now running on an all-new server and we've updated our Forum software. The visual differences are obvious, but hopefully you'll notice the super-fast speed. If you notice any glitches or have any issues, please post on the Site Support section at the bottom. If you haven't yet, please upgrade your account which is covered in the Site Support section or via the DONATE tab above, which gives you full site access including the DOWNLOADS section. We really appreciate every $ and your support to keep this site ad-free. Create an account, sign in, upgrade your account, and enjoy. See you on the road in 2024.

Throttle body sync?

cog2803

Tuned and Synch'ed
GT Contributor
Joined
Nov 7, 2008
Messages
33
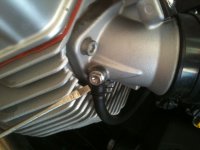
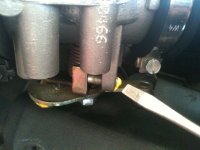
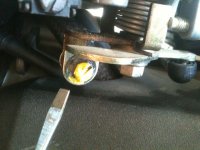
I've synced carbs on four cylinder in-line bikes before using the basic Motion Pro Mecury based carb synchronizer. I see where the vaccum hoses attach to the the two throttle bodies but I am not clear on where an adjustment is made to bring the two into sync. I've found posts that mention the air-bleeds screws being closed or opened and then to sync the throttle bodies . . .

But I'm not clear on where the adjustments are made, how they are made or how much they are made. This is my first bike with fuel injection and with just two carbs :)

Bill Buchanan
97 Griso 1100
 
Close of the air screw on the RHS and open the LHS 1/2 a turn. Some might have a different view on this but when i did it last week it worked fine.

The adjustment is made on the LHS, it's the large screw facing outwards under the throttle body, NOT THE SMALL ONE FACING TO THE REAR
 
This is how you do it for the Stelvio:

Open the garage door first :laugh: , and then put a fan in front of the bike to keep it from overheating.

Close both air screws, attach the vacum hoses, start the bike and let it warm up.

Balance the TB's at 3,000 rpms using the adjustment screw (make sure you know which screw).

Let the bike idle and adjust the idle using the air screws,

Then reset the TPS and you are done.

The manual (in the "downloads" section) describes how to do this. Plus if you do a search on this site you'll find more info and pictures.

If you take your time and get this right, it makes a noticeable difference in how the bike runs.
 
This is the air screw, yes?


As noted below, nope, it's not the air screw. It is the fitting to which the vacuum hose from the carb sync tool is affixed.
 

Attachments

  • IMG_1196.jpg
    IMG_1196.jpg
    131 KB · Views: 739
Don't touch this one, right?

As noted below - Correct, DO NOT touch this one. It is identified as the "Throttle Stopper" in the Breva manual with the admonition "Don’t move absolutely the throttle stopper, to avoid the need of throttle body replacement."
 

Attachments

  • IMG_1198.jpg
    IMG_1198.jpg
    156.4 KB · Views: 750
This one adjusts the sync between the two throttle bodies, yes?
 

Attachments

  • IMG_1197.jpg
    IMG_1197.jpg
    175.6 KB · Views: 728
cog2803 said:
This is the air screw, yes?


This is the air inlet to the throttle body. It is here you will attach your gauge to measure vacuum so you can balance them. The screws you close... then adjust open only one for idle balance (left side) are viewable from underneath the throttle bodies inside the tubular shaped channel visible above the adjusting screw for adjusting synch as you have indicated .
Hope I'm explaining OK :)
 
cog2803 said:
This one adjusts the sync between the two throttle bodies, yes?

Correct.

See the 1100 Breva service manual in the download section. The sync procedure is the same and it shows the location of all screws.
 
Ding! Ding!

The Breva 1100 Service Manual is great. I wish there was one for the Griso. I would have never found the bypass screws without the pictures in the manual and the collective assistance from those folks who posted in response to my questions.

Again, thank you very much.

Bill
 
Here's my interpretation of the instructions on synchronizing the Throttle Bodies on a Griso - or Breva as most of this came from the Breva 1100 Service Manual available in the download section of the Forum.

Throttle body sync - step by step

a. Check TPS using VDST or Axone, 4.9 for Griso, or for Breva 4.5 - 4.9, reset TPS if needed.
b. Attach vacuum hoses from carb sync device, Motion Pro, TwinMax, Carbtune, etc. to the air inlet on each throttle body.
c. Completely close the by-pass screws on both throttle bodies (located on the bottom of each throttle body)
d. Start the engine and warm up to 60° Celsius (160 degrees Fahrenheit)
e. Run the engine at 2000/3000 rpm and with the vacuum meter, check for a difference of vacuum equal to or less than 1 cm Hg (1,33 kPa) between the two cylinders .
f. If this is the case (difference between the two cylinders is equal to or less than 1 cm Hg (1.33 kPa)) continue to # 1.
g. If difference is higher (greater than 1 cm Hg (1.33 kPa)) proceed to # 2.

#1 Run the engine at idle and check that the vacuum between the two cylinders is balanced. If this is not the case, open ONLY the bypass screw of the cylinder with the highest (most) under-pressure to obtain equal values between left and right throttle bodies.

#2 Adjust the adjuster on the throttle bodies connecting rod, which is the screw on the LHS throttle body (shifter side and on the front of the unit) to to obtain equal values between left and right throttle bodies.

h. Using VDST, check TPS. (4.9 for Griso, for Breva 4.5 - 4.9) Reset TPS if needed.
i. Run the engine at idle and check the vacuum difference between left and right as indicated in steps above. If difference exists open ONLY the by-pass screw on the side with the higher (most) under-pressure to obtain correct balance.

**************

This seems to indicate that the by-pass screws on the throttle bodies are the "fine" adjustment if the difference of vacuum between the two cylinders is no greater than a maximum of 1 cm Hg (1.33kPa). The goal being to achieve as close to zero difference between the left and right.

This also seems to indicate that the adjustment screw on the LHS Throttle Body is the "coarse" adjustment" if the difference of vacuum between the two cylinders is greater than 1 cm Hg (1.33 kPa)

Please review and comment for clarity, missed steps, etc.

Thanks

Bill
 
Bill,

For the high speed sync, get as close to dead even as you can. To me, 1cm tolerance is too much. You will feel the difference. It is nice to have the idle very close even as well, but you didn't buy the bike for it to idle much. To me, the high speed sync is more important than the idle sync, but the idle sync is the easiest to obtain.
 
The adjustment on the rod is for high speed (2,000 - 3,000 rpm) balancing. The bleed screws are for adjustment at idle only.
 
I cruise at 4000rpm most of the time, do I sync the throttle body at 3000rpm as recommended or does it make sense to sync it at 4000rpm?
 
Phang said:
I cruise at 4000rpm most of the time, do I sync the throttle body at 3000rpm as recommended or does it make sense to sync it at 4000rpm?


Wouldn't hurt. But then it may make little to no difference.
 
Back
Top