• Ciao Guest - You’ve landed at the ultimate Guzzi site. NEW FORUM REGISTRATIONS REQUIRE EMAIL ACTIVATION - CHECK YOUR SPAM FOLDER - Use the CONTACT above if you need help. New to the forum? For all new members, we require ONE post in the Introductions section at the bottom, in order to post in most of the other sections. ALWAYS TRY A SEARCH BEFORE STARTING A NEW TOPIC - Most questions you may have, have likely been already answered. DON'T BE A DRIVE-BY POSTER: As a common courtesy, check back in and reply within 24 hours, or your post will be deleted. Note there's decades of heavily experienced Guzzi professionals on this site, all whom happily give endless amounts of their VALUABLE time for free; BE COURTEOUS AND RESPECTFUL!
  • There is ZERO tolerance on personal attacks and ANY HYPERLINKS to PRODUCT(S) or other competing website(s), including personal pages, social media or other Forums. This ALSO INCLUDES ECU DIAGnostic software, questions and mapping. We work very hard to offer commercially supported products and to keep info relevant here. First offense is a note, second is a warning, third time will get you banned from the site. We don't have the time to chase repeat (and ignorant) offenders. This is NOT a social media platform; It's an ad-free, privately funded website, in small help with user donations. Be sure to see the GTM STORE link above; ALL product purchases help support the site, or you can upgrade your Forum profile or DONATE via the link above.
  • Be sure to see the GTM STORE link also above for our 700+ product inventory, including OEM parts and many of our 100% Made-in-SoCal-USA GTM products and engine kits. In SoCal? Click the SERVICE tab above for the best in service, tires, tuning and installation of our products or custom work, and don't miss our GT MotoCycles® (not) art on the BUILDS tab above. WE'RE HERE ONLINE ONLY - NO PHONE CALLS MADE OR RECEIVED - DO NOT EMAIL AND ASK QUESTIONS OR ASK TO CALL YOU.
  • Like the new V100, GuzziTech is full throttle into the future! We're now running on an all-new server and we've updated our Forum software. The visual differences are obvious, but hopefully you'll notice the super-fast speed. If you notice any glitches or have any issues, please post on the Site Support section at the bottom. If you haven't yet, please upgrade your account which is covered in the Site Support section or via the DONATE tab above, which gives you full site access including the DOWNLOADS section. We really appreciate every $ and your support to keep this site ad-free. Create an account, sign in, upgrade your account, and enjoy. See you on the road in 2024.

Tonti Forks on a Loop

geodoc

Cruisin' Guzzisti
Joined
Oct 27, 2008
Messages
205
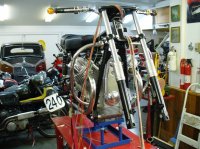
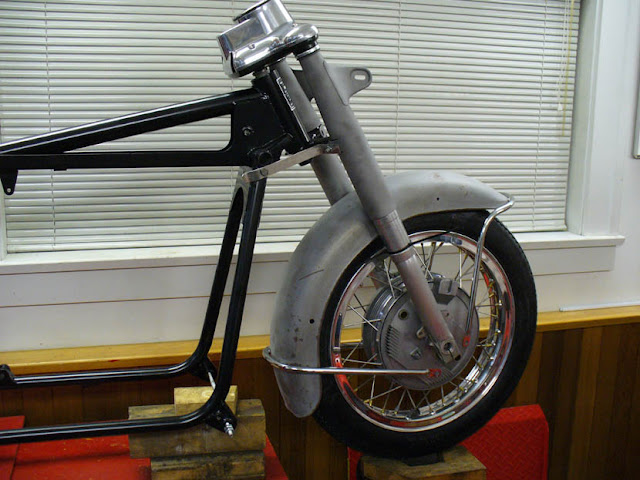
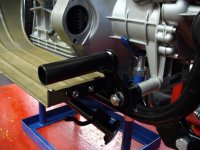
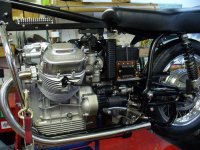
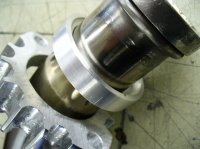
Here's my project Loop that's getting Tonti sliders and FACs to replace the original damping-challenged units.

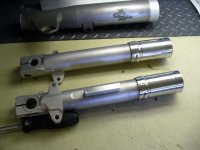
Bought new Eldo tubes and a pair of used aluminum sliders. Turned down the tabs off the upper sliders and left the lower ones intact to attach the fender braces.

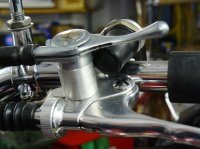
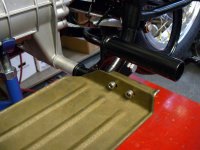
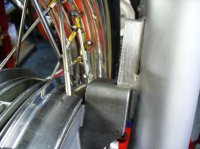
The slider top edges when fully extended are about even with the bottom edge of the tube shrouds. I'd originally thought that I would have to extend the shrouds to cover a gap when fully extended, but now I'm not going to bother.

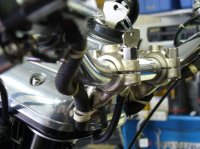
The FAC top nuts fit perfectly in the Eldo tubes and cause the speedo "binnacle" to sit about 1/8" higher when the binnacle is screwed to the FAC top nuts than original. The FAC top nut holes that come with air fittings will be used to attach the 2 binnacle forward screw locations. They are 6mm stock, but the FAC cap holes are 8mm. I drilled out the holes for 8mm socket head screws and turned down the socket heads to as big as I could get and still fit in the counter-bores in the binnacle meant for the 6mm socket head screws.

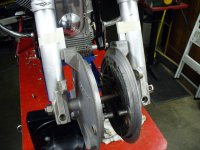
Next challenge is to make up a pair of aluminum stops to weld up to the inside of the sliders to locate the brake backing plate bosses and make a place to screw the fender mounts to. Friend & welder / machinist Ian Watson tells me he has a trick for doing this without distorting the sliders, though plan 'B' involves a 35mm reamer.

The other challenge is modifying a pair of fender braces to suit the cast-in tabs at the bottom of the sliders for a good fit.

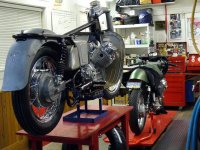
More photos and progress report as the work continues.

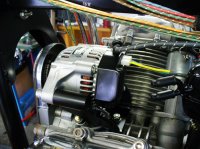
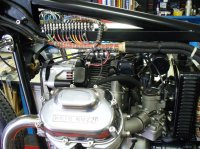
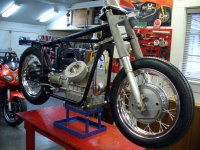
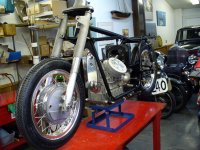
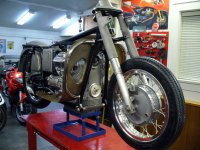
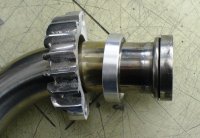
Other low-down: engine is from a Convert, gearbox a garden-variety 5-speed, 850T rear wheel and brake, pumpkin final drive housing w/ 7/33 gearset, early Ambo tank and V700 side covers, V700 style paint, disc brake swing arm & u-joint.

PS: anybody have a V700 "long bullet" headlight bucket they want to flog off to me?

GD

frontend_2.jpg


engine.jpg
 
man you like pain... drilling your instrument cluster??? why not helicoil/thread insert the FAC (or even use a step stud)? turning down the sliders??? why not run a disk front wheel and brake? Modify the fender braces??? why not get a set of disk brake front end braces. Modify the sliders to accept the drum front fender??? why not get a disk brake frontend fender (oops, nevermind, looks like you cut off the upper mounts for that)??? modify the upper outer tubes for more overlap??? once again, the disk brake front end upper tubes are longer...

seems you took the path of maximum resistance and hackage. not that there is anything wrong with that...
 
Couldn't use a step stud, no room for a socket in the recess where the 6mm socket head was. really not overtly noticeable the way I went.

Why not a disc brake? Well the 4LS will be good enough for this bike's purpose, sort of 60's Italian cop bike that it will be. I like the retro-future Loop-look but with actual damping, but that demands drums. If I could I have some sort of Nino Rota theme horn!

Common man, you understand, doncha?

G

mtiberio said:
man you like pain... drilling your instrument cluster??? why not helicoil/thread insert the FAC (or even use a step stud)? turning down the sliders??? why not run a disk front wheel and brake? Modify the fender braces??? why not get a set of disk brake front end braces. Modify the sliders to accept the drum front fender??? why not get a disk brake frontend fender (oops, nevermind, looks like you cut off the upper mounts for that)??? modify the upper outer tubes for more overlap??? once again, the disk brake front end upper tubes are longer...

seems you took the path of maximum resistance and hackage. not that there is anything wrong with that...
 
This thing may actually be ready for Spring
 

Attachments

  • 02-05-11_2.jpg
    02-05-11_2.jpg
    158.4 KB · Views: 1,281
  • 02-05-11_1.jpg
    02-05-11_1.jpg
    160.3 KB · Views: 1,279
WOW that's great!

You sellin parts off the Roller to pay for the Guzzi? :eek:

The shop looks really good too. Epoxy floor?

Alex
 
Heh Alex,

Naw .......... the Rolls (actually a 1952 Silver Cloud) belongs to shop-mate or rather shop owner Tom who's Bonneville Salt Flats unit is in the racing section of the site here under "Racing / Duct Fun".

The floor is apparently just sealed cement

Here's some more shots from today:

Tonerjockey said:
WOW that's great!

You sellin parts off the Roller to pay for the Guzzi? :eek:

The shop looks really good too. Epoxy floor?

Alex
 

Attachments

  • 02-07-11_1.jpg
    02-07-11_1.jpg
    154.8 KB · Views: 1,214
  • 02-07-11_3.jpg
    02-07-11_3.jpg
    115.8 KB · Views: 1,209
  • 02-07-11_4.jpg
    02-07-11_4.jpg
    114.9 KB · Views: 1,210
  • 02-07-11_5.jpg
    02-07-11_5.jpg
    145.8 KB · Views: 1,210
  • 03-04-11_2.jpg
    03-04-11_2.jpg
    118.8 KB · Views: 1,034
Little bits of progress are turning into something that's starting to look like a motorcycle;

All the electrical components are installed. It took a lot of head-scratching and a number of wadded-up sheets of paper to get the original "snuff box" & ignition switches to work with the Moto Gadget M-Unit. All control signals to the M-Unit are grounds on or off so the switching arrangement had to be changed considerably.

All the wire was ordered from Rhode Island Wiring yesterday

The seat cover from Harper's is a near-perfect match to the V700 / Ambo. The foam was done to match by local upholster. It will have to be modified slightly to tuck in the front to clear the tank.

Have made weld-on adapter collars to allow Eldo headers to be installed on the Tonti stud-style exhaust.

Have all the parts to assemble now except: the stainless "cigar" mufflers that are "arriving soon" (ah-hem .....) from Harpers. Wonder if plan 'B' might be Epco cigars and cable stuff to order yet from Flanders.


Hats-off to Charley Cole - he provided me with a scookum Ambo "pumpkin" rear drive housing containing a 7/33 gear set as well as a disc rear type pinion bearing carrier to go with the disc type swing arm / u-joint setup.


Hope that tomorrow the brake backing plate lugs get welded on to the fork sliders and the tubes still fit w/o having to ream or hone the slider I.D.'s.
 

Attachments

  • 03-16-11_1.jpg
    03-16-11_1.jpg
    160 KB · Views: 999
  • 03-16-11_2.jpg
    03-16-11_2.jpg
    152.4 KB · Views: 999
  • forklegs.jpg
    forklegs.jpg
    61.6 KB · Views: 999
Wow I was happy to change my oil. Now I feel compelled to polish something. :mrgreen:
 
Winters are long, the shop has heat, an espresso machine, a bottle of George Dickel, stereo and a lathe.

So that's the sequence - 1st get warm; then jack up on a 'quad' espresso; then knock back a few shots of GD; fire up James Brown's "Cold Sweat", then crank down the chuck on that piece of 2 inch aluminum round stock & let 'er rip!

Silverhorse347 said:
Wow I was happy to change my oil. Now I feel compelled to polish something. :mrgreen:
 
Finally got the brake backing plate / fender mount lugs welded on to the sliders. 1st step was to locate the lugs to the sliders and affix with 'C' clamps using the backing plates tightened to to the axles to get them in the right spots. Next heat the assemblies up to 400F and heat soak for 30 min. Then each slider was pulled from the oven and welded then back in the oven. After welding, the sliders were left in the oven for 30 min with heat on, then 4 hours with the heat turned off to slowly cool & hopefully minimize distortion.

Despite high hopes there was enough distortion to prevent the tubes from fitting in the sliders. A lot of work with a special sanding rig and a bake caliper hone got them both fitting again. Most of the distortion was in the lower part of the legs, so I figure that the extra clearance from sanding / honing at that point shouldn't be a problem.If I was going to do run of these, I'd invest in an expanding reamer for about $225 and make short work of it as well as removing less material and only where it was needed. I sanded and honed for probably 5 hours to get a fit.

Tomorrow fit the front fender to the mount hole locations to the upper lugs, then they go off to the powder coater.


Adapting stainless loop headers to a Tonti flange-type head outlet. 1st made up a stainless collar to mate against the exhaust gasket, then welded on to the pipe. Next made up a couple aluminum spacer collars for the finned exhaust collars to push against the formed-in radiused flanges in the headers. The spacer collars have a radius cut into the I.D. to mate over the formed in flanges.
 

Attachments

  • lugs-2.jpg
    lugs-2.jpg
    222 KB · Views: 749
  • exh-2.jpg
    exh-2.jpg
    258.1 KB · Views: 748
  • exh-1.jpg
    exh-1.jpg
    190 KB · Views: 747
Thanks, though it would be sweeter still if I could get a pair of (^#$_*^@^)*! stainless 'cigar' mufflers. They are under the care of "Our Lady of Perpetual Back Order".

th_01 said:
:D Sweet setup Nice work
 
Yo Amboman ............ Drinks on me when you're in town or when I'm in yours!

I called up Feked (a rather obscure source - never heard them before). They had the stainless mufflers w/ x-over in stock and they will be winging their way here next week. That's the last of the parts outstanding to complete this project, hallelujah.

I'm reminded at why trans-Atlantic parts orders are to be avoided when possible, the shipping cost is brutal - between 40 & 60 quid ($60-100 CDN). Ouch ! & that's shipping to the USA which is less than to Canada for some reason. Maybe the last part by dog sled is the expensive part, being in Canada after all.

The bench today:

Got the fork sliders back from powder coating. When the fork shrouds are ready after paint Monday the front end can go together for good except for taking the wheel back off to install the painted fender.

Got a good start on the electrical installation. Motogadget M-Unit's installed with all the wire connections in & out of it. Will work up to the terminal strips mounted on the frame square channel. Alternator installation done.

GD


Amboman said:
geodoc said:
Thanks, though it would be sweeter still if I could get a pair of (^#$_*^@^)*! stainless 'cigar' mufflers. They are under the care of "Our Lady of Perpetual Back Order".

th_01 said:
:D Sweet setup Nice work

Hi George,

Here are a few more leads on stainless "cigar" mufflers:
http://www.feked.com/moto-guzzi-v7-silencers.html
http://www.motostoricheitaliane.com/Eng_Menu.html
 

Attachments

  • 03-26-11_1.jpg
    03-26-11_1.jpg
    253 KB · Views: 625
  • 03-26-11_2.jpg
    03-26-11_2.jpg
    236.5 KB · Views: 624
  • 03-26-11_3.jpg
    03-26-11_3.jpg
    270.1 KB · Views: 622
geodoc said:
Yo Amboman ............ Drinks on me when you're in town or when I'm in yours!

I called up Feked (a rather obscure source - never heard them before). They had the stainless mufflers w/ x-over in stock and they will be winging their way here next week. That's the last of the parts outstanding to complete this project, hallelujah.

Happy to help. Looking forward to seeing them on the bike. Took me a while to remember how I found them a few months (years?) back. Had to Google "Morini mufflers" and found a page with a few good links, Feked being one of them.

Very cool project, you're making me think about doing another Loop myself. I should finish the ATK and get started on the Blast Diesel first though... :D
 
That work is sublime as ever George.
What are the advantages on useing that electrical system ?
I'm pretty sure that Fecked source their exhausts from Armours in the Uk.Riders of brit bikes will be familiar with them...I had serious costomer care issues back in the late eighties re panther parts...Armours simply didn't give a F--K about suppling crap. Hopefully they are a bit more attentive these days !
 
Heh Chris,

The M-Unit incorporates circuit protection and some relays into one power distribution / circuit protection box. It also has various additional features like brake light flasher modes, turn signal cancel modes, theft alarm, etc.

http://www.motogadget.com/en/m_unit.html

a very trick little gizmo.

chris a said:
That work is sublime as ever George.

What are the advantages on useing that electrical system ?
 
Pretty close to fire-up ready. Electrical is all done and functioning. Cables are made except for front brake, which needs to have the front fender back from the painter to be sure of the correct routing / length. Carbs are synched and final airbox installation done. Managed to come across some old-style BMW cloth-covered fuel hose.

Stainless mufflers / cross-over arrived from Feked in the UK. Nice finish, not so nice fit. The cross-over spigots are not welded on at exactly 90 deg. to the centerline of the muffler. I had to use an old cross-over heated up & bent to get a fit. Will modify the stainless one at some point later. I sent a gripe mail to Feked and he replied that he would let the maker know & hopefully get the problem fixed for future orders.
 

Attachments

  • 04-12-11_1.jpg
    04-12-11_1.jpg
    237.4 KB · Views: 536
  • 04-12-11_2.jpg
    04-12-11_2.jpg
    202.2 KB · Views: 536
  • 04-12-11_3.jpg
    04-12-11_3.jpg
    205.1 KB · Views: 535
  • 04-12-11_4.jpg
    04-12-11_4.jpg
    234.8 KB · Views: 535
  • 04-12-11_5.jpg
    04-12-11_5.jpg
    257.2 KB · Views: 535
I got a set of SS cigar mufflers from Epco (in Ohio). I love them, they are solid, nice thick SS, not the fragile stuff like Stucci. Had the same issue with the centerline of the muffler, the plane of the hanger tab and the centerline of the crossover spigot not being orthogonal to one another. Since I got into the habit of using Flexi-SS tubing (think old panhead and indian head pipes) for my crossover tube to prevent spigot breakage, I had no issues with the fact that the two crossover spigots didn't point toward one another perfectly. I got the flexi tube from JC Whitney. It goes over the spigot rather than inside, and I retain with a SS clamp. This may only work because I removed the brake crossover tabs off of my frame. YMMV...
 
Back
Top