• Ciao Guest - You’ve landed at the ultimate Guzzi site. NEW FORUM REGISTRATIONS REQUIRE EMAIL ACTIVATION - CHECK YOUR SPAM FOLDER - Use the CONTACT above if you need help. New to the forum? For all new members, we require ONE post in the Introductions section at the bottom, in order to post in most of the other sections. ALWAYS TRY A SEARCH BEFORE STARTING A NEW TOPIC - Most questions you may have, have likely been already answered. DON'T BE A DRIVE-BY POSTER: As a common courtesy, check back in and reply within 24 hours, or your post will be deleted. Note there's decades of heavily experienced Guzzi professionals on this site, all whom happily give endless amounts of their VALUABLE time for free; BE COURTEOUS AND RESPECTFUL!
  • There is ZERO tolerance on personal attacks and ANY HYPERLINKS to PRODUCT(S) or other competing website(s), including personal pages, social media or other Forums. This ALSO INCLUDES ECU DIAGnostic software, questions and mapping. We work very hard to offer commercially supported products and to keep info relevant here. First offense is a note, second is a warning, third time will get you banned from the site. We don't have the time to chase repeat (and ignorant) offenders. This is NOT a social media platform; It's an ad-free, privately funded website, in small help with user donations. Be sure to see the GTM STORE link above; ALL product purchases help support the site, or you can upgrade your Forum profile or DONATE via the link above.
  • Be sure to see the GTM STORE link also above for our 700+ product inventory, including OEM parts and many of our 100% Made-in-SoCal-USA GTM products and engine kits. In SoCal? Click the SERVICE tab above for the best in service, tires, tuning and installation of our products or custom work, and don't miss our GT MotoCycles® (not) art on the BUILDS tab above. WE'RE HERE ONLINE ONLY - NO PHONE CALLS MADE OR RECEIVED - DO NOT EMAIL AND ASK QUESTIONS OR ASK TO CALL YOU.
  • Like the new V100, GuzziTech is full throttle into the future! We're now running on an all-new server and we've updated our Forum software. The visual differences are obvious, but hopefully you'll notice the super-fast speed. If you notice any glitches or have any issues, please post on the Site Support section at the bottom. If you haven't yet, please upgrade your account which is covered in the Site Support section or via the DONATE tab above, which gives you full site access including the DOWNLOADS section. We really appreciate every $ and your support to keep this site ad-free. Create an account, sign in, upgrade your account, and enjoy. See you on the road in 2024.

Fitting Moto Guzzi Accessory LED Fog/Auxillary Lights - 2S002059

I intend to create a “How to do this” guide for the installation of the factory rear mounting rail, the engine guards, the fog lights, the front dash USB port, etc.

I’ve written many guides like this here.
 
I’m forward to the how to guide to help me think through my auxiliary light install (I already have a set of Clearwater Darla lights that I plan to use). Thank you in advance Scott!
 
The parts just arrived yesterday. Although I initially thought that you did not require the engine bars, as per the information GTM posted, which said the engine bars were required, I also ordered a set of those which arrived yesterday as well. We will see what is what soon.

I probably will not get to install in until later next week. When I do, I will document it and share it.
Your wiring hookup might be wrapped in the loom ,like mine was , there is one plug that is for something else look deeper to the left of the battery area.
 
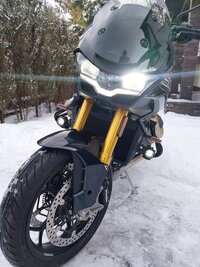
LEDs installed

At first I was planning to use accessory LED, same brand as I installed on my BMW few years back. However, since there is already pre-installed electrical connection on the Guzzi, crash bars have mounting points, getting more information proved difficult and factory set is not that more expensive I have ordered one last week. It arrived yesterday and got installed in the evening.

500 euros delivered so in colonial money that would be about 550 dollars.

The set is like IKEA flat pack furniture, just don’t be a regular man, don’t start with discarding the instructions, just follow them. It’s fast and easy job and everything fits with ease.

For me slight hindrance was that I had crash bars installed already and in order to weave cables through they needed to be loosen up bit.

For installation one needs torx, Allen and socket wrenches but for reasonably well stocked toolbox that shouldn’t be a problem.

The current for LED is about 3 Amps and they seem pretty bright. For obvious reasons I can’t do a night time test drive right now.

The picture might be misleading because of bright snow filter in the phone.

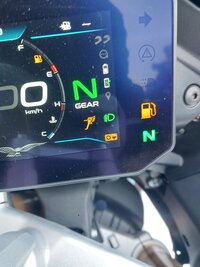
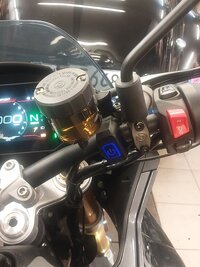
LEDs are operated by the light switch and here lays the biggest drawback of the system, at least for me. Every time the key is off and on again the LEDs need to be turned back on again. They don’t stay and I like them on all the time.

20240117 124648
20240117 124800
 
Little update,
for safety I like when additional LEDs are on all the time. Wouldn’t like to be bothered to switch them every time I turn the ignition key. So I have slightly tweaked the accessory wiring loom and added bi-stable switch. Now the LEDs can be on all the time with the key or can be at will with the factory setup.
 
For the Guzzi owners who don’t want to be bothered with accessory lights, the original LED cable can be utilised to install any lights. The thing is, the bike panel checks the resistance in the control circuit. Once there is some resistance any added accessory lights can be operated through red light button. The only problem might be the resistance value, the accessory set has a relay with 120 Ohm, standard automotive relay are 80-90 Ohms. I don’t think that should pose any problem.

I think this set is identical with offered as Guzzi accessory less relay, wiring loom, mounting bits and 120 Euros.

xlmoto.de/product/nebelscheinwerfer-givi-s322-led_pid-PIA-150940
 
Back
Top