• Ciao Guest - You’ve landed at the ultimate Guzzi site. NEW FORUM REGISTRATIONS REQUIRE EMAIL ACTIVATION - CHECK YOUR SPAM FOLDER - Use the CONTACT above if you need help. New to the forum? For all new members, we require ONE post in the Introductions section at the bottom, in order to post in most of the other sections. ALWAYS TRY A SEARCH BEFORE STARTING A NEW TOPIC - Most questions you may have, have likely been already answered. DON'T BE A DRIVE-BY POSTER: As a common courtesy, check back in and reply within 24 hours, or your post will be deleted. Note there's decades of heavily experienced Guzzi professionals on this site, all whom happily give endless amounts of their VALUABLE time for free; BE COURTEOUS AND RESPECTFUL!
  • There is ZERO tolerance on personal attacks and ANY HYPERLINKS to PRODUCT(S) or other competing website(s), including personal pages, social media or other Forums. This ALSO INCLUDES ECU DIAGnostic software, questions and mapping. We work very hard to offer commercially supported products and to keep info relevant here. First offense is a note, second is a warning, third time will get you banned from the site. We don't have the time to chase repeat (and ignorant) offenders. This is NOT a social media platform; It's an ad-free, privately funded website, in small help with user donations. Be sure to see the GTM STORE link above; ALL product purchases help support the site, or you can upgrade your Forum profile or DONATE via the link above.
  • Be sure to see the GTM STORE link also above for our 700+ product inventory, including OEM parts and many of our 100% Made-in-SoCal-USA GTM products and engine kits. In SoCal? Click the SERVICE tab above for the best in service, tires, tuning and installation of our products or custom work, and don't miss our GT MotoCycles® (not) art on the BUILDS tab above. WE'RE HERE ONLINE ONLY - NO PHONE CALLS MADE OR RECEIVED - DO NOT EMAIL AND ASK QUESTIONS OR ASK TO CALL YOU.
  • Like the new V100, GuzziTech is full throttle into the future! We're now running on an all-new server and we've updated our Forum software. The visual differences are obvious, but hopefully you'll notice the super-fast speed. If you notice any glitches or have any issues, please post on the Site Support section at the bottom. If you haven't yet, please upgrade your account which is covered in the Site Support section or via the DONATE tab above, which gives you full site access including the DOWNLOADS section. We really appreciate every $ and your support to keep this site ad-free. Create an account, sign in, upgrade your account, and enjoy. See you on the road in 2024.

How to build a Guzzi (BlackJack) Car

The Making of a Moto Guzzi Car

Part 13

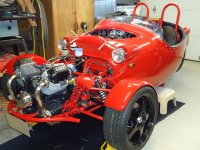
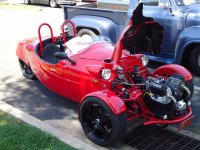
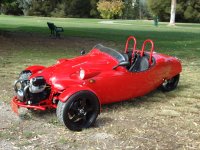
At this point, nearly everything has been built. It was time to disassemble and prep for painting. Before that, I wanted to take it off the jack stands and roll it out for a few pictures. It was as exciting as taking out a freshly unwrapped sled on Christmas morning for its first run. Shoot, it might be as thrilling as receiving a Red Ryder 200-shot carbine action air rifle for Christmas. It didn’t matter that it didn’t run yet or that I was the only one excited. This was big stuff! It’s never been off the jacks. Once down on the ground on its own feet my initial thought was, “This really sits low”.

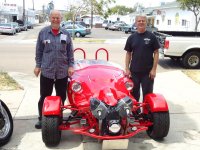
I went to get my wife so she could steer and brake while I pushed it into position. She sure looked good in the natural light. It didn’t matter that she was naked with no coat on. This was my baby and she was beautiful; that is, my wife. So after a few pictures of my wife, I went to get my son. He looked happier than my wife posing. The car fit him better and he looked natural in it, like, this is going to be mine some day.

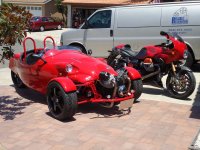
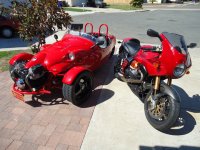
I moved my V11 Rosso Corse into the picture and things were really looking good. I’m not a photographer, but I was enjoying what the camera caught. As the sun sets, so all good things must come to an end. Soon it was back on the jacks for disassembly. It was a little saddening so I dragged my feet a bit.

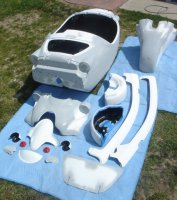
As I started taking it apart, I thought it might be interesting to count how many brackets I made. I counted 52. Almost all are stainless. I had them powder coated along with the dash. The empty boxes were now filling up again. Prepping for painting is about as much fun as getting poison ivy on a camping trip so I kept looking for other things to do.

All along, I’ve been thinking of the process of making it legal. More specifically, could it pass California EPA the first time through? The motor has to meet or exceed its design specifications. I had incorporated all the original design features except one. I didn’t have a charcoal canister (evaporative control system). I really didn’t want to clutter up a good design, but I don’t think EPA is dumb enough to over look it. So I retrieved the charcoal canister that I removed from my V11 when new and began searching for its new home. After some deliberation, I determined that the firewall under the voltage regulator was the best place for it. After another trip to the candy store I had all the connecting stuff that I needed. After plugging, drilling, routing, assembling and of course, more brackets, the surgery was done. It was the tidiest double bypass anyone has ever seen.

While working on the double bypass I also started on the front bumper. I personally feel that one should come with the kit or at least as an option. There really is no right or wrong, only preferences, when making the bumper. Because there isn’t a straight line anywhere on the car, I think that the bumper should have similar curves. I thought of many materials, but decided 1½˝ OD with ⅛˝ thick wall aluminum tubing would match best. This decision is primarily based on the 1½˝ OD of the exhaust pipes. To save a buck, my friend suggested I go to a used material yard in town since the place I normally buy from only had 12 ft. sticks of it. The closest aluminum tubing I could find in the yard was 1¼˝ OD with ⅛˝ thick wall. I figured that was close enough so I bought it along with some other aluminum that I thought might make some good brackets.

All along, bending the bumper was in my mind since I prefer to make it myself and save another dollar. I don’t like building tools for one time use so I called my friends until I found one who had a bender that I could borrow. He had several styles and sizes which made material selection easier for me. I ended up using a 1¼˝ EMT hand bender. It was a little tough, but with some help from my son we got it done. Since there are 4 bends in it, two of them reverse; the hardest part is making sure that all the bends are on a single plane. Getting the right amount of degrees is much easier and of course the radiuses are all the same as determined by bender.

California requires a front license plate which really complicates things for me, more on this later. I also plan on mounting fog lights on the bumper. Some other design considerations are protection, strength, absorbing impact and the motor vibrates while the frame is solid.

When figuring out how to mount the bumper I had to think 3 dimensionally. The frame is really far behind the bumper, but the unused front motor mount is close. If I mount the bumper to the frame, nothing substantial prevents the bumper from being deflected vertically. I can’t mount it rigidly to the motor because I don’t want the motor damaged in an impact. So the solution was to make a bracket that is designed to collapse upon impact yet provide enough rigidity to support the bumper vertically. Now, how best to attach it to the unused front motor mount? I don’t need a honking bolt to support the bracket which is welded to the bumper. So I made 2 brass sleeves that accommodate 8mm bolts and pressed them into the unused mount holes. The bracket is rubber mounted to the engine mount bolts to absorb engine vibration.

This sounds like a lot of work just for a bumper and it is. I usually don’t go into this much detail to keep you awake, but today I felt like this might interest a few of you. I next made the brackets to the frame. There are four of them, two on each side of the motor. The inner pair is made of 1˝ OD aluminum and is designed to withstand a substantial impact. The other pair further outboard is more ornamental. They are constructed of flat curved tempered aluminum. They attach to the ends of the bumper and could withstand a good impact and bounce right back. I stole this idea from old car bumpers. It’s practical, yet has beautiful curves that accent the car’s shape. Because of the crude bending tools that I used, these curves added a great deal of time to the project. Also, all of the joints are compound angles. If you can’t bend and splice to half a degree, then this project is not for you.

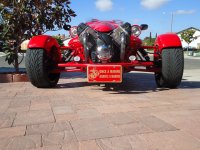
I made various caps and plugs for the bumper on the lathe then decided where to mount the fog lights. After a couple more brackets, I was ready to tackle the license plate mount. Before making the bumper I decided that the best location for the license plate was centered below the bumper. What really bothered me was its size, 6˝ by 12˝. It’s like a big barricade right in front of the oil pan. Not only is it not aerodynamic, it restricts cooling to the motor which would not be an issue if it was water cooled. I just couldn’t tolerate this air flow restriction so I made the license plate mount hinged and counter weighted. When stopped, it hangs vertical, but while in motion, the airflow pushes it horizontal. I’m betting that the police won’t mind. We’ll see. Anyway, it’s easy enough in the future to make it fixed, if need be. I decided to have the bumper powder coated the same color as the frame because it is clearly an extension of the prominently displayed supporting structure.

I’m running out of ideas, but was able to find a couple of projects that I had been thinking of in order to delay prepping the parts for painting. There are currently no lockable compartments in the car. It would be nice if the front storage compartment could be locked. I have about four spare elevator control panel locks under my work bench just waiting to be used. I’ll be darn, but these locks fit perfectly. I even have spare keys for them. I also made a battery hold down strap from old spare aircraft parts. Collecting old stuff has its value sometimes and sometimes it doesn’t. Kind of like the old motorcycle parts I’ve seen hanging from the rafters of some motorcycle shops. If no one knows theyexist they might as well be thrown away, but if they were on E-Bay, that’s another story.
 
The Making of a Moto Guzzi Car

Part 14

I ended my last article by putting off preparing fiberglass parts for painting, better known as blocking. They should call it slow torture. Sorry, but I don’t relish the idea of spending eternity removing every imperfection from a surface. I can think of at least a thousand more exciting ways to torture myself. Well, it has to be done and I’m too cheap to pay someone else. For me it’s a little overwhelming blocking a whole car. So I chose to break it down into smaller goals of completing individual panels. At this point, I can see the light at the end of the tunnel. I’m about 90% done and getting fairly skilled at wet sanding. My friend tells me that I’m lucky that there isn’t a straight line anywhere. I now know why.

I started researching batteries for the car. Before getting too picky on my preferences I measured the cavity and selected 35Ah as my only criteria. I found that car batteries now have a standard battery group size chart. At least it’s new to me. This would make my search much easier except not one battery on that chart will fit my cavity. It was about as useful as a back pocket on a shirt. The motorcycle industry doesn’t seem to be as organized. After a thorough search, I also found that not one battery would fit. I even looked at lawn mowers. When I changed my criteria to 30Ah I found several large motorcycle batteries that were close, but still wouldn’t fit. The height of the cavity was the biggest problem. Not wanting to use a small battery or high priced unique one, the only alternative was to change the cavity dimensions. The simple solution was to cut the bottom off the molded in fiberglass cavity, reposition it 1˝ lower and mold it in. It’s located in front of the passenger’s feet and battery access is through the front storage compartment. I really wasn’t happy about it because it’s difficult to reach. It’s not an hour job. Working with fiberglass isn’t fun and upside down in a small car is even worse. On the flip side, at least I noticed before I painted and reassembled. So now I can fit a common motorcycle battery rated at 30Ah and 385 CCA.

My attraction to the Blackjack Zero has always been first and foremost the Moto Guzzi Motorcycle. Without that motor, it would be just another kit car. I’ve enjoyed many years as a member of the Moto Guzzi National Owners Club and plan on many more in the future. I hope to contribute as much as I can to such a wonderful group of people who have given me so much.

During this project I have received a great deal of useful help from many fellow Guzzi enthusiasts. Your support means a lot to me. Thank you for caring and giving of your time and talents. Of course, without you, this club wouldn’t exist and we wouldn’t have the opportunity to meet such great people.

One thing I have learned in life is that an organization is only as good as its people. It doesn’t matter what the organization does. It’s all about the people. So if you are looking to join a club, observe its members. Are they enthusiastic, unified, work well together and so on? There are many great clubs that we could join. What’s our motive? Are we looking to give, receive or perhaps both? What interests do you have? Do others in the club share the same interests? This is all pretty basic, but important to ask yourself.

I’m a typical individualistic motorcycle rider. I do my thing my way. I’m happy on solo rides and in my garage. I’m also mature enough to know that there’s more to life than being the Lone Ranger. I’ve been blessed to acquire some good skills and I still have a few week areas that I would like to improve. I think it would be selfish of me to not share some of the things I know. So for me, I would like to help others and need some help from time-to-time.

Since deciding to build a kit car, I’ve been looking at various car clubs on the internet. I’ve also picked the brains of kit car owners, rodders and cruisers. Since I’m the new kid on the block, I have lots of questions and few answers. I think kit cars are a smaller niche than Moto Guzzi, if you can believe that. California has nearly every kind of car club you can imagine. There are two kit car clubs in California, one northern and one southern. I think local support is critical. Where is the best paint shop in town? Where can I take my seats to get upholstered? Who can help me sort out my fuel system? We need local support.

I’ve never been involved in the car community and wasn’t very impressed with what I saw. These people, like use, love there machines; only they have a lot more time and money in them. For most, $20,000 will just get your foot in the door. With that said, I found a disturbing trend. There’s often an underlying theme that most exotic car owners have. The theme is that, it’s all about me and my car. Now I know that you would be hard pressed to find a more materialistic society than Southern California. Right now, I imagine that you are saying that it’s not that bad where you are. You’re probably right. This attitude of me and my toy just turns me off. I like the modified bumper sticker from the 1980s that says, “He who dies with the most toys…still dies”. We know that we can’t take our stuff with us when the ticker quits so why do some people live as if they can? When stuff becomes our reason for existing, then we loose proper perspective and life gets out of whack. Our relationships suffer. Maybe I’m the odd ball, but I don’t think this world revolves or should revolve around me and my hunk of metal. There’s more to life than that. I’m sure that much of my perspective comes from working on farms in my youth. Most people didn’t have much, but they were always willing to help others with what they had. This is not a pet peeve of mine. I just realize that I don’t want to be part of an organization like that.

While searching clubs on the internet, one caught my eye. I’m not going to try to sell you anything, but I’ll list it in case you’re interested. What caught my attention is a simple phrase on their site. It says that, “your toy must become a tool and not a treasure”. This club believes in using their vehicles and the automotive hobby to reach out to other people. I was a little concerned that their club is a rod and custom and my car is a kit. What I found out was that they don’t even care if you have a car. They’re all about the people. This impressed me so much that I decided to join their club. So if you are interested in this, here is their local chapter web site of their national organization. http://www.christianrodsandcustomssd.com/gpage2.html
 
You are doing wonderful work and I really appreciate the time you have taken to document the progress of your car. It is truly inspiring. :mrgreen:

I can't wait to read the next installment!
 
Part 15

Well, I survived the blocking process. I have no idea how many hours it took, but it was a lot. I haven’t kept track of hours while building the car. Rather, I count steps and phases by days, weeks and months. Of course steps and phase are whatever I make since the build manual for the whole car is 14 pages. This phase took about two months of all my spare time. I read a book on building kit cars when I started this project. It said to calculate the cost and time that you think it will take to complete, then double it. That, I think, is very accurate and valuable advice.

I had a tight budget for the paint job, but I did buy the best polyurethane primer and top coat available. I painted the inside black myself and shopped around for a painter to do the outside. I chose a man who I thought would perform a reasonable job at a reasonable price. Keep in mind that a show quality paint job for a car is in the thousands of U.S. dollars. And I’m building this car to enjoy drives with my wife, not win trophies. When completed, the only imperfections I noted were a few pits that I missed and a little dust that settled into the wet paint while in the paint booth. I didn’t complain because we all get what we pay for and the pits were my mistake. I purchased some buffing materials at the paint store for the dust removal, but have yet to use them. Overall, I’m happy with the results, especially considering the money spent and that this is my first time blocking a complete car.

I didn’t have a clear coat applied because I want to add some graphics later. I just don’t know what I want yet. When in school, I never received an A in art class and never less than an A in all my industrial arts classes. So most likely I’ll leave this decision up to someone else. My only idea at this time is to apply the same dark red checkers that my V11 Rosso Corse has. I’m open to any suggestions that anyone might have.

I planned a few projects while the car was getting painted and curing. The first was eradicating the fiberglass dust from the garage. That is about as easy as getting the sand out of your car after a day at the beach with the family. You’ll never get it all, and so it is with fine fiberglass dust.

The other project was performing the engine recall on the hydraulic valves. If you remember from previous articles, I purchased a 2003 Stone motor without the recall installed even thought the seller indicated that it was. I don’t harbor any ill feelings because he wasn’t a Guzzi person and the only way to know is by pulling off a valve cover and knowing what to look for. Moto Guzzi wouldn’t honor the recall because it was out of the frame, even though I had the frame’s VIN and they acknowledged that the recall still needed performed. A friend of mine and I split the cost of a motor we purchased on e bay. I wanted the hydraulic recall parts and he wanted the rest. I purchased the recall instructions from Moto International. I borrowed the special tools needed for the job from Mark Etheridge at Moto Guzzi Classics. I also had to make a few special tools that are required for normal engine rebuilds. It took about eight months and a considerable amount of effort to get all this together. I had to call four dealerships just to find someone who had the recall instructions.

The seller of the Stone motor said that the motor I bought had less than 5,000 miles on it. When I disassembled it, I confirmed from the worn parts that it had no more than 10,000. The hydraulic recall parts from the e bay motor had zero miles on them. Most of the valve train is replaced during the recall and the new parts are quite different than the old ones. The most significant change to the new parts are that the valve train receives more lubrication. There is still debate as to whether or not this is the solution to the problem of badly worn valve train parts on some hydraulic motors. One other highly publicized point is the use of the correct specified engine oil. The sticky point seems to be the SG rating. The short of it is that unless you want to risk damaging your motor you need to use synthetic 5W-40 SG motor oil. The only manufacture is Red Line and it isn’t cheap. See http://www.redlineoil.com/content/files ... 20Data.pdf
Dave Richardson has a nicely written article on this issue on Todd Eagan’s web site at https://www.guzzitech.com/Hydra-valve-DR.html

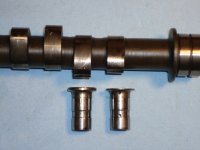
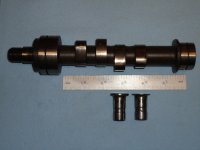
So, what did I find in my motor? How bad could less than 10,000 miles be? I expected to find like new parts. So I was rather surprised to find all parts in perfect condition except the cam lobe and bucket for the left intake valve. This is the cam lobe closest to the transmission. The lobe had worn .012˝ and the bucket was destroyed to an astonishing .064˝ missing. Total, there was .076˝ less lift to the left intake valve. Conclusion, this was a bad motor. That’s probably why I got such a good price for it. I’m not an expert Guzzi motor rebuild guy so I took my parts to Bill Ross to see what he thought. His garage has been the scene of many Guzzi motor projects. He said that he has never seen those parts in such bad condition.

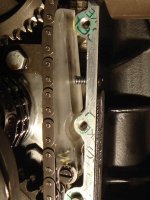
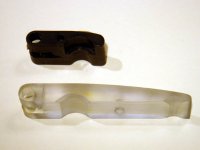
While I was in there, I replaced the timing chain tensioner with my own design that I had made and installed on previous Guzzi motors. Essentially, the only significant difference of the new tensioner is a larger contact area for the timing chain. I fully expect this design to last the life of the motor.

When I completed the engine work, I filled it with oil. I then decided to fill the VW transmission with oil too. I found out that I needed a 17mm allen to remove the plug. Not having one, this task was delayed for another day until I purchased the tool.

When I retrieved the newly painted parts, I placed them all in the living room except for the tub (main body). By this time my wife was in Japan and wouldn’t be back for a year. She wouldn’t mind. Besides, where else could I keep the parts clean and protected until I had time to reinstall them? I’ve been known to rebuild a few small motors in bedrooms when that was the only space available. I must give some praise to my wife. We’re still married.

Where should I begin the reassembly instructions without putting you to sleep? This is a challenge. Let me first say that when I disassembled every piece down to each washer its location was identified. One of the best ways that I have learned to do this was when I fixed airplanes. We would retrieve used cardboard and draw a picture of the part about to be disassembled on it. We would then make holes in it with a scribe for each fastener. As each fastener was removed it was inserted into the corresponding hole in the cardboard. If the fastener was not a screw or bolt then it was taped onto the cardboard in the corresponding location. This method saves a lot of time when reassembling. I also used marked zip lock bags and boxes for the larger parts. Referring to pictures taken prior to disassembly is also quite helpful. On one previous project I even video taped the disassembly process due to its complexity.

In theory, all parts should fit exactly as they were before. Reality is quite different. The first consideration is the added thickness of the paint. Yes, a few thousands do make a difference. Be prepared to redrill holes and reshim panels. Another consideration is that fiberglass panels have a bad habit of changing shape on their own. I didn’t have this problem on this project. I can’t say enough good things about the quality of the manufactured fiberglass panels that come with the Blackjack Zero. I only wish I could make such great fiberglass parts.

I really don’t know if there is any logical sequence to putting it all back together. Of course the parts behind other parts must be installed first. Stuff that’s going to be in your way goes in last, like the seats and hood. I decided to start with easy large items just to get them out of my way. Space is limited in a two car garage. Early on, I installed all the stuff under the car so that I would be done working on my back. This also has the advantage of being able to take it off the jacks if you need to move it around. You’re done with the jacks unless you want to spin the tires with the engine prior to a test drive. I chose to leave it on the jacks because the working height for assembly is easier.

Prior to disassembly I had installed everything except the wiring and brake lines. One of the other first things I did was to bend and install the rigid and flexible brake lines. This is because other parts are mounted over them. The front brake lines follow the fire wall while the rear line runs along the inside of the floor. All parts that pass through the body’s bulkheads are sealed with ether rubber or RTV (liquid sealant). I also installed some wiring on the difficult to reach items as they were installed like the backup switch on the transmission. I kept this to a minimum because I didn’t want to get bogged down installing wiring.

I figure that this is a pretty good place to stop for the month. From here on it’s a lot of detail. Hopefully you’re still awake. I bet your wife isn’t though.
Kurt
 
The Making of a Moto Guzzi Car

Part 16

At this point I’m just weeks away from finishing the final assembly of the car. But, I’ve been telling people that for weeks. All I have left is half the wiring. It’s been going kind of slow since my wife went to Japan to take care of one of our kids. Being Mr. Mom hasn’t allowed me much time to work in the garage.

My son helped me lower the body onto the frame. I’ll be darn, but the shoe wouldn’t fit. After three tries I found the culprit. While the body was off I played around with the transmission and left it in gear. This caused the shifter linkage to protrude about a ½˝ more than in the neutral position. After I fixed that, it slid right on.

I then reinstalled the rear swing arm and tire along with the gas tank and fuel system. I routed the fuel lines and hidden antenna inside the left cockpit capping. All the wiring to the rear passes through the right cockpit capping.

The fiberglass rocker panels, fenders, tail section and rear light molding fit back together perfectly as did the front hood and storage compartment hatch. I was surprised that all the fasteners for the tail section fit properly. It was the most difficult panel to fit and adjust when building. This is primarily due to its size and the number of items that it has to align with.

When I installed the exhaust system I also installed the muffler heat shield and oxygen sensor for the WEGO III. The sensor was installed in the common pipe downstream of the muffler. I secured the wiring running forward on the frame in such a manner as to allow me to move the sensor and wiring to ether the left or right exhaust pipe fittings if I desire.

The battery that I purchased fit fine, but the buckle that I used to hold it down did not. It was ⅛˝ too thick. It was a shame to remove such a nice buckle, but a thinner one had to replace it. Now that I knew the location and type of battery posts, I could install the connecting wiring. At this point, I noticed that I had one unfused wire. This 4 gage wire ran from the positive battery terminal to the starter. I wondered how I could have made such a mistake. After some research, I learned that this wire is usually not fused on cars because the potential for failure is unlikely. Even though I agree, I decided safer is better so I added a fusible link. I also installed a clutch safety switch for safer starting.

All the hydraulic clutch parts fit together well, but the master cylinder plunger wouldn’t extend when I bled the system. I disassembled it and found nothing wrong except dry sticky seals. After lubricating and reinstalling the seals it extended and bled just fine. The brakes bled without a hiccup. I was very pleased with the position and feel of both these pedals. Remember that I made the clutch pedal because of the modification from cable to hydraulic actuated clutch.

All the electrical components were remounted without any issues. I installed the custom made electrical switch that I made inside the steering column for the horn. I replaced the 18 gage wiring that came with the head lights and fog lights with 14 gage. All wiring is ether 14 gage, 18 gage or shielded 20 gage for all low voltage control circuits.

I installed 3 ground terminal blocks. One is located on the fire wall, one in the front storage compartment and the last one in the rear storage compartment. I also installed a bonding strap from the frame to the motor.

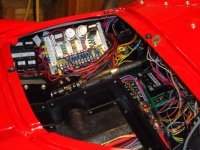
All the electrical connectors, except the Guzzi motor related ones, are weatherpak. I designated the highest pin number for the ground if applicable. I annotated wire colors and numbers and pin letters or numbers on my schematic as they were installed. I made small changes to my electrical schematic as I installed components. For example, I installed a second 12V outlet under the dash. I pulled in spare wires to the rear of the car for future use. I decided to wire the day running lights that came in the headlights. I hadn’t anticipated this so I had to order another rocker switch for the dash.

As small issues came up I corrected them rather than having a hundred things to change at the end. For example, the wee shifter knob that came with the kit was tossed. I made a manly one on the lathe. So far, I’ve only skipped one issue, the gas pedal. It works, but is not ergonomically correct. I decided to see how it feels when I drive then come up with a new design.

Prior to installing the carpet and exhaust, I put together the emergency brake lever, cable, switch, wiring and cover plate. I found it tricky applying the carpet on the concave surfaces of the cockpit walls. What worked best was 3M spray glue #77. I made a temporary piece of wood to insert into the map pockets in order to stretch them flat until the glue dried. The carpet over the tunnel is secured by hook and pile tape in order to gain access to the emergency brake lever cavity. I purchased padding to install under the floor carpeting. I also purchased carpet for the storage areas. Once all the carpeting was in I installed the shifting mechanism. It adjusted quite nicely with the factory cut slotted holes, imagine that, no modification. I also installed the seat runners and seat belts which all bolt through the carpeting.

I originally wanted to have the seats professionally upholstered, but I’m still into saving a buck at the moment so I did it myself. I figure that I can easily have it done in the future if I still fancy. Actually, the material that came with it isn’t bad. I only made one change. I added padding to the inside sides of the buckets prior to applying the vinyl covering. I also added trim around the bucket edges for esthetics. It all came out reasonably well. The back and bottom cushions are separate. Both attach to the bucket by hook and pile tape. This makes cleaning a snap. I also drilled small holes in the low point of the bucket and flooring to drain water in case I have a bad day. We, San Diegans, often joke about rain here since we receive an average of 9.9″ (25cm) per year.

The cockpit capping / molding was a little more difficult. I don’t know what the fabric that came with the kit is made of, but it stretches like elastic in all directions. This turned out to be essential. There are many compound curved surfaces on these moldings. Application of normal fabric would not be able to follow the contours without wrinkling. The trick was to glue and stretch small areas then wait for the glue to dry prior to moving on. It’s slow, but works. I watched four movies in my living room during this process. Once again, 3M spray glue #77 worked best.

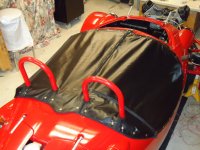
The kit comes with a pre-sown one piece tonneau cover. I wanted more versatility, so I purchased two waterproof zippers and had a local sail shop sew them in. I then installed the snaps. One drawback is that the front windshield and tonneau cover can not be used at the same time since they share some of the same snaps on the body. I would have corrected this except I didn’t notice until after I installed the snaps on the body. In the big scheme of things, it really doesn’t matter. My first big modification that I want to perform after the car is completed is to design a permanent windshield and make a convertible top for it.

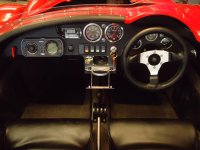
While looking at some pictures of other Blackjack Zeros, I noticed something that I installed backwards. Remember, this is all about picture building, no reading required. I installed the steering column bushing nearest the steering wheel on the back side of the dash. It should have been installed on the front side. I found this funny because it works fine ether way which is rather unusual. I don’t mind because this aluminum bushing is quite bulky, 3″ O.D. My objective was to create as tidy an appearance as possible for the dash. Ether way you install it, the addition of two shaft locking rings, not included, are required on ether side of another steering column bushing to limit longitudinal movement of the steering column.

My building progress is a bit ahead of my writing at this point. I think I’ll wait for my next article to inform you of the results of the electrical smoke test. This is why fuses were created, to save us from ourselves.

Final Assembly 02
 
The Making of a Moto Guzzi Car

Part 17
I was finally able to complete the car on July 14th thanks to a week off work. Some of the electrical issues that I encountered while wiring the car had me wondering about Murphy’s Law. Any circuit design must contain at least one part which is obsolete, two parts which are unobtainable and three parts which are still under development. The wire that needs to be reached will always be in the most difficult location. And the only perfect science is hind-sight. No matter how careful you are, it still happens.

I drew the electrical schematic prior to purchasing some of the electrical parts.
The headlights that I received from Europe came with day running lights. My schematic didn’t incorporate them. I decided to use them in order to save a few watts which required a different light switch in the dash and a simple change to the schematic. That was easy enough except the Durite rocker switches that I used on the dash can only be obtained from Europe. They are really good switches, but in hindsight I should have picked a more common switch to use. After each circuit was wired I performed a quick test to ensure it works and correct any problems. The headlights with low and high beams on blew the fuse after one minute. I didn’t have the lights and bulbs when I made the schematic so I guessed on the load and fuse size. Armed with a calculator and verified with an ammeter, I fitted the proper size fuse.

The fuel gage didn’t work after I filled the tank. Oops, I forgot to connect one wire there, problem solved. Prior to installation a mechanical adjustment is necessary on the fuel level sender in order to match the size of gas tank. By reaching down the filler I could push down on the float and watch the gage indication change. It was spot on. The tank holds a total of 5.9 US gallons.

As I was wiring the engine I noticed that the engine oil pressure switch didn’t have a wire, mmm? It’s a simple one wire circuit. This amused me because I remembered to buy the part for it, but forgot to draw the circuit on the schematic. This was a simple fix except that I now had to add a simple idiot light on a completed perfect dash. After careful measuring and drilling the surgery looks original.

I wired the emergency brake switch normally open when it should have been normally closed due to the position of the switch and hand lever. That solved the pesky light on the dash. This was good practice for removing the carpeting and cover on the tunnel; rrright.

What really slowed me way down were the engine connectors. I purchased a used California wiring harness with the intention of reusing the engine and ECU connectors. This would save money and I heard that it’s impossible to purchase the ECU connector separately. Butt splices are to be avoided at all costs as a possible source of future problems. So I extracted and reused each pin. In order to reuse pins without breaking them is close to brain surgery. I don’t recommend it. The only thing I’ve done that’s harder was fix my son’s IPOD. I don’t recommend that ether. Of course, if you’re the thrifty type then this is right up your alley, go for it. After disassembling the 26 pin ECU connector, I decided that those pins can’t be reused and a special crimping tool, which I didn’t have, would be necessary. The result was that I soldered and heat shrinked my new wires onto the old ECU wires in order to reduce bulk and eliminate bad connections. It worked fine, but was a bit slow. I spliced the remaining wires to the ECU connector last since most of the wires terminate there. All I kept thinking about is, don’t make an expensive mistake. I have more wires connected to the ECU than the original motorcycle had in order to support my added electronic gizmos. Most of the wiring to the ECU is straight forward, but a few are not. I triple checked my schematic and compared it with the original bikes schematic. I found no errors except one redundant wire that I eliminated. The fuel pump wiring couldn’t be completed and tested until the ECU was also completed because they are tied together. The end result was, no smoke signal emerged from the fuse or ECU, what a relief.

I decided to rout my wiring differently than the manufacture did from the engine bay to the front storage compartment. Much of his wires pass through the battery compartment and have to make a few turns. I made a plate for the wires to pass through the fire wall centered at the top of the tunnel. The wires make no turns and aren’t in the battery compartment at all. It has two holes and a rubber grommet. I guessed at the diameter needed for the holes. The wires did fit, but it was a little tight. I’d make it a little larger if I had to do it again. The manufacturer molded in a smartly made race way for the wires to pass through the front storage compartment on their way to the dash. This design feature is really smart and worked beautifully. The final number of wires used was sixty 18 gage, eleven 14 gage and four shielded pair wires. I also used four diodes. There are 17 fuses and 8 relays. Ya think it’s overkill? Naa.

At this point, all electrical circuits had been checked except charging and engine running. I dusted off the fire extinguishers and had my son stand by. I had already primed the fuel system, spun the motor to pump oil and set the throttle position sensor. I removed all maintenance plugs and covers. It all looked ready. I pulled the idle increase, turned the key and, no start. The battery was half dead from all the electrical tests. I had my son man the jumpers to the car and it still wouldn’t start. A little ether on the air filters and it came right to life. The exhaust billowed smoke in the garage. That’s when I remembered that I put oil in the cylinders a year ago. The motor hasn’t run in at least two years. After the oil burned off, the smoke went away and subsequent starts were no problem.

Now to remove the jacks and go for a quick spin. I was actually surprised that everything worked the first time. For me, this is a fairly complicated project with lots of modifications along the way. Here are my initial observations. The Blackjack Zero is an outstanding design. The quality of materials couldn’t be better. I would recommend it to anyone who has some building skills. The weakest area is the building manual or lack there of. Of course, if you like a challenge, then this is a plus.

The motor is quieter than I expected. This was my first hydraulic lifter Guzzi motor. It’s way quieter than solid lifters. It’s strong and has lots of torque like every Guzzi motor that I’ve experienced. The muffler is a bit noisy, especially during hard acceleration and deceleration. If you’re required to pass noise limits in order to get it legal I suspect this may be a problem. The California Code of Regulations as specified in Section 1040-1044, 1046 and 1047, title 13 specifies noise limits (80dB-A) for all new cars, pickup trucks, vans and motorcycles apply only to new motor vehicles, under full throttle acceleration tests, measured 50 feet from the test vehicle. California defines all kit cars as “special construction” and therefore not a new vehicle. As I go through the legal process, if I find out otherwise, I’ll pass along the info. to you. The steering is lighter than I anticipated (2 ½ turns lock-to-lock). The hydraulic clutch and new pedal that I added is perfect. It brakes on a dime. It drives similar to a Mini Cooper, but firmer and more go kart like and way more fun. I haven’t driven high speed yet due to legal issues (no papers or insurance). The gas pedal works fine, but as I stated earlier, it’s not ergonomically correct. I’ll be building my own later. The manual transmission is no different than driving a car. It’s nice to have a real reverse. Cornering and suspension were fine at low speed. I kept forgetting to turn off the turn signals so I installed an audible signal. The only thing I didn’t like was the gas pedal position. Oh, speaking of foot position, if you have a shoe width of EEE you’re not going to like the space between the pedals. They are pretty close together. The high beam light switch on the floor doesn’t help ether. But that’s my design.

There are a few things to wrap up like the kit doesn’t come with a weather seal for the front storage compartment so I purchased one. I need to make a fabric wall that attaches by hook and pile tape to the top of my already 4″ high wall to keep the electrical components in the front storage compartment safely separated from the storage contents. But mostly there are lots of adjustments that need to be made. I’m prepared to spend a lot of time with the fuel injection.

I feel somewhat relieved that the build is done. I can now get on with my life and spend some time outside the garage. As much as I love that garage, I realize that there is more to life than wrenching.

I started preparing for a visit to DMV tomorrow. I’m not a fan of paperwork so I hope it goes smooth. I’m mentally prepared to hand over the credit card and take a second mortgage on the house. You have to love the financial condition of California and the creative ways they find to take your money. More on the legal process in the next issue.

Completed 08 very sm Sonny and Donny Angel 01 sm
 
It looks fantastic mate :) A long and frustrating job, I'm sure, but that will hopefully just make it all the more rewarding to drive :)
 
The Making of a Moto Guzzi Car

Part 18

Well, after several visits and unexpected turns I survived the California Department of Motor Vehicles, DMV, better known as Diabolical Ministry of Vehicles. It’ll try to make it understandable in a Reader’s Digest version for you.

My first visit went pretty smooth. I had all the documents and money they wanted. Did I mention money? “If everything seems to be going well, you have obviously overlooked something”. mmm. Because the Blackjack Zero has 3 wheels it can be registered as a car or a motorcycle, at least on paper. I wanted to register it as a car so I received all the appropriate paperwork for registering a specially constructed car. At this point, I was really happy that the North American VIN I received from the manufacture worked beautifully. If it hadn’t, I would have been shown the door. I had worked with the manufacture a year and a half earlier to develop a number since he had never shipped one to North America. At this point, the VIN is the most important piece of the car.

I had some problems getting insurance. The problem is that the paperwork from DMV has no make, model or year. That’s not a mistake. That’s how specially constructed vehicles are identified in California. The only thing that identifies the vehicle is the VIN and “special construction”. Insurance companies don’t know what to do with it. I asked a friend who has a Scorpion kit car. He said that all Scorpions in the US are insured by Grundy Worldwide Auto Insurance. They specialize in collector vehicles. I called them and they knew just what to do with it. They are very reasonably priced, but do have strict rules.

My next stop was the California Highway Patrol, CHP. Their purpose is to ensure that the vehicle wasn’t assembled from stolen parts and assign a primary VIN if needed. The initial VIN from the manufacture would become a secondary VIN. Don’t ask. I don’t understand it ether. I failed my first visit because they wanted all the bill of sale information for the kit car on one form. I had all the information, but on about 6 different documents. They also had a hard time trying to figure out where to attach the plate for the primary VIN, more rules than you want to know. We delayed that decision because I didn’t have the papers they wanted anyway.

Next, I went to get the Blackjack Zero certified weighed. The DMV said it didn’t need weighed because it wasn’t a truck, but the light and brake guy wouldn’t perform his inspection without a certified weight certificate. Although the light and brake guy was wrong, I didn’t fight it because it only cost $10.00 and was right down the street. I was also curious as to the weight myself. It weighed in at 1,060 pounds wet. It must have been all those stainless steel brackets I made. Back at the light and brake station, the car flew through the inspection without one hiccup. This thing will brake on a dime. The paperwork took longer than the inspection.

I typed a bill of sale document with all the information the police wanted and e mailed it to the manufacture. He verified my numbers signed and faxed it back to me. I returned to the CHP. They passed my paperwork, but still had an issue with the VIN. They questioned whether they needed to add a primary VIN and where to place it. After more phone calls, they decided to use the Manufacture’s VIN data plate as the primary VIN and not add another VIN. I don’t claim to understand any of that. There are lots of rules to this VIN stuff. They did like the VIN data plate that I made and riveted to the fire wall. Of course I didn’t tell them that I manufactured the plate. One of the sticky points is that it is not visible to a police officer from the outside of the car. They prefer it to be located inside the front windshield. That isn’t going to happen. The officer that attended me was very helpful, understanding and familiar with the many weird problems that specially constructed vehicles have.

So far so good, I knew that I was going to have problems with the referee station (SMOG check) so I gave them a call. For those not familiar with California, SMOG is short for, small hog. We have lots of them here. It’s impossible to get a real person so I left a detailed message. After receiving no reply, I paid them a visit in person. The inspector said that he received my message, but couldn’t return the call because of a bad return number, whatever. He had a meeting with senior inspectors who decided that I will file for the SMOG exemption, form SB100. My impression was that they just didn’t want to mess with this 3 wheel motorcycle engine thing.

After another trip to the DMV, I was able to get the SMOG exemption form SB100 from Sacramento, no easy task. Cool, I’m on my way. I returned to the Referee Station with all required paperwork in hand. Even though it is exempt from SMOG requirements with SB100 there are still SMOG issues that need checked and paperwork that needs signed. Now the same inspector, after taking pictures and acquiring the statistics of this thing, says that he can’t SMOG it as a car without approval from higher authority. I thought that was what the last meeting was about. Never argue with an inspector. I used to be one. They’re always right. So he said he’ll call me tomorrow sometime which he did. Now some invisible authority says that I must register it as a motorcycle and don’t need SB100 or a SMOG check at all. It seems that there is only one specially constructed 3 wheel vehicle registered as a car in California. They allowed that one because it weighted over 1,500 pounds. So even though on paper it can be registered ether way, the reality is quite different.

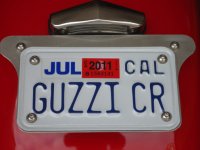
Now, all I had to do was take another trip to DMV with my paperwork and tell them where to put it… that is, change it to a motorcycle. I thought this was going to be a problem since there was a lot of paperwork by this time. Sure enough, DMV wasn’t sure if they could do it, so after a few calls to Sacramento and some waiting they said it was done. Yahoo! They issued me a normal motorcycle license plate and I ordered a personalized plate while I was there. My personalized plate will say, GUZZI CR. I couldn’t fit the ‘a’ in car. That’s close enough to make me happy.

Looking back at the process, it really wasn’t that bad, but does take some time. Most of the inspections require an appointment. It took me about 2 months to complete the process. If anyone thinks California is bad, they should talk to people from other countries. They will then appreciate our beloved bureaucracy.

There are pluses and minuses to registering the Blackjack Zero as a car or motorcycle. If you plan to build them for other people then the small motorcycle verses large car market is a consideration. If it is a motorcycle then it can operate in the carpool lane with a single occupant in California. The cost and complexity of registration is reduced for a motorcycle. Motorcycles don’t need a SMOG check. All specially constructed vehicles do, even ones with motorcycle engines. So why did mine not get a SMOG check? I don’t know, but I do know that the inspector is always right. A motorcycle has one small rear license plate verses a larger front and rear one required for a car. In California, a class C license (basic car license) may operate a motorcycle with a side car attached or a three wheel motorcycle.

Then there’s the helmet issue. California Vehicle Code section 27800-27803 is where you’ll find the answer to this question. The following words, “This section does not apply to” can be replaced with, “A helmet is not required for” for understanding this piece of the code out of context. Section 27803(f) “This section does not apply to a person operating, or riding as a passenger in, a fully enclosed three-wheeled motor vehicle that is not less than seven feet in length and not less than four feet in width, and has an unladen weight of 900 pounds or more, if the vehicle meets or exceeds all of the requirements of this code…”. The dimensions and weight of the Blackjack Zero place it in this category. It’s also helpful to know how California defines “fully enclosed”. DMV defines a blackjack Zero, Scorpion, JZR and other similar 3 wheel kit cars as fully enclosed just like a convertible. In their words, you must sit in a car like seat and wear a seat belt or wear a helmet. One friend of mine in California drives a Scorpion registered as a motorcycle without a helmet and sometimes gets stopped by police who try to issue him a ticket for not wearing a helmet. Of course he keeps a copy of the California Vehicle Code helmet section with him for this purpose. Another friend in California also has a Scorpion, but wears a helmet all the time because he thinks it is more comfortable. I bought a pair of aviator goggles and like them a lot. So far I have only been stopped by police once. Actually, they followed me into a parking lot. They didn’t care at all about papers and rules. They just thought it was the coolest thing and had some questions for me. I get this a lot, so I stole an idea from my scorpion friend and made, what I call, a fact sheet. If I don’t have 10 minutes to talk, I just give them this handy sheet that will answer most of their questions.

If I were to title the next part, I would call it, Civilizing the Beast. After building so many mechanisms, there is bound to be a lengthy adjustment and modification process. I started the adjustment phase while I was running around with a 60 day temporary paper license plate. It took me about 2 weeks to achieve a good base line tune before I connected the Power Commander. It ran pretty good, but rich throughout the whole RPM range. I can’t say enough good things about the WEGO III computer. It displays and stores the air fuel ratio, AFR, data. I can download a table exactly like the Power Commander’s table except in 500 RPM increments. There are many variables that can be adjusted for data logging. It’s been wonderful for taking the guess work out of the adjusting process. I first tried to adjust all parameters to achieve a 14.7+.3-.6 AFR. That was pretty easy. What I found out though, was that the motor doesn’t like 14.7 AFR at certain RPMs and throttle positions. In those areas it took me a while to get it adjusted as lean as possible without any adverse reactions. At this point, I’m still making adjustments with the Power Commander in the basic mode. This means that the maps for the left and right cylinders are the same. I know that there is a Power Commander V available or soon to be available. It has the ability to adjust a user selected AFR automatically when connected to an Auto Tune. This is a better idea than my system of manually inputting the changes. I don’t know how well it works. For more information visit Todd Eagan’s web site at Guzzi Tech. https://www.guzzitech.com/store/GT-Rx-PCVATECU.html

I purchased a notebook computer to monitor and make fuel adjustments on the road. It has a Windows 7 operating system which does not like the Power Commander and Vehicle Diagnostic Scan-Tool Software (VDSTS) programs. The VDSTS is the program needed to connect to the Guzzi 3 way diagnostic connector. Windows 7 works fine with the WEGO III program though. I also have a desk top computer with an XP operating system in the garage loaded with the same programs that doesn’t have any of the problems that the Windows 7 has. I was never able to get some functions of the VDSTS to work and left it at that. I don’t really use it anyway. The problem with the Power Commander program is that the computer will not connect and communicate with the unit 95% of the time. A message appears that says, “Error Receiving Power Commander Map”. I couldn’t fix this no matter what I tried. I finally resolved this by first turning the vehicle’s key to (on) and connecting the power commander to the notebook which is (off). Next I turn (on) the notebook, open the Power Commander program and click on “Get Map”. It will then recognize and communicate with the Power Commander just fine. Love them or hate them, computers are necessary.

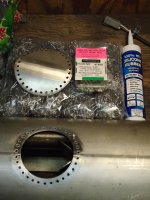
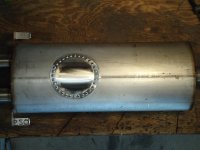
Early on, I was getting a little concerned about the exhaust noise that I was producing for the neighbors. Although it sounded cool, I couldn’t talk with the passenger except under the lightest throttle positions. Something needed to be done. I took the muffler off, examined it to determine the best location for an access hole, then made an appointment for surgery and prepared the operating table. The muffler has two pipes entering and one exiting. That’s all it does. It’s a simple collector box. There are no baffles of any kind. I made a couple of deflectors and stuffed it full of stainless steel scouring pads until I couldn’t get any more in. I made a stainless steel cover plate for the access hole that is secured, air tight, by a whole lot of 8-32 nut rivets, sometimes called nut zurts or threadserts. See picture. It’s now as quiet as a mouse with no loss of power and only a gain of about 5 pounds. The motor and exhaust are now as quiet as a normal car. It’s amazing.

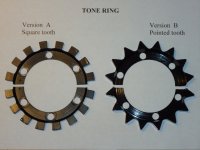
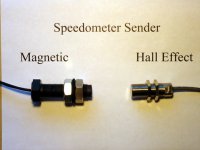
The speedometer wouldn’t calibrate properly. I narrowed the problem down to bad pulses from the sensor, but the sensor tested fine. I thought the problem might be the signal generated by the square tooth tone ring that I had made so I made a pointed tooth tone ring. See picture. Nop, this didn’t fix the problem, although it did produce a better signal. To make a log story short, the problem turned out to be electromagnetic interference, EMI, entering the magnetic sensor. The magnetic sensor picks up pulses from a tone ring mounted on the transaxle. The source of the EMI is the rotating gears inside the transmission. The sensor is mounted about 2″ away from the transmission. That was weird to me. I was expecting the source of the EMI to be the engine’s ignition coils which are mounted about 12″ away. No amount of shielding would eliminate this EMI. A magnetic sensor produces a very low voltage AC sign wave and is quite susceptible to EMI. The only way to correct the problem was to replace the magnetic sensor with a hall effect sensor. The hall effect sensor that is compatible with my speedometer must operate at 5V TTL. It produces a 5V square wave which would be nearly impossible to disrupt with EMI. For those non electronic people TTL means transistor-transistor logic. You really don’t want me to explain what that means. I’ll put you to sleep. The down side to all this is that hall effect sensors are quite a bit more expensive than magnetic sensors. As I told my friend, there isn’t any problem that money can’t solve, at least on this project.

The next obvious issue that I needed to correct was the transmission gear ratios. The gearing in the VW transmission is stock. First, second and third gears are OK, but fourth is barely usable. The motor turned 3700 RPM at 70 mph in 4th gear. That’s waay too slow. I’m amazed that the motor will even accelerate under those conditions, but it will. It has more low-end torque than my VII has. The good news is that there are many available gear sizes for VW transmissions. The bad news is that if it isn’t a normal stock size it’s considered a racing gear. Make sure you’re sitting down when you hear the price. In the end, I compromised a bit and had only the 3rd and 4th gears replaced with a non- standard size gears. The motor now turns 4500 RPM at 69 mph in 4th gear. Remember, I’m not trying to create a racing machine. I want a usable fun car that my wife and I can go spooning. Look that word up you youngsters. Boy I’m feeling old.

People keep asking me for performance numbers that I can’t answer yet. I finally got some mileage numbers though. I get 39.5 miles to the gallon on non freeway roads.

I don’t like to drive much at night because the headlights slowly suck the life out of the battery. We all know that these crankshaft mounted alternators don’t produce many amperes at low RPM. I haven’t actually had any problems yet, but I think I will. The most that I’ve lost on a night drive so far was 0.5 volts. I bought new headlight bulbs that are each 10 watts less with no noticeable change in light intensity. They didn’t help much. What I really need are HID lights. They draw far fewer watts. Before I fork over more money for that, I want to observe the results from the new transmission gears that increased the motor’s RPM.

Another item that required slight modification was the rack and pinion mounting brackets that came with the kit. They are simple steel ´U` bands that wrap around the rack housing and bolt to the frame. They secure the rack well in every direction except laterally. If a good sized pot hole is encountered by one of the front wheels the force generated shifts the rack a small amount laterally. The next thing you realize is that the steering wheel isn’t straight anymore when the road is. It really needs a completely new bracket design, but for now, I just added set screws to the brackets that lock the rack in place.

Yet another item that needed modified was my fuel system. I’m using a stock Guzzi external fuel pump mounted on the firewall. A friend said that I might have overheating problems and should consider installing a pump inside the gas tank. So I feel it from time-to-time. It gets warm and seems OK. After a couple of months riding, I had my first fuel pump problem. First you must know a little about how my fuel plumbing works. The fuel pump constantly pumps fuel through the filter then to the engine. Prior to the engine the regulator bleeds off any excess pressure, thus, maintaining pressure. The excess pressure is returned to the pump, not the tank. I save one fuel line this way. So there is always some fuel recirculation occurring through these three units. The pump itself generates heat in the fuel and some of that heat comes right back to it. One day I was stuck behind a slow car going down a mountain. The grade was about 15 miles long. It was about 100° F and dry. The engine was practically idling at 2000 RPM. I noticed that my air fuel ratio was climbing so I kept a close eye on it. Around 18:1 the motor wasn’t very happy and by 19:1 it had enough. I found that the fuel pump was real hot so I put a wet rag in it and waited 5 minutes. The problem went away and never returned. I figured that so much fuel was recirculating that it got too hot. Rather than mount a pump in the tank and decrease fuel capacity, I added a power steering cooler to the recirculating fuel line.

The corners of the rear tire rubbed the rear fender while cornering and during bumps. This is the part not seen under the tail fairing attached to the swing arm. I tightened the rear axel bearing and remounted the rear fender a quarter inch higher. This eliminated the rubbing while cornering, but didn’t stop the rubbing during bumps. If I look closely at the manufactures’ pictures, I can see that his tires are slightly more narrow than mine even though they are the same size, 205/40 R17. I’m sure this is due to different tire manufactures. All three fenders fit very close. If you remember, I reinforced the front ones prior to painting to decrease flexing. I think I’ll reinforce the rear one also.

I finally installed the front storage seal that I’ve had for almost two months. I’ve been putting it off because I knew I’d encounter fitting problems, and I did. I decided to attach it to the stationary (body) side because it would seal better around the hinges. It’s the right seal for the gap, but causes the lid to distort. The compartment lid is a bowed piece of ⅛″ thick unreinforced fiberglass. It flexes quite easily. The lid closed and secured fine, but bowed between secured points. I had to trim the seal to just contacting the lid when locked down in order to not distort it. That was real fun. Of course, all this could have been avoided if the lid was reinforced near the edge.

This car is a real people magnet. It’s amazing. I even have people video taping me driving down the highway. I’m constantly having short conversations at red lights. When I tell them what it is, they’re still confused. I’m not used to all this attention.

It drives like a cross between a go kart and Mini Cooper, but is much more fun than a Mini. One of the weaknesses is that the faster you go the more sensitive the manual steering inputs are. The rack and pinion is 2 ½ turns lock-to-lock. For me, 80 mph is where I start to feel uncomfortable. Some of this is due to the grooves in the cement freeway. And some of it may be due to the fact that I haven’t had my steering computer aligned yet.

I’m not an expert, but there are a few unique things I’ve learned about driving 3 wheel cars that you might not realize. It’s harder to dodge road debris because the distance between the tire paths is less than a 4 wheeled vehicle. When backing up we use the rear corner of the car as a guide. A 3 wheel car has no rear corner, only a rear center. I find myself forgetting that the corner that I’m using as a guide is actually located in the center so I drive backwards in an arc. Since the Blackjack Zero has a front mounted motor and is front wheel driven it pulls through corners and sticks like glue. I have to really work hard to get the front tires to squeal. The rear wheel could use more weight on it because I can get it to skip to the side on a fast bumpy tight curve. The weight of a passenger pretty well takes care of this issue. I’m talking about driving in a manner that wouldn’t be approved of by the spousal unit.

Well, I ran long this month. This is my last planned article for the club newsletter. I’ve tortured you for almost two years with my weird writing style. I hope that I may have inspired you to write about your own project(s). I’d love to hear what others are doing in their garages. I know that you love your Guzzi(s) or you wouldn’t be reading this. Share some of that love with the rest of us. If you think that you can’t write, then just take another look at my writing. If I can do it, anyone can. Now let’s hear about your ride.

Muffler Mod 01 sm Muffler Mod 04 Tone Ring 01
 
Re: How to build a Guzzi (BlackJack) Car Part 19 (Last)

Part 19
Taming the Beast

Hello, back again! I hope by popular demand, if not, then forced entertainment is coming your way. I remember a lot of that in the military. Those of you who know what FEN stands for know what I mean. Hint, it’s not Far East Network. I said in my last article that it was my final one. But Frank persuaded me to write a follow up article after I had put on a few miles. I now have 4,000 miles on the Blackjack Zero and some notes to remember events along the way.

I’d like to recap a few things for the new members and as a reminder for those who may have lost a few brain cells since the last article. Hey, I sympathize with you. It’s tough out there. I got laid off twice in 2010. I choose to look at the bright side. It allowed me the time to finish building the Blackjack Zero and make some nice modifications.

The Blackjack Zero is a 3 wheel reverse trike kit car from England. The builder offers the option of installing a Moto Guzzi or a VW beetle engine. Both versions use a VW beetle transmission and are front wheel drive. For more information visit www.blackjackzero.com. You might also want to look at some videos on You Tube that I made.

I titled this article, “Taming the Beast”. I didn’t coin this, but it’s very fitting for this step of the process that you are about to read. You see, there are always rough edges to any new design that need to be smoothed out in order to make the product more desirable. I believe this step is what makes a good or bad product, a product that people want or hate. To prove my point, does anyone remember the Chevrolet Vega? Unfortunately, I do, because my sister bought one when I was in high school. One guess as to who the unlucky mechanic was?

After a considerable wait, I finally received the custom license plate that I ordered from California (see picture). Being a Guzzi person, I think of this Blackjack Zero as a Guzzi car, but in reality, it’s both. And as you know, it’s registered as a motorcycle.

I made some necessary and optional changes since getting the Blackjack Zero on the road. One of them was a modification to the brake lights. The brakes work so well that little foot pressure is required to stop the vehicle. The brake lights did not come on during light stops. The lights are actuated by a pressure switch mounted on the master cylinder. I could have changed it to a mechanical switch, but chose not to because a pressure switch already exists. A lower pressure brake switch does not exist so I modified the existing one to actuate at a lower pressure.

A friend pointed out to me that my front tires were wearing unevenly. I checked the front end adjustment and sure enough, it was out of alignment. I presume the break-in had something to do with it because I aligned it during assembly with weight on wheels. After I readjusted it, high way speeds were greatly improved and low speed saw a slight improvement.

I initially set all the tire pressures at 28 PSI and the dampeners pretty stiff on the car. I also set the spring tension as per manufactures recommendations. I found that I needed to increase the spring tension on the rear shock to prevent it from bottoming out while ridding with a passenger over a bump. I had to decrease the rate of dampening on the front to improve the ride over bumps. At 3,000 miles I hit a pot hole pretty hard with my right front tire at about 40 mph. Unfortunately, it bent and cracked the rim. I guess low profile tires will do that, but they sure look great. The bad news is that there is no spare tire. The good news is that 5 minute epoxy will seal a crack in a rim good enough to hold air. Following this incident, I changed the front tire pressure to 30 PSI. The most suitable carry-on jack that I have been able to find is an aluminum scissor jack made by Porsche.

There were initially a few rattles that were annoying. One was between the gas tank and the bulkhead that it is mounted to. A simple piece of rubber between the two large flat surfaces took care of that. Another was in the right front brake. It made a squeal when braking that took me four tries to find. The source turned out to be one caliper mount bolt. The bolt was tight, but not tight enough. I was glad to fix that one. I turns out that the anti-rattle clips that I made for the brake pads don’t do anything. With or without the clips, they don’t rattle.

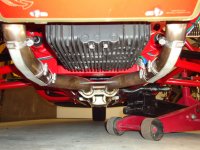
The ground clearance of the car is something that the driver needs to be aware of. It doesn’t hit speed bumps, but will scrape the exhaust under the motor while driving through dips too fast. The design is good. It’s just the price you pay for having a vehicle with low ground clearance. I made some simple guards for the exhaust before I really scrape them up (see pictures).

It requires some flexibility to get into and out of the car. Additionally, some upper body strength is required to lower and lift your body into and out of the car. I was surprised to discover how many people have so little flexibility. This was due to #1, weight, and or #2, health. Size is not a problem. The cockpit is basically the same size as a normal car. So weight and health should be a consideration if purchasing a Blackjack Zero. Vertically challenged people have a harder time stepping over the sides which are 26˝ (66 cm) high to enter the car. So I purchased a small plastic folding step for them and stow it behind the seat.

The seat back cushions didn’t provide lumbar support. On short trips, it wasn’t noticeable, but on longer trips it created back fatigue. The remedy was to add padding to the back cushions.

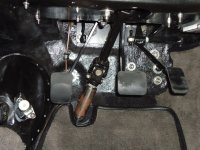
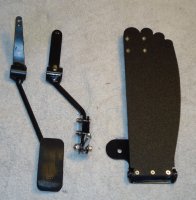
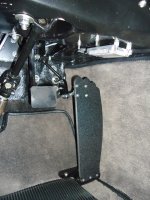
I found it difficult to control the accelerator pedal smoothly because the height of the pad on the pedal changes in relation to the floor as it progresses through its full range of motion. The pedal pivots above the foot and pulls a throttle cable above the pivot. Of course, a foot pivots on its heel. Until I modified the pedal, most of my driving was bare foot which gave me better control. The only way to solve this ergonomic dilemma with the space available was to pivot the accelerator pedal on the floor. Some cars are designed this way. The trick is in connecting the pedal to the cable without changing the cables location while providing the correct amount of throw. There isn’t much of the old pedal that could be used, so new parts had to be custom made (see pictures). The driver’s side carpeting moved around a little while actuating the pedals so I attached hook and pile tape between the carpet and floor beneath the pedals.

I don’t claim to be an expert tuner, but I can perfectly tune the motor one day and the next day the air fuel ratio will be slightly off if the air and or engine oil temperature has changed. To solve this I problem, I created alternate circuits for the air and engine oil temperature sensors. By engaging a switch I can select a fixed resistance value for each of these sensors. This produces a predetermined consistent output from the ECU. This makes tuning more precise and produces more desirable engine output characteristics when the air or motor is extremely hot or cold. This is not necessary, but helpful when trying to optimize performance. I currently am achieving 37 mpg with mixed driving so this method works for me.

I had some infrequent random popping from the motor as it came off idle that I just couldn’t get rid of. I know that any slight uneven difference in throttle body opening positions can cause random popping. This can occur even after the throttle linkages have been properly adjusted using mercury sticks. The usual cause is play in the linkage that allows unequal and inconsistent movement of the butterflies. I made the main pivoting point of my throttle linkage with .003″ gap so no binding would occur. I solved this problem by remanufacturing this pivot with .0005″ gap.

Here’s the weirdest problem that I may have ever seen on any motor. My main crank case vent hose sweat oil through the pores of the rubber when hot. I used ¾″ automotive water hose for the main crank case vent hose. I’ve used it many times on other motors without any problems. The hose did not deteriorate. My theory is that there is some additive in my oil that has smaller molecules than the rubber in the hose. I’m using Redline synthetic 10W-40 #42404. This is the only engine that I use this expensive stuff in due to the hydraulic lifters. I solved this problem by replacing the hose with ¾″ fuel hose. It looks overkill with internal wire braiding and double the wall thickness of the water hose, but it works.

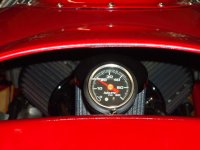
I added a fuel pressure gauge under the hood for trouble shooting (see picture). The fuel system and VW regulator checked out just fine.

Reverse popped out of gear sometimes because it was not fully engaged. The shift lever would come in contact with the end of the slot on the shifter bracket in reverse, but was correctly adjusted for all forward gears. To fix this, I made the shifter bracket slot longer only for the reverse gear position. I’m not a VW person, but apparently, the length of throw for reverse is longer than the 4 forward gears.

I replaced the H4 head lights with HID head lights to correct the battery draining problem. It would drain the battery 0.8 volts at 4,000 rpm in 80 miles with the low beam lights on. It now just barely keeps to needle in the green at highway speeds. Cruising around town at night for more than 20 minutes is still a problem. The real solution for a VII motor is a three phase alternator and regulator. This is on my long term list of things to do. If anyone knows of a company that makes them for VII Guzzi motors please let me know. Otherwise, I’ll need to adapt one from another bike or make one from scratch.

Of all the wiring I installed, which was 100% of the vehicle, I only managed to create one self induced problem. I initially had an intermittent electrical problem. It turned out to be a recessed pin in the ignition switch connector. That was an easy fix.

I wasn’t satisfied with the intensity of the tail running lights. This condition is a common problem on many motorcycles with advice found on many motorcycle forums. Rather than add more light assemblies or replace the existing assembly, I thought it best to try to modify the existing assembly first. The inside of the housing is black plastic so I lined it with foil tape to reflect more light. I reversed the wire connections to the running and brake light bulb filaments. This now gave me great running lights, but imperceptible brake lights. I knew that would happen so I purchased and mounted four, two for each housing, small light bulb sockets. I made covers for the new bulbs to separate the light from the bulb next to it. I wired the new lights to the brake. Believe it or not, this all fits in the housing like it was designed this way from the factory. The end result is that the brake now illuminates three bulbs per light assembly. The center has a dual filament and on ether side are single filament bulbs wired to the brakes and separated by a shield so that the running light does not interfere with the visual effect of the brake lights (see pictures).

Driving the Beast

I’ll try to be as objective as possible in this test drive report since I’m also the builder and owner of the vehicle. The Blackjack Zero is only available in right hand drive, RHD. This may bother some, but I think it adds to the uniqueness and English appeal of this vehicle. So after approaching it from the correct side you next need to decide whether to step on the seat or the floor while stepping over the side upon entering the vehicle. Stepping on the seat is easy, but avoiding the seat is a bit harder. At this point, the roll bars conveniently double as hand holds for entering and exiting the car. Once inside, you next find that the seat belts are opposite, pulling from inboard to the buckle outboard. The seats adjust on runners. This is an added feature of mine that isn’t included in the kit. The pedals are not adjustable. The seats don’t recline, but tilt forward to gain access to the storage area behind the seats.

No helmet or motorcycle license is required in California and the carpool lane can be used with only the driver. It doesn’t get much better than that, but wait! Once orientated to the RHD controls you discover that this car was made for left handed people. Since I’m one of those, shifting is more natural, another plus. The controls and indicators are logically laid out for RHD. The only thing that requires a manual to understand is programming the stereo. I say this, because this is a kit car and no two are alike. Each has been built to suite the owners taste. I, being the builder and owner, wanted the controls as much like a normal RHD car as possible. This necessitated custom building a horn on the steering wheel and turn signal controls. There are a few things that require an explanation. Such as, the stomp switch on the floor actuates the high beam lights. The red lever on the far left of the dash is for battery disconnect. And the T handle on the far right of the dash is the idle increase for cold starting the fuel injected Guzzi motor. The hidden cup holder on the dash is a welcomed amenity. And don’t mess with the switches under the dash if you haven’t read and understand the electrical manual. Depending on your height, some of the less necessary gauges on the dash are partly obstructed from view by the steering wheel. I knew this when I designed the dash, but there was only so much real estate to work with.

With all that said, it’s time to go for a cruise with your better half. One thing that you’ll need before leaving home is a good application of sun block. This is not optional for cruising in a car without a top in Southern California. Eye protection is prudent. An aviator’s cap or similar device is recommended for warmth and or wind protection. The wind blast will tangle long hair before the first stop sign. I prefer aviator goggles. Another helpful, but not necessary item, is ear plugs. If you plan on driving 60+ mph the wind noise is pretty harsh. And forget talking to your passenger or listening to music at that point. For this reason, I prefer slower smaller roads. If you prefer to wear a helmet and wire in audio, then this is a mute point.

The first thing you’ll notice is the constant attention the Blackjack Zero and you receive. I’m still not comfortable with it, but I meet the nicest people. After 4,000 miles, I’ve only come across one person who actually knew what it was and had visited the web site. The usual red light conversation starts like this, (Them) That’s a cool car. What is it? (Me) A Blackjack Zero. (Them) A what? (Me) A Blackjack Zero. (Them) How fast will it go? (Me) I don’t know. I get that question all the time. I still haven’t maxed it out and really have little desire to do so. I can confirm that it can comfortably pass other cars starting at 75 mph. One annoyance to me is the valve train clatter at 3,900 rpm. For that reason, I try to avoid staying at that rpm. Other than that, the 2003 Moto Guzzi Stone motor, which has hydraulic lifters, is quiet.

The car doesn’t come with a top or front bumper, or hardly any assembly instructions. So if you like a challenge and building, then this is right up your alley. If you appreciate a well designed machine with high quality parts then you won’t be disappointed. This is the only reverse trike that I know of, that uses a car transmission coupled to a motorcycle engine and is front wheel drive. I soon realized that the added complexity was worth the extra effort and expense when the Blackjack Zero exhibited glue-like agile handling in all driving conditions.

As I drive it, I find that it feels very much like a small sports car. It reminds me of the days growing up when helmets weren’t required for motorcycle riding and I could enjoy the wind in my face and through my hair. The steering is precise, cornering is tight and every bump is felt. The low profile tires and the lack of weight have a lot to do with the firm ride. The steering is similar to a go-kart in that sensitivity increases as speed increases. By 80mph, I find myself needing to watch the road conditions to the degree that distracts from the vehicle’s driving appeal. One thing to watch out for is uneven pavement. This condition pulls all cars left or right, but the Blackjack Zero is especially quirky in this situation. On the other hand, bump steer is non-existent. The VW Beetle 4 speed IRS transmission is crude in comparison to modern motorcycle transmissions, but having reverse is priceless. My example has aftermarket 3rd and 4th gear ratios. Cornering reminds me of a go kart. The sway bar is stiff. Slowing down for curves is optional. The brakes are as good as any high performance motorcycle. I still can’t break traction with the front tires, but the rear will at about double a curve’s posted speed. When the rear wheel starts to break traction it’s very much in control since the front is doing all the work. I just back off the throttle a little to decrease speed which reduces lateral Gs. This stops the rear wheel from skipping to the side. This is the weakest link of the vehicle. A pleasingly plump passenger is a plus at this point. I’ve had a few people tell me that they dislike the front wheel drive design. If I did the same thing on a rear wheel drive, I’d loose control and spin out. Curves put a smile on my face that’s hard to get off. My passengers, on the other hand, look a little worried from the lateral G forces. It’s a good thing that I added padding to the inside sides of the seats.

The left mirror is half obstructed by the distortion at the edge of the windshield so I’m in the habit of using the right one. At 5΄10˝, the wind coming over the windshield hits me at nose level. And if you really want to get blasted just take it off. I think it looks good so I always leave it on. I thought the snap on design would be cheesy, but it’s surprisingly solid. The windshield can’t be used at the same time as the tonneau cover because they use the same snaps.

The controls are right where they should be. The winkers do not self cancel, but are within finger tip reach without my hand leaving the steering wheel. I added a beeper to remind me they are on. The HID lights are awesome, but will drain the battery if not at highway speeds. The day running lights are conventional and don’t produce any noticeable draw on the battery. This can certainly help conserve a few electrons when needed. I found that the rocker switches are obstructed if a tall cup is used in the cup holder. They are still functional. I just have to reach around the cup. The holder could not have been located lower or it would interfere with the driver’s leg. The sound system is nice. The hidden antenna works perfect. The CD will skip from the firm ride, but it’s a dinosaur anyway. There’s a plug and small storage for an IPOD in the center of the dash. Who doesn’t need 30,000 songs at your finger tips these days? There are two outlets for powering widgets. All storage compartments and the dash have lighting. The only lockable compartment is the front storage compartment. The lock is not included in the kit. The map pockets work well and some flat objects can even be stored under the seats. There’s far more storage capacity than other cars of this size. Without a passenger, I often use it to buy groceries for my family of 5 without any problems. A tank of gas will carry you 220 miles.

A friend of mine has a Grinnall Scorpion III. It’s a good vehicle to compare with, being slightly smaller than the Blackjack Zero. The first thing I noticed is that the Scorpion is a nightmare for maintenance since the motor is behind the seat. It’s so bad that my friend replaces his complete drive train with a spare when maintenance needs done. Storage is much smaller. The cockpit is smaller. There’s no space beside the seats, unlike the Blackjack Zero. So if you, or your passenger, are a bit broad in the beam, then you’ll need a shoe horn to get in a Scorpion. One thing that it has up on the Blackjack Zero is speed. The Honda Gold Wing or BMW K motor produces a lot more horses. He has experienced hydroplaning on several occasions. Because our vehicles are very similar, having wide tires and light weight, I’m sure that the Blackjack is susceptible too.

This is the most enjoyable vehicle I’ve ever driven. I have a Mini Cooper and this beats it hands down. My VII Rosso Corse is great, but comfort is not its middle name. I’m getting 37 mpg so it’s not just fun, it’s practical. Tell that to the wife along with all the dating potential it has. Don’t forget to mention the comfort and you’re not getting any younger. Next you might want to mumble the price, yes, all this fun does cost. I spent just over $31,000 and almost two years to get it on the road.

Reverse trike three wheeled vehicles have recently become popular in southern California. They are still very rare and most are electric, but people know about them. I presume their popularity might have something to do with the ease of licensing them and our Mediterranean like weather. Maybe someday, there’ll be enough to start a club.
 
Back
Top