Ciao Guest - You’ve landed at the ultimate Guzzi site. NEW FORUM REGISTRATIONS REQUIRE EMAIL ACTIVATION - CHECK YOUR SPAM FOLDER - Use the CONTACT above if you need help. New to the forum? For all new members, we require ONE post in the Introductions section at the bottom, in order to post in most of the other sections. ALWAYS TRY A SEARCH BEFORE STARTING A NEW TOPIC - Most questions you may have, have likely been already answered. DON'T BE A DRIVE-BY POSTER: As a common courtesy, check back in and reply within 24 hours, or your post will be deleted. Note there's decades of heavily experienced Guzzi professionals on this site, all whom happily give endless amounts of their VALUABLE time for free; BE COURTEOUS AND RESPECTFUL!
There is ZERO tolerance on personal attacks and ANY HYPERLINKS to PRODUCT(S) or other competing website(s), including personal pages, social media or other Forums. This ALSO INCLUDES ECU DIAGnostic software, questions and mapping. We work very hard to offer commercially supported products and to keep info relevant here. First offense is a note, second is a warning, third time will get you banned from the site. We don't have the time to chase repeat (and ignorant) offenders. This is NOT a social media platform; It's an ad-free, privately funded website, in small help with user donations. Be sure to see the GTM STORE link above; ALL product purchases help support the site, or you can upgrade your Forum profile or DONATE via the link above.
Be sure to see the GTM STORE link also above for our 700+ product inventory, including OEM parts and many of our 100% Made-in-SoCal-USA GTM products and engine kits. In SoCal? Click the SERVICE tab above for the best in service, tires, tuning and installation of our products or custom work, and don't miss our GT MotoCycles® (not) art on the BUILDS tab above. WE'RE HERE ONLINE ONLY - NO PHONE CALLS MADE OR RECEIVED - DO NOT EMAIL AND ASK QUESTIONS OR ASK TO CALL YOU.
Like the new V100, GuzziTech is full throttle into the future! We're now running on an all-new server and we've updated our Forum software. The visual differences are obvious, but hopefully you'll notice the super-fast speed. If you notice any glitches or have any issues, please post on the Site Support section at the bottom. If you haven't yet, please upgrade your account which is covered in the Site Support section or via the DONATE tab above, which gives you full site access including the DOWNLOADS section. We really appreciate every $ and your support to keep this site ad-free. Create an account, sign in, upgrade your account, and enjoy. See you on the road in 2024.
Don't you worry lads, I won't be blown away LOL I'm so anal about that weight saving because I'm adding weight elsewhere, like my behind the wheel number plate mount. At the end of all mods it will still be a lot lighter than standard V7 but when that end will be I can't tell coz I have a bunch of ideas already brainstormed and waiting in line for their turn, and new ones are still popping in as well
I'm experimenting with carbon/fiberglass colors as I'm brainstorming one special mod. Dyed resin doesn't give any looks for fiberglass but carbon chops still have their "sparkle". But I still don't like it... it looks kinda out of place... There's dyed fiberglass chop strands on the market to make aka forged colored carbon fiber, but they're more expensive than actual real carbon! Damn, makes no sense LOL
I'll keep on experimenting
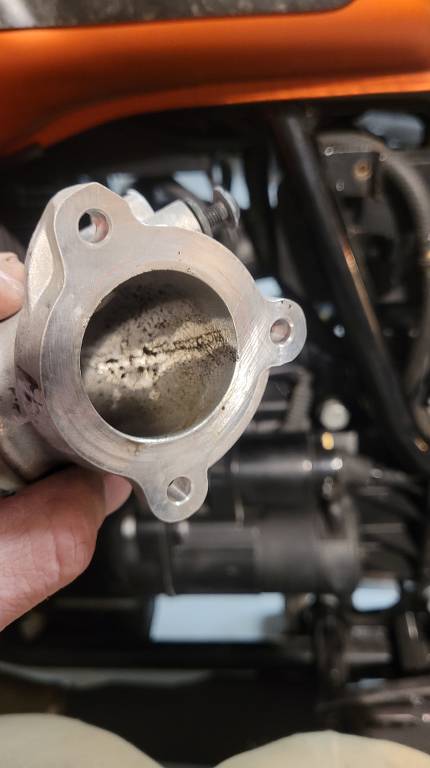
I took out my intakes. I'll be powdercoating them same satin orange color as my valve covers. I fond inside some tinsy tiny dirt residue mixed with oil. Shame on me, I gotta clean and oil my DNA filter more frequently...
I also found out that intake in the heads is rough as a sandpaper. At first I thought that it should be polished but apparently that's the way it should be for better atomizing. Well, I learned something new today So I ain't gonna touch them but I'll check for porting to cylinder heads and rubber "Y" intake.
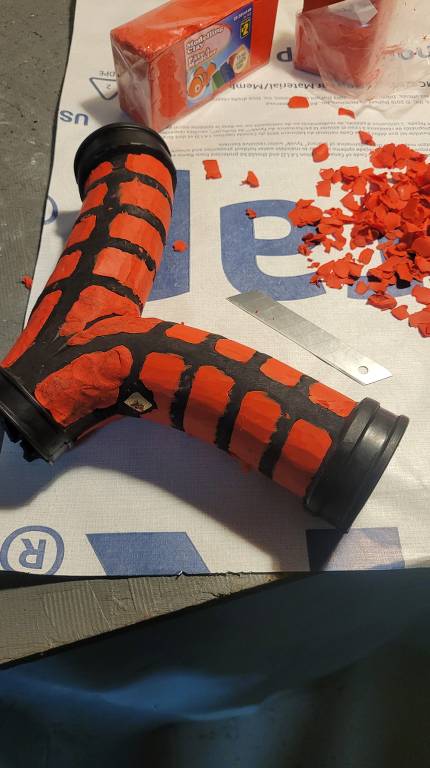
As of rubber "Y", I'm not sure yet what am I gonna do with it... A while ago I had plans to make a complete new Y from carbon fiber using oil and head resistant resin but now I'm kinda bailing on that idea because of amount of work involved. After taking it off I realized that it will be easier just to skin that rubber with carbon fiber. It would add a 100gr'ish on existing part, instead of new lighter part, but, whatever, it'll look cool. Or at least that's what I think LOL
No, it won't flex... For the ease of assembly and to have some form of flexibility I'm thinking to skin it only main Y, leaving alone them rings that hold clamps for intakes and throttle body. Ideally I would like to grind down those ribs and skin it so it's all smooth curves but I know that they're vital for rigidity. Otherwise that rubber would be collapsing under the load of vacuum. Just a thin one layer skin of carbon fiber chops would be enough for rubber Y not to collapse rigidity wise with grinded down ribs, but there's a big but here... resin doesn't stick to rubber very well. It will, and it will vibrate off over time. And if then rubber will start collapsing- I'll be in deep sh!t and I won't even see it LOL
I think I'm better of just making a fake sleeve/condom...
And my rear fender is done. On non visible part I put a coat of enamel to seal carbon:
And on visible underside I did satin finish. Now my letters are a complete mess. If it would be chain drive, ya'd think that I shred a cat in the chain...
I started sandblasting stuff for powdercoating. It will take a while... a good while... I made a pig tank from 100lb propane tank for my 2.5hp 5gal compressor but that's still not enough. After few mins of sandblasting I have to wait for few mins for air to fill the tank. And after few on&offs my compressor was overheating, so there's another coffee break. In one evening I managed to sandblast only my speedo bracket and 1/5th area of one valve cover. High temp exhaust paint of valve cover comes off easy but original black coating is really tough. I don't want to change sandblasting media to lower grit to speed up the process, the one I have is just about right and leaves a nice smooth finish, so it will take a while... a good while... lol
I always thought it would be true fun to give Mindis a full workshop with all the cool tools and stuff he could ever want, and see where he goes. The guys a mad genius for sure…
I do indeed, it's on my shopping list... as well as milling machine, bigger lathe, powdercoating oven, vacuum oven, better Mig and Tig welders, plasma cutter, V100 Mandelo, and so on and on. I'm still single and still in search of a wealthy cougar, if ya know any...
I do indeed, it's on my shopping list... as well as milling machine, bigger lathe, powdercoating oven, vacuum oven, better Mig and Tig welders, plasma cutter, V100 Mandelo, and so on and on. I'm still single and still in search of a wealthy cougar, if ya know any...
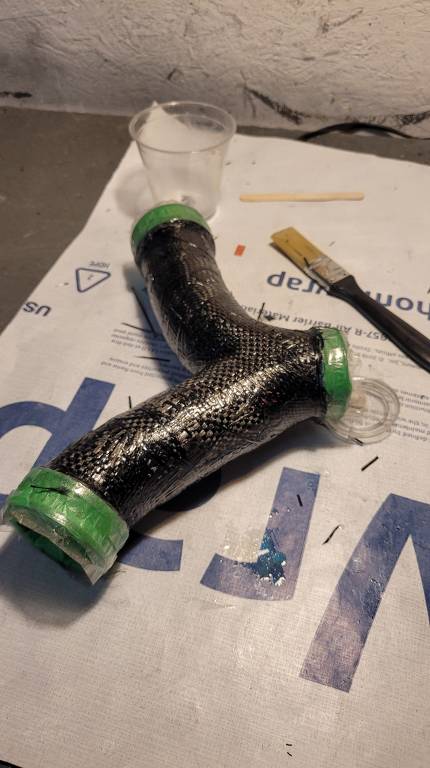
Back to intake Y. I sanded a bit of ribs and filled the rest with modeling clay:
I taped it all and put carbon cloth on it:
I'm not filling between ribs with carbon fiber and resin because it would be heavy. Cloth is only a thin skin to hold a shape while I'll be doing carbon chops. Once cured I'll cut it open to get the clay out, then I'll glue it on and finish with carbon chops for that forged carbon fiber looks.
I think I got my composite shenanigans pretty well going, yet I still fail once a while... oh well...
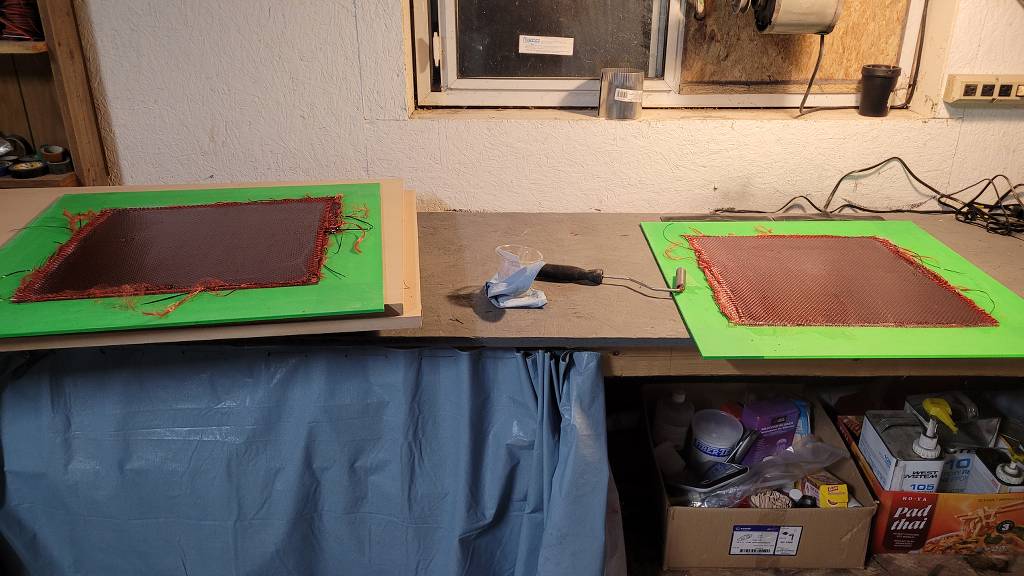
I need a carbon fiber sheet for my other special mod. The way to make it is between 2 pieces of glass. They peel off very easy and leave super flat and finest finish, I've done this loads of times. Only this time it didn't work and and mirrors cracked and shattered while trying to separate them. I know already what went wrong- I used only one coat of wax on them mirrors instead of few due to impatience, I raised temperature too much on heating pad underneath to speed up curing time due to impatience what melted thin wax layer, I used regular glass mirrors that I got for nothing instead of tempered glass.
My piece is not wrecked and will be used as intended, it's just I got a big mess and wasted time on cleaning it...
Never be in a hurry to fail… I think I speak for a lot of us when I say, we enjoy watching your “ Shenanigans “
thanks for letting us see, the good and the bad.
I’ll have learned something should I ever Dare to try !
After a fail I gotta share a win, a big win, powdercoating
Holly smokes guys, I could not believe that a cheap kit can give the results that looks so professional and high end! And I mean it!
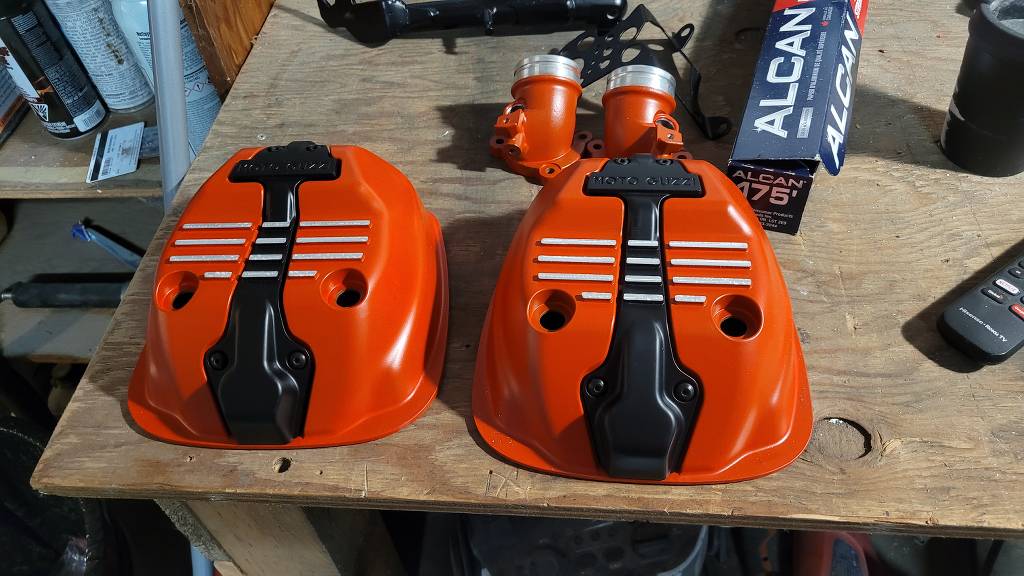
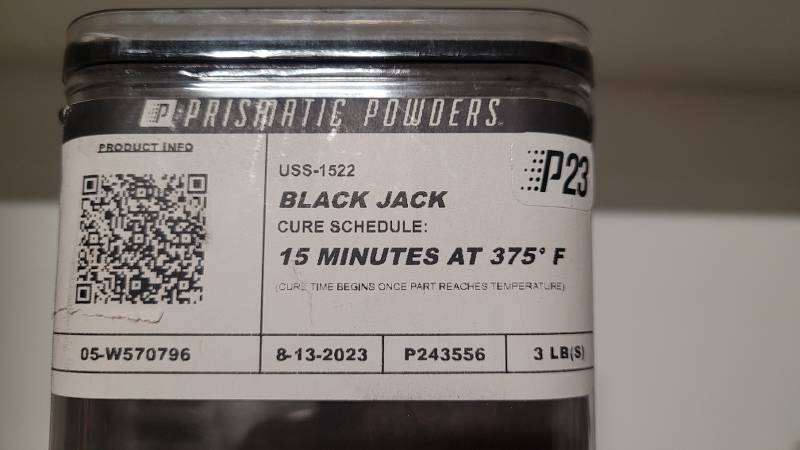
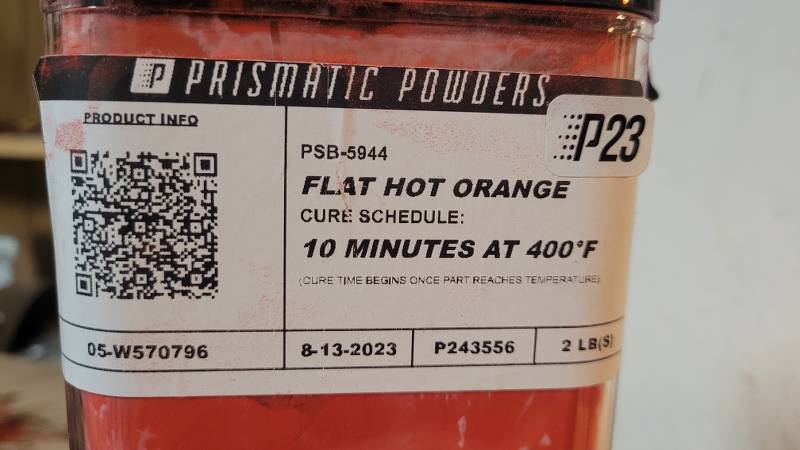
K, here's 2 colors I got from Prismatic Powders:
One is satin black, the other is satin orange for my valve covers and intakes.
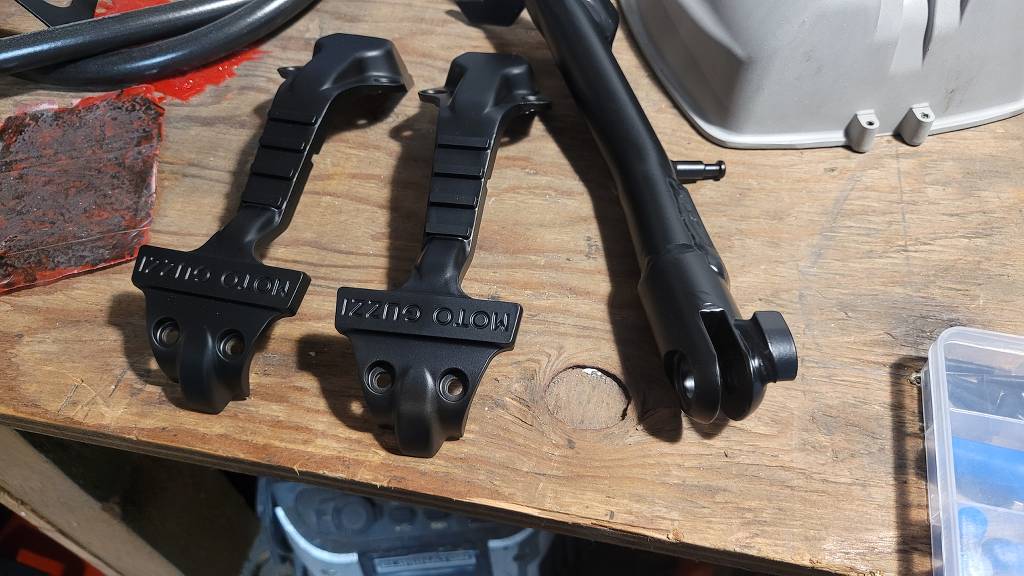
I had my parts ready for a while:
I was still waiting for silicone plugs for bolt holes to arrive but then I thought I might start the parts that doesn't need plugged. Set up my space and started with my speedo bracket:
All went super, spark plug covers and kickstand followed. It was half a guess, half a shot in the dark when I was ordering powder because they have tons of different black and lots of "shininess" options. From mirror-shine to total mat, as dark as my soul... Looks like I picked exactly what I wanted- low gloss/semi satin
Then Bezos' minion showed up at my door and brought me my silicone plugs, awesome.
And flat hot orange turned to be like Chevy Red, aka burned orange. On their website color picture looked a wee bit more "orangy" but how it turned out it's pretty accurate, baring in mind that same powder can have different color shades on different surfaces.
Isn't that sexy, eh?
And here's besides my orange copper tank:
In half a Sunday I learned a very lot on powdercoating:
#1. You shouldn't do it on Sunday hangovers after boozing all night at work's Xmas party.
#2. It's forgiving and easy. Between American measurements of Bake/Toast/Keep Warm on my toaster oven I was struggling to keep the right temperature but it was all fine.
#3. Baking smokes and stink. Should be done in ventilated area or it'll give ya a headache. Please refer to point #1 on a headache matter...
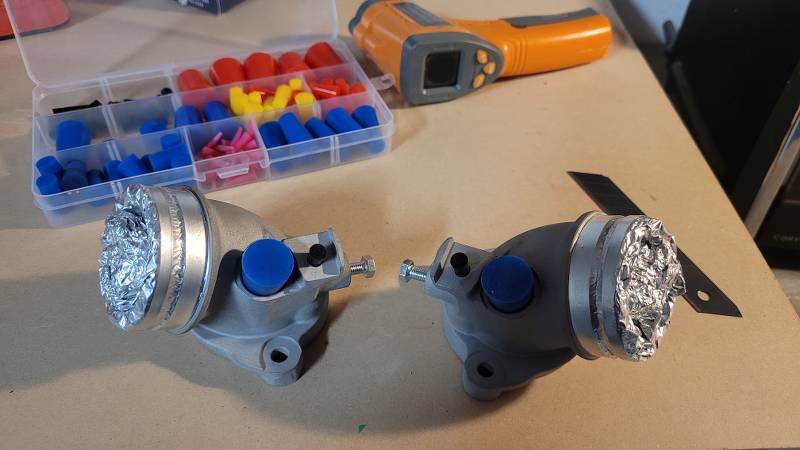
#4. It's definitely worth having silicone plugs for bolt holes to protect the threads. Hight temp tape for masking is overrated though and doesn't work. Doesn't stick well in first place, and comes off after 370F, where some powders need 400F temperatures. But hey, a bit of outside of the box thinking can make kitchen foil work like charm
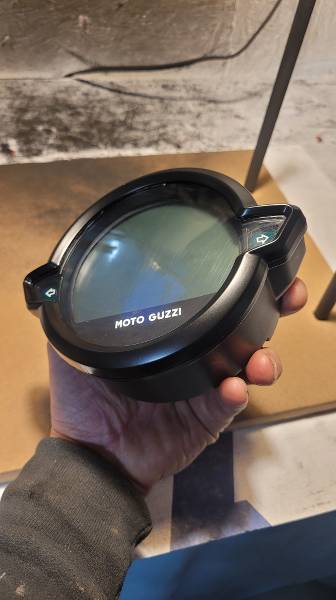
#5. It's time consuming, quite a lot. Ya have to bake the part for a while to burn impurities, let it cool, powdercoat, bake, cool gradually. Takes time. In between the parts ya can tape, sand, and paint that speedo's silver ring around that's been annoying you for a while:
#6. It's cheap. I had no clue how much powder will I need, aprox search wasn't that helpfull, so I got some extra. Now I have enough powder for like 50 more valve covers and at least a few hundreds of sparkplug covers... For 2 sparkplug covers, speedo bracket and a kickstand I used barely a shot glass worth of powder. Oh, that's another American measurement.... Please refer to point #1 regards this measurement...
So here's my half-a-hangover-Sunday achievement:
I could not be happier how parts turned out, looks da beez kneez If anyone is thinking about trying powdercoating- it's definitely worth it. And since I have shit tons powder left, I offer myself to help local guzzistas to powdercoat small parts if needed. Whatever fits in small toaster oven, it's what I have for now. Not for money, but for a coffee and a chat, a ride together, for a good cause (aka beer, please refer to point #1)
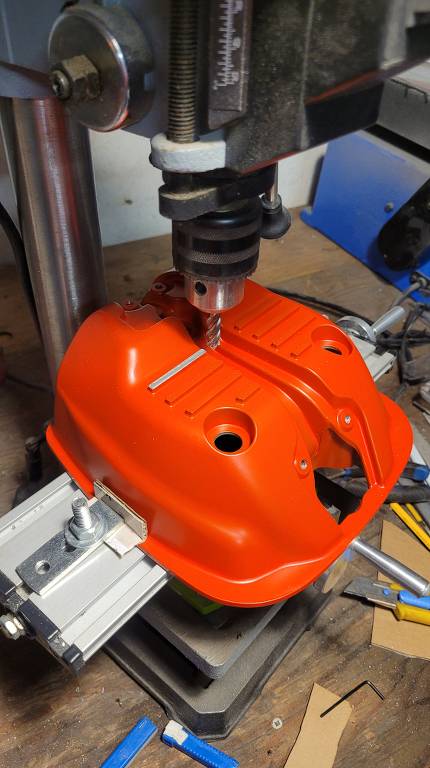
I'm trying to mill top of the fins on my valve covers and so far I'm not winning LOL My bench drill is only little one, I don't have Z axis for up/down, and that little mill attachment is flimsy. It did fine for my RC hobbies but won't do now... Well, heavy duty floor drill with mill attachment just moved up to No1 on my shopping list.
I tightened up my mill vice and somehow made it to mill the fins:
It might look good in the pic but I'm not very happy with it... My bench drill is still not a milling machine LOL At times it was starting to oscillate, therefore I have visible machining rings. I'll find a flat stone and make a brushed aluminium looks. I also don't have a wide enough bit to do Moto Guzzi in one pass. I'll leave it as is for now.
To my American friends, aluminium is also known as alOOminOOm
")
")


 If anyone is thinking about trying powdercoating- it's definitely worth it. And since I have shit tons powder left, I offer myself to help local guzzistas to powdercoat small parts if needed. Whatever fits in small toaster oven, it's what I have for now. Not for money, but for a coffee and a chat, a ride together, for a good cause (aka beer, please refer to point #1)