Be careful if you ordered saddlebags with your V100. Didn't come with any instructions. You have to take rear passenger seat off, then push the hangers into the square holes and give the bags a hard push forward to lock into the rails. Then reinstall the rear seat to positively lock the bags on. Was very careful and checked to see if bags were secured by ushing and pulling on them. Everything seemed good. Second day with bike, went for a 100 mi ride. Got home and left bag was missing. Didn't hear it come off. Reran the route consisting of ravines, deep ditches and forests but couldn't find it. Am told there aren't any more in North America and I will have to wait till July to get a new set (at cost). Heartbroken.
Navigation
Install the app
How to install the app on iOS
Follow along with the video below to see how to install our site as a web app on your home screen.
Note: This feature may not be available in some browsers.
More options
-
Ciao Guest - You’ve landed at the ultimate Guzzi site. NEW FORUM REGISTRATIONS REQUIRE EMAIL ACTIVATION - CHECK YOUR SPAM FOLDER - Use the CONTACT above if you need help. New to the forum? For all new members, we require ONE post in the Introductions section at the bottom, in order to post in most of the other sections. ALWAYS TRY A SEARCH BEFORE STARTING A NEW TOPIC - Most questions you may have, have likely been already answered. DON'T BE A DRIVE-BY POSTER: As a common courtesy, check back in and reply within 24 hours, or your post will be deleted. Note there's decades of heavily experienced Guzzi professionals on this site, all whom happily give endless amounts of their VALUABLE time for free; BE COURTEOUS AND RESPECTFUL!
-
Be sure to see the GTM STORE link also above for our 700+ product inventory, including OEM parts and many of our 100% Made-in-SoCal-USA GTM products and engine kits. In SoCal? Click the SERVICE tab above for the best in service, tires, tuning and installation of our products or custom work, and don't miss our GT MotoCycles® (not) art on the BUILDS tab above. WE'RE HERE ONLINE ONLY - NO PHONE CALLS MADE OR RECEIVED - DO NOT EMAIL AND ASK QUESTIONS OR ASK TO CALL YOU.
-
There is ZERO tolerance on personal attacks and ANY HYPERLINKS to PRODUCT(S) or other competing website(s), including personal pages, social media or other Forums. This ALSO INCLUDES ECU DIAGnostic software, questions and mapping. We work very hard to offer commercially supported products and to keep info relevant here. First offense is a note, second is a warning, third time will get you banned from the site. We don't have the time to chase repeat (and ignorant) offenders. This is NOT a social media platform; It's an ad-free, privately funded website, in small help with user donations. Be sure to see the GTM STORE link above; ALL product purchases help support the site, or you can upgrade your Forum profile or DONATE via the link above.
You are using an out of date browser. It may not display this or other websites correctly.
You should upgrade or use an alternative browser.
You should upgrade or use an alternative browser.
V100 saddlebags note and warning!
- Thread starter Glen72
- Start date
fig32
Tuned and Synch'ed
Sorry to hear that and thanks for the heads up. I am waiting for bags and looking forward to getting them but would hate to have it fall off. Doesn’t sound like the best design.
I suppose they are good once you get them on properly. The left one (the one thst I lost) is big enough to take a full face helmet. They really look good when installed. I live 3 hours from dealer so had to take them off at to trailer the bike home. Once back seat was removed, we had to hit the front of the bags really hard with our knee to get them to move backward so they would release. To remount, they push in, then lock on by moving them forward. Then you put the seat down. The locking tabs on the back of the bags have red tags that are supposed to indicate that you have them in far enough to lock. Don't take anything for granted. I'm told there aren't any replacements available in North America untillthe end of July.
Albertasaurus
Just got it firing!
My condolences Glen. So the mistake you made was not pushing the left bag forward enough to lock it in place?
I suspect that the propblem was that it wasn't pushed in far enough on the front post before pushing it forward. Only the front post is locked by the seat. If it's not all the way in and only held by the rear one then it feels secure but can slide back and release. This is only conjecture since there isn't any way to prove it once the bag is gone. It takes a lot of force to push it in and slide it forward, same with removing the bags. Might become easier with use.
FWIW, I was discussing bags today at my dealer (I am hoping to get my set at the end of the month ). The tech that does their bag assembly and install was telling me it really helps to use some silicon spray to lube it up. He’s done quite a few at this point, and agrees - it’s a tight fit. He mentioned something about making sure the bags are in place far enough that you can’t see some sort of label. Maybe those are the red tags you mentioned.
I’d probably re-ride that route a time or two, and try to pay attention to any nasty bumps or breaks in the road, that may have “helped” the bag fly off, and look closely in those areas. You probably already thought of that, but thinking out loud. That really stinks - and, I feel bad that it happened to you - it would really bum me out!
I’d probably re-ride that route a time or two, and try to pay attention to any nasty bumps or breaks in the road, that may have “helped” the bag fly off, and look closely in those areas. You probably already thought of that, but thinking out loud. That really stinks - and, I feel bad that it happened to you - it would really bum me out!
Would have been nice if Moto Guzzi or dealer had issued some instructions with the bags. The lubricant is a great idea. Thanks for suggestion but I did run entire route in my truck about 1. 5 hours later (as soon as I got home). Also went and rode route again yesterday on the bike. Nothing.
Have to say not a very smart idea to release them going back...
Acceleration and air pressure will always push them back... and you won’t even know it happened!
Look at places where you accelerated hard and where you were going fast... + a bump?
Evel Knievel on a Guzzi...
Worst case scenario somebody has a really expensive litter box for the cats..
On a serious note… Thank you so much for posting your mishap
I think this will prevent quite a few people from losing the saddlebags!
Last edited:
Yup, someone would pick it up and have absolutely no use for it. It looked expensive so they picked it up. Geez, you'd never think the guy who lost it would come looking for it.
Finally had time to do a more thorough investigation. I found that the bags tend to rest on the rear pin and the rear footpeg mount when you are installng the bags. The weight of the bag resting on these two points tend to rotate the bag when you release your hands to push the bags forward to lock them in. This pulls the front pin out so it doesn't engage with the seat lock. Having weight in the bags exaserbates the problem. Make sure you push in on the top forward part of the bag with one hand while you are pushing the bag forward with the other hand. It is very hard to push them forward so you tend to use both hands. Use lubricant on the slides and hit the back of the bag with your knee if you need more leverage. Then lock the seat down. Will likely need your knee to get them off too. Hopefully they will loosen up with use. Good luck!
I do think the technique used on the Norge bags with a small hinged safety clip ahead of the bags was a simple and great failsafe for potential bag latch failure. I believe the best place to fabricate a similar arrangement is to possibly drill the rubber-covered frame tab that engages a slot on the bottom front of each bag. A simple stainless spring pin or even a small padlock would be cheap insurance against losing a bag.
Guzzi's bag-latch solution on this bike is clever, but not well-executed in regards to redundancy of the latching mechanism. I think a fix is very doable. I'm going to study it more closely and arrive at a reliable, unobtrusive solution. Even the smallest size tractor linchpin would be a simple, foolproof, secure, easily deployed non-locking solution. For instance, this one, in stainless steel.
amazon.com/Stainless-Steel-Lynch-Linch-4-3mm/dp/B08LMRKGKZ/
Pins with similar self-retaining functions come in a variety of design configurations, sizes, and materials.
- Joined
- Jun 26, 2011
- Messages
- 6,506
Would have been nice if Moto Guzzi or dealer had issued some instructions with the bags.
I thought it would be covered in the OWNERS MANUAL but it’s not!
WTH?
Thoughts on installing Panniers:
When installing the bags, get the front and rear mounting posts lined up with the receiving slots, and you will notice the inside tab for the lower mount (that attaches to the passenger foot peg bracket with the rubber) is shorter allowing it to move inward together with the two posts into the receiving slots.
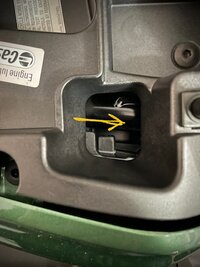
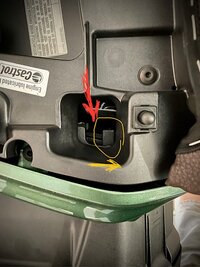
Once lined up push the bag inward until they are seated into the slots, along with the lower mount around and up against the rubber. Once this is good, hold the bag into the bike with your legs and or stomach, and while keeping the bag seated inward, grab the handle, then with your free hand strike the bag forward from the rear, near the top in line with the posts with the heel of your hand until you see the front post is forward as far as it will go as seen through the opening in the seat well where the "spike" on the seat that locks in the post goes. You will have to coax it to the front with multiple palm hits, don't be afraid of breaking it, they're pretty tough, just don't go Medieval (the spike on the bottom of the seat fits behind the post locking it in place as seen in the pic showing location with red arrow). Once the bag is persuaded to forward position you can let go of it as it is held from coming out by the two "hooks" at the end of the posts. To remove, reverse the procedure while striking with your palm from the front, while making sure the bag is supported by legs and stomach......... Easy Peasy........


Last edited:
Gman - thx for the post … I’ll be referring back to it, if I ever GET my panniers .
.
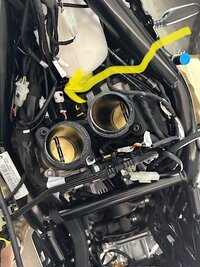
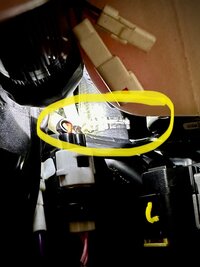
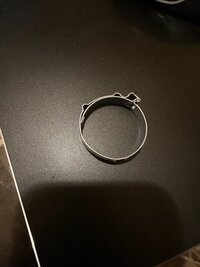
You're welcome. I am currently in the process of repairing a coolant leak that began at about 220 miles. It is a hose clamp, the crappy crimp on style that is on the rear of the rubber hose from the left side of the radiator where it attaches to a aluminum "pipe" about 35 mm dia or 1 3/8" I have the old clamp off and just ordered a new one ( german 9 mm wide worm gear type. I had to remove all or the front bodywork, fuel tank and airbox to get to it. I came off pretty easy because it was not crimped tight enough. it is about 3-4 hours just to see the hose clamp. I may post pictures for those who like to do their own. I generall do not want anyone other than myself working on my bikes... Unless some expensive specil tools are needed. The arrow shows where the defective clamp is located deep within, the close up you can see where the coolant reservoir is for reference, and the defective, or maybe not crimped tight enough clamp.Gman - thx for the post … I’ll be referring back to it, if I ever GET my panniers.
Attachments
- Joined
- Jun 26, 2011
- Messages
- 6,506
This clamp I'm sure, was originally specified to be removable and reusable. That's the type that it is. They used the exact same type on the charcoal canister on the Stelvio NTX. I showed them in my online removal guide for the Charcoal Canister in the Stelvio Forum.
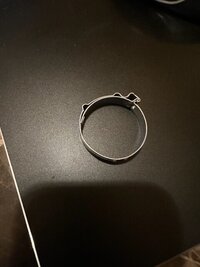
I have to say that to me, it really isn't an appropriate clamp for a high pressure - high temperature application.
In my opinion, based upon my experience and other vehicles and motorcycles I own, they should have specified a Oetiker clamp. That's what I would use. Positively. If you use the correct size which is stamped into the clamp itself, the Oetiker ear clamp is absolutely bulletproof in that properly installed Oetiker clamps do not leak.
The problem however becomes accessibility to properly compress the tensioning ear. It may even require a specialty tool be constructed for the specific purpose. I have several in all sorts of configurations.
I would be very interested to see what Moto Guzzi's solution is. If you find out, please post. That would be very interesting indeed.
They very well could have just gone to the original style but to a smaller diameter clamp where the increased pressure would get the job done. It remains to be seen.
Last edited:
fig32
Tuned and Synch'ed
Thank you gentlemen for the great information! I pick up my bags tomorrow and will reference this thread and if I ever have the coolant leak, I now know one of the possible culprits and how to correct it. Much appreciated!

