• Ciao Guest - You’ve landed at the ultimate Guzzi site. NEW FORUM REGISTRATIONS REQUIRE EMAIL ACTIVATION - CHECK YOUR SPAM FOLDER - Use the CONTACT above if you need help. New to the forum? For all new members, we require ONE post in the Introductions section at the bottom, in order to post in most of the other sections. ALWAYS TRY A SEARCH BEFORE STARTING A NEW TOPIC - Most questions you may have, have likely been already answered. DON'T BE A DRIVE-BY POSTER: As a common courtesy, check back in and reply within 24 hours, or your post will be deleted. Note there's decades of heavily experienced Guzzi professionals on this site, all whom happily give endless amounts of their VALUABLE time for free; BE COURTEOUS AND RESPECTFUL!
  • There is ZERO tolerance on personal attacks and ANY HYPERLINKS to PRODUCT(S) or other competing website(s), including personal pages, social media or other Forums. This ALSO INCLUDES ECU DIAGnostic software, questions and mapping. We work very hard to offer commercially supported products and to keep info relevant here. First offense is a note, second is a warning, third time will get you banned from the site. We don't have the time to chase repeat (and ignorant) offenders. This is NOT a social media platform; It's an ad-free, privately funded website, in small help with user donations. Be sure to see the GTM STORE link above; ALL product purchases help support the site, or you can upgrade your Forum profile or DONATE via the link above.
  • Be sure to see the GTM STORE link also above for our 700+ product inventory, including OEM parts and many of our 100% Made-in-SoCal-USA GTM products and engine kits. In SoCal? Click the SERVICE tab above for the best in service, tires, tuning and installation of our products or custom work, and don't miss our GT MotoCycles® (not) art on the BUILDS tab above. WE'RE HERE ONLINE ONLY - NO PHONE CALLS MADE OR RECEIVED - DO NOT EMAIL AND ASK QUESTIONS OR ASK TO CALL YOU.
  • Like the new V100, GuzziTech is full throttle into the future! We're now running on an all-new server and we've updated our Forum software. The visual differences are obvious, but hopefully you'll notice the super-fast speed. If you notice any glitches or have any issues, please post on the Site Support section at the bottom. If you haven't yet, please upgrade your account which is covered in the Site Support section or via the DONATE tab above, which gives you full site access including the DOWNLOADS section. We really appreciate every $ and your support to keep this site ad-free. Create an account, sign in, upgrade your account, and enjoy. See you on the road in 2024.

V7-850 Evap and Tip Info

Depends on whether ya going to your dealer for service or doing it yourself. My dealer is half a day's trip away so I did my service myself. If I had plans to go to my dealer for anything I'd probably kept my Goose stock...

Oh dear god, that would have literally killed you!

Do not believe him!. It's his PASSION to modify!

In fact, he lives, eats, breaths, and sleeps motorcycle modification. (Rumor has it he likes it more than tattoos and piercings and that's really saying something!) :D

Fortunately, he's damn good at it too! Little Lithuanian Garage Engineer with Mad Skills...we hate him because we can't do what he can. It's not fair... :p
 
Oh dear god, that would have literally killed you!
Ya dead right on this! Who dares to take that pleasure from me! LOL
And ya right again, any advise from me would be Do It Yourself:)

On the Evap note, I suppose modifying anything technically voids the warranty, but at the same time it depends on relationship with the dealer. I saw a good post about it here, more likely from you if I remember correctly. Personally I don't have any relationship with my dealer. Bike runs awesome, after 4.5K kms from new no issues, I love wrenching myself and my dealer is half a day's trip away. So from my point of view- I'll do whatever I want and if I will ever need a dealer for anything I'll be prepared to be denied the service. I just have a lot of trust in V7 and confident enough in myself that I can fix stuff myself before I'll need help from a dealer:)
I do realize that other people doesn't roll that way🤷‍♂️
 
As a perspective buyer of a V7 Im glad I came to this forum and found this thread.
Carry on gentlemen :)
 
FWIW, my canister came out easily on the right side without removing the frame cross member that is secured by the long bolt. Just tip it down and slide it under the right pipe. I would suggest removing the hoses from the Bosch valve and the plastic vent valve first. Then the canister can be extracted with the hoses still attached. This eliminates fighting to detach the hoses from the canister under the frame. A car body clip fastener removal tool works well for getting the vent hoses to slide off the barbed fittings. Remove the clamps first!

'23 V7-850 Special
 
Last edited:
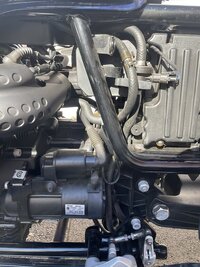
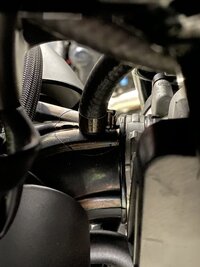
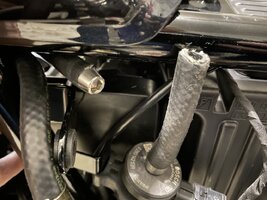
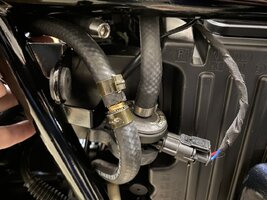
My 2021 850 Special was experiencing the typical “cutout” issue we have all historically described. My Moto Guzzi dealer mechanic actually called last week and without saying the exact words, encouraged me to pursue the EVAP mod which he said came from their discussion with Italy. Finally had time to deal with mine today. I prefer to do mechanic’ing so things don’t appear like a hack job. So, for my mod, I drilled out the check valve then reinstalled. For the vacuum hose, I made a 5/16” diameter 3/8” long metal slug for a plug. Inserted the slug in the hose 1 inch above the Bosch vent valve, then reconnected that hose to vent valve and reinstalled the factory clamps. All this to say, my system "appears" stock, but functions per the modification. Lastly, as expected, it cured the engine “cutout” issue.

View attachment 24140View attachment 24141View attachment 24142View attachment 24143
I have a late 2022 V7 850 Special which currently dosnt seem to show any of these issues (I will add I havnt been riding in hotter temperatures yet), however Im keen to persue this mod and the method you detail seems almost the easiest , makes sense and leaves the system looking 'stock'. Couple of basic questions, some show the 'block' of the Bosch vent valve above the valve (as you do) and some below. Guessing it dosnt make any difference where the block is as the electrical connection to this valve dosnt care?
Secondly with your mod you have left the canister under the bike in place I assume? ( I have fitted a factory center stand and retained the canister currently)
 
Last edited:
I too made the evap bypass mod. At first I was a bit skeptical but after the mod I’m a believer.
The symptoms on my bike (V7 850) were such that when slowing down to a stop I would need to change down gears a bit sooner than I thought was necessary compared to other bikes I’ve owned. If I did not change sooner the bike would chug back and forth with a lot bit of drive train backlash. Being a new bike I thought it was just the characteristics of this bike and soon learned to adjust my riding style. On some occasions on slow corners in first or second gear the bike would unpredictably surge forward and I’d have to close the throttle a bit to compensate.

After the bypass the chugging back and forth smoothed out dramatically. Now I can slow down the engine speed with the decreasing road speed and change down gears a bit later.
The bike has become so much smoother to ride at slow urban type speeds. It’s gained a gentleness to it making it much more delightful to ride.

I effected the mod by removing the “valve” thing between the fuel tank and canister and left the rubber pipes open. Then I disconnected the tube at the purge valve that leads to the inlet manifold and blocked this tube with a small bolt and clamp.

My initial test was a 45 minute ride in an urban setting. After more testing I’ll problaby clean up the mod by altogether removing unwanted pipes and bits.

Thanks to all who commented on this thread and to those who posted pictures. It made my job a lot easier.
 
Hey,

So I’ve perused the thread and have a basic understanding of what to do, however I’m still a bit confused. I opened up the bike today and see where everything is, but when it comes to the 2 hoses, I’m confused on which to cut (both?) and which one I need to clamp or put something in.

So the right one is the Bosch one that needs to be kept closed somehow, and the left one I can just cut and zip tie to something else?

I figured to leave the canister in for now, just want to figure this part out first and then remove that after.

I am very new to all this, I don’t know what the manifold is (or where or anything at all). I’ve googled for a video but haven’t found anything that shows enough.

IMG 8206
 
In short, you need to plug the line that comes from the red circled fitting below. I strongly do not recommend a vacuum cap at the fitting.
And I can’t see your plastic tip over valve shown below. Heat that and pop it apart to gut it, and snap back together.
Gotcha. That is super helpful. Thanks.

For the plug, what works best? I can run to a hardware store and get something.

And for heating, what’s the best way to go about that? It was just hidden behind the starter but I can pull it out a bit.

Now that you’ve shown me, this is super easy compared to what my brain initially thought.
 
For the plug, what works best? I can run to a hardware store and get something.
And for heating, what’s the best way to go about that?
An M8 allen bolt is best.
Hair-dryer and a small eyeglass screwdriver. Don’t pull by the hoses to separate. All well covered on this Forum many times.
 
Thanks for all the great info concerning this subject. So, you plug the line above the Bosch-valve and remove the internals of the tank vent line plastic valve, all clearly understood. But what about the connections of these two lines to the canister? Do they stay connected to the canister or do you leave them open?
 
Thanks for all the great info concerning this subject. So, you plug the line above the Bosch-valve and remove the internals of the tank vent line plastic valve, all clearly understood. But what about the connections of these two lines to the canister? Do they stay connected to the canister or do you leave them open?
I left the connections on my bike intake to the canister and works well. Some have commented about fuel fumes in garage if the cannister is removed, that dos'nt suit me having a garage that's attached / connected to the house and more importantly shared with the wife's car, don't need the grief of being told my bikes smelling out the garage / house!
 
Thanks Roger, To leave the 2 hoses connected to the canister was also my understanding on how the bypass should be done. But looking at the evap-system schematic under the seat of my V7 ( there is also a picture on P3 of this thread) still has me somewhat puzzled about how this whole 'contraption' works. In principle, if fumes develop in the tank they are routed to the canister through what is called the 'ventilation valve'. Then, supposedly based on a command from the ECU, the 'purge valve' opens, thereby connecting the cannister to the manifold vacuum and the fumes are pulled into the combustion process. So far, so good. But what is the purpose of the ventilation valve between tank and cannister and what determines whether it is closed or open? And what is the deal with the opening on the right side of the cannister labeled 'Air Atmosphere' in the above mentioned schematic? Wouldn't this opening to ambient air allow fumes to escape no matter what and render the whole system useless?
 
;)
Did you plug the intake leak? I stole your photo for the first post here. Nice shot, thanks.
If you mean the intake hose (pictured) to the top of the Bosch purge valve.. no, not yet; going to get an M8 today. Ps I'm leaving the canister and hoses attached as my R nineT had a similar system that dripped when it was hot.

IMG 4145
 
Last edited:
Line plugged from the intake, line left open above the purge valve and tucked away. 😎
Is there any issues with leaving an open line to a controlled device?

IMG 4149 IMG 4150
 
Good topic but as a non-native english speaker I read it ten times and still have to ask just to make it sure that I don`t destroy anything :) Sorry that I borrowed some pictures from this topic.

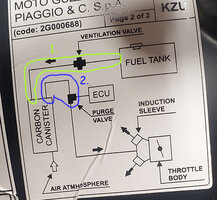
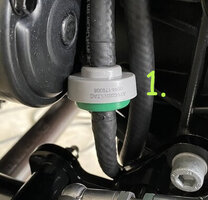
1. As shown in the picture; the hose from tank to evap-canister (marked as yellow/1.) could be replaced with a new straight hose and the end that was connected to evap-canister could be left to free air (as that is just a fuel tank breather if I understood correct) ? Other options are to open vent and remove insides or just to drill through ?

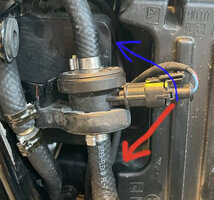
2. The second line (marked with blue/2.) is the hose with electronic vent. It should be plugged but connector should be left attached? Does it matter do I plug it from bottom or above the vent ? I would assume plugging it from bottom (between the evap canister and vent/red arrow) would prevent dirt from getting to vent and the hose from vent to intake could be left as is ?

If some professional could confirm these I promise to make clear point to point instructions with pictures about evap-delete so that even us non-native would understand :D

I will try to remove the canister too. I had no issues with fumes on my previous bike and it had just straight line for the fuel tank breather. There might have been some kind of "blowback-vent" (I don`t know what it`s called in english) to prevent flow to the otherway but it had no evap-system.

20221029 130922 IMG 1487

E72DDE25 3AE0 4AA9 8460 1639C7F2C153
 
If some professional could confirm these I promise to make clear point to point instructions with pictures about evap-delete so that even us non-native would understand
These are well defined/shown in the posts directly above already. 1. Yes. 2. No, it must be plugged between the purge valve and induction sleeve (your blue arrow above) as shown in Tom's posts above.
 
These are well defined/shown in the posts directly above already. 1. Yes. 2. No, it must be plugged between the purge valve and induction sleeve (your blue arrow above) as shown in Tom's posts above.

Thanks for the confirmation and sorry about the stupid questions but actually post above just confused me more. I mean earlier someone just removed the hose and put a ~8mm slug (I would assume thread cutted off from M8 bolt would do the same) to the hose and connected it back to vent without cutting the hose. It leaves the possibility to get back to stock if for some reason it would be needed.
Anyway can I still plug the vent also from above (red arrow) to prevent dirt getting in the vent or should it be left open to free air to breath ?
Thank you.

And yes; I have to use dictionary to write these posts.
Reconnection is why I cut mine where I did and left the canister. I didn't that to the tank valve, I just gutted it. 😎
 
Back
Top