Purchase and more info here;
 gtmotocycles.com
For our full fueling solution, we recommend the UpMap AND PC6/AT-300 -- see our dyno-proven results;

 www.guzzitech.com
We recommend starting by completing the evap/tip system resolve, which includes tank removal instructions for below, here; https://www.guzzitech.com/forums/threads/v85tt-evap-and-tip-info.19893/ -- once done, and tank still removed:
Below is for the '19-20 E4 model ONLY. For the E5 models, we HIGHLY recommend leaving all valves plugged in to the factory harness, and leave them open ended to atmospheric air. Do NOT cap or seal them. So in short, replace the block-off plates, and remove the rubber lines from the plates to the valve, and remove the line from the valve to the air box, and cap ONLY there.
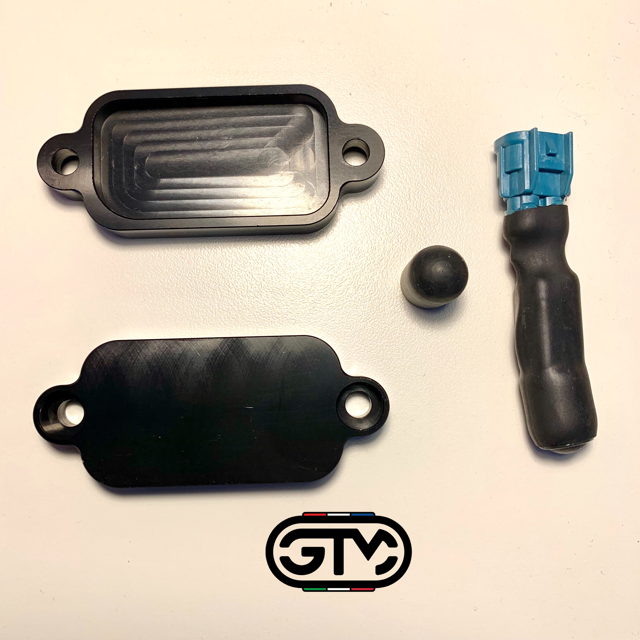
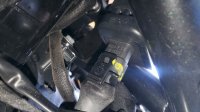
1. Locate and unhook SAS pump connections (electrical and rubber hoses), unplug oil pressure and head temp sensors (shown in step 2 below) and unbolt cylinder block off plates (one on each cylinder, left circled below):

2. Remove SAS pump (slide left off of rubber mount studs, better seen in step 3 below), hoses and air supply plates, this includes the connection to the air box in step 6 below.

3. Pump removed as shown, along with air supply plates. It's easiest to unplug the oil pressure sensor, and head temp sensors as shown below. Carefully note or photograph the connectors to insure proper reconnection.

4. Each cylinder port should look like below, for step 5 below.

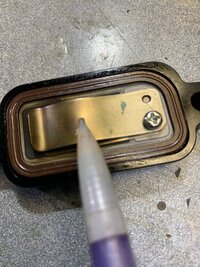
5. Transfer the valve plate to each GTM supplied CNC block-off plate, note orientation when removed and fit for larger radius, (inverted for pic) top right, as shown for each side.

6. On the air box intake connection spigot to the SAS pump, cap per second pic below.


7. Plug in supplied pigtail connector to stock wiring harness connector, and secure as desired. Left block-off plate shown, the right is a little hard to get to, and tough to photograph. Be sure to reconnect the oil pressure and head temp sensors, and reinstall tank. End.

GT MotoCycles V7III-V9-V85TT SAS - Air Block-off Kit
GT MOTOCYCLES® V7 III, V9 & V85TT Secondary Air Supply Elim Kit If you've modified your modern small block and would like to help the fueling and closed throttle decel popping... Our proprietary Secondary Air Supply (SAS) Elim Kit for your '17-20 E4 V7 III, V9 & V85TT & '21+ E5 V7-850, V85TT &...
gtmotocycles.com
For our full fueling solution, we recommend the UpMap AND PC6/AT-300 -- see our dyno-proven results;
2021-on V85TT E5 Performance thread
All, this thread will house performance info on the 2021+ V85TT From ~65 rwhp stock to 83.6 rwhp. Full kit has K&N with opened air box lid, SAS, full GTM exhaust system and UpMap base WITH PC6/AT-300 for dynamic GTM tuning. Overlays on the same '22 V85TT E5 bike below show a completely...
www.guzzitech.com
We recommend starting by completing the evap/tip system resolve, which includes tank removal instructions for below, here; https://www.guzzitech.com/forums/threads/v85tt-evap-and-tip-info.19893/ -- once done, and tank still removed:
Below is for the '19-20 E4 model ONLY. For the E5 models, we HIGHLY recommend leaving all valves plugged in to the factory harness, and leave them open ended to atmospheric air. Do NOT cap or seal them. So in short, replace the block-off plates, and remove the rubber lines from the plates to the valve, and remove the line from the valve to the air box, and cap ONLY there.
1. Locate and unhook SAS pump connections (electrical and rubber hoses), unplug oil pressure and head temp sensors (shown in step 2 below) and unbolt cylinder block off plates (one on each cylinder, left circled below):
2. Remove SAS pump (slide left off of rubber mount studs, better seen in step 3 below), hoses and air supply plates, this includes the connection to the air box in step 6 below.
3. Pump removed as shown, along with air supply plates. It's easiest to unplug the oil pressure sensor, and head temp sensors as shown below. Carefully note or photograph the connectors to insure proper reconnection.
4. Each cylinder port should look like below, for step 5 below.
5. Transfer the valve plate to each GTM supplied CNC block-off plate, note orientation when removed and fit for larger radius, (inverted for pic) top right, as shown for each side.
6. On the air box intake connection spigot to the SAS pump, cap per second pic below.
7. Plug in supplied pigtail connector to stock wiring harness connector, and secure as desired. Left block-off plate shown, the right is a little hard to get to, and tough to photograph. Be sure to reconnect the oil pressure and head temp sensors, and reinstall tank. End.
")


")
 ... this applies to E5's of course.
 some leave the fuel line going to the EVAP can so it takes in the nice fuel smells but it doesn't worry me...if your bike sits in a fairly enclosed area this might be a better option.