• Ciao Guest - You’ve landed at the ultimate Guzzi site. NEW FORUM REGISTRATIONS REQUIRE EMAIL ACTIVATION - CHECK YOUR SPAM FOLDER - Use the CONTACT above if you need help. New to the forum? For all new members, we require ONE post in the Introductions section at the bottom, in order to post in most of the other sections. ALWAYS TRY A SEARCH BEFORE STARTING A NEW TOPIC - Most questions you may have, have likely been already answered. DON'T BE A DRIVE-BY POSTER: As a common courtesy, check back in and reply within 24 hours, or your post will be deleted. Note there's decades of heavily experienced Guzzi professionals on this site, all whom happily give endless amounts of their VALUABLE time for free; BE COURTEOUS AND RESPECTFUL!
  • There is ZERO tolerance on personal attacks and ANY HYPERLINKS to PRODUCT(S) or other competing website(s), including personal pages, social media or other Forums. This ALSO INCLUDES ECU DIAGnostic software, questions and mapping. We work very hard to offer commercially supported products and to keep info relevant here. First offense is a note, second is a warning, third time will get you banned from the site. We don't have the time to chase repeat (and ignorant) offenders. This is NOT a social media platform; It's an ad-free, privately funded website, in small help with user donations. Be sure to see the GTM STORE link above; ALL product purchases help support the site, or you can upgrade your Forum profile or DONATE via the link above.
  • Be sure to see the GTM STORE link also above for our 700+ product inventory, including OEM parts and many of our 100% Made-in-SoCal-USA GTM products and engine kits. In SoCal? Click the SERVICE tab above for the best in service, tires, tuning and installation of our products or custom work, and don't miss our GT MotoCycles® (not) art on the BUILDS tab above. WE'RE HERE ONLINE ONLY - NO PHONE CALLS MADE OR RECEIVED - DO NOT EMAIL AND ASK QUESTIONS OR ASK TO CALL YOU.
  • Like the new V100, GuzziTech is full throttle into the future! We're now running on an all-new server and we've updated our Forum software. The visual differences are obvious, but hopefully you'll notice the super-fast speed. If you notice any glitches or have any issues, please post on the Site Support section at the bottom. If you haven't yet, please upgrade your account which is covered in the Site Support section or via the DONATE tab above, which gives you full site access including the DOWNLOADS section. We really appreciate every $ and your support to keep this site ad-free. Create an account, sign in, upgrade your account, and enjoy. See you on the road in 2024.

V9 Suspension Thread

Im considering an upgrade to the forks and shocks of my 2016 Bobber, but im unsure if there's a difference in front fork upgrade compatability for the earlier models? Specifically Marzocchi vs Kaifa? Is there a way to tell which fork I have?
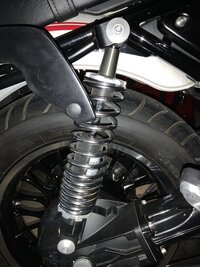
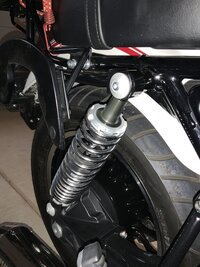
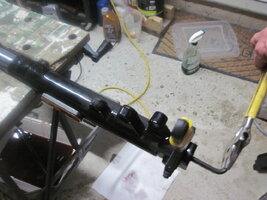
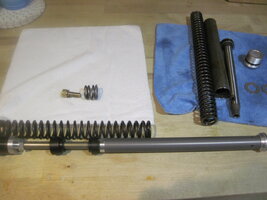
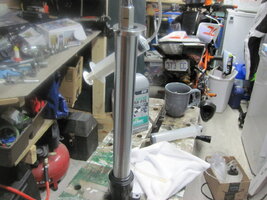
The Bobber/Roamer has NEVER had Marzocchi, so you have no worries there mate. ;)
Which upgrades are you considering?
 
ah, ok then! Cheers for that. So Im thinking your Matris V9 kit with adjusters and perhaps the GTM 2WS rears. Trying to get best value for money, as I only really ride a few hours every month or two, so not looking for the ultimate, just an improvement.
 
ah, ok then! Cheers for that. So Im thinking your Matris V9 kit with adjusters and perhaps the GTM 2WS rears. Trying to get best value for money, as I only really ride a few hours every month or two, so not looking for the ultimate, just an improvement.
Welcome, and you won't go wrong with that combo. The stock suspension parts are below sub-standard. TIA for the business!
 
Anyone performed the FKE fork upgrade at home? Im handy with the maintenance basics (I have heaps of tools/torque wrenches etc), and Ive done the evap delete and ECU reflash, but dont really want to mess around with the internals of a fork. Im assuming however, with this particular kit, it can be done without removing wheels, stanchions, oil etc? Just a simple pull out and drop in replacement? And as for rear shock replacement, is that the same story? Can I just unbolt the old and replace with the new, one side at a time?
 
Anyone performed the FKE fork upgrade at home? Im handy with the maintenance basics (I have heaps of tools/torque wrenches etc), and Ive done the evap delete and ECU reflash, but dont really want to mess around with the internals of a fork. Im assuming however, with this particular kit, it can be done without removing wheels, stanchions, oil etc? Just a simple pull out and drop in replacement? And as for rear shock replacement, is that the same story? Can I just unbolt the old and replace with the new, one side at a time?
The FKE can nearly be dropped in once you support the bike, and remove the fork preload cap (not quite that easy, but for reference), the internals can be lowered into the fork with a grabber tool and related, and if you don't have to change the fork oil mileage wise, you'll be all set. The fork tubes do NOT need to be separated from the stanchions to install the kit. The forks must be removed from the bike to change the oil. Rear shocks can be swapped easily, but we also recommend supporting the bike's weight for the transfer.
 
So I have discovered something after examining my rear shocks… under the rubber boot at the top of the spring there is a 4 position dial. I’m assuming (and it feels like) it’s rebound adjust. Is this unique to early models? I’ve never seen it mentioned in the forums. I never even knew it was there, and the manual it came with doesnt mention it. Weird.. My shocks have the three position preload, not the double ring style.
 
So I have discovered something after examining my rear shocks… under the rubber boot at the top of the spring there is a 4 position dial. I’m assuming (and it feels like) it’s rebound adjust. Is this unique to early models? I’ve never seen it mentioned in the forums. I never even knew it was there, and the manual it came with doesnt mention it. Weird.. My shocks have the three position preload, not the double ring style.
Post a photo.
 
Those are not stock shocks, likely Ikons. Bottom is ramped preload, top is rebound adjust. Those are barely/basic OEM replacements.
 
I put Icons on my V9 and the ride is way, way better. None of that slamming over bumps. Also changed the front fork oil but don't remember what I replaced the stuff with.

My wife refuses to ride this bike because of the hideous stock suspension. The Ikon change was a dramatic improvement to us. She still would rather ride on the back of my Harley but at least now she will take a short ride on this Goose. She liked my old 500 V50 Goose best but it is just too small for me to ride her on it anymore. The older I get the more cramped I feel.

IMG 4810
Now you DO see the alligator on that floating plate in the middle of the pond. Right?
 
Last edited:
Can anyone that has a 2018 V9 let me know if the rear top shock mount looks like the pic below? Apparently it now looks like this for the 2018 models in Europe. Thanks.
View attachment 15906
I bought this 2017 V9 Roamer a few months ago and found this thread. Here are some pictures of my MOTO Guzzi. Not sure it will help.
 

Attachments

  • 660AB417-BF5F-4A4A-AD62-3627D21482BB.jpeg
    660AB417-BF5F-4A4A-AD62-3627D21482BB.jpeg
    97.8 KB · Views: 9
  • 1AF8B758-05E6-4D41-8960-96EDA604276D.jpeg
    1AF8B758-05E6-4D41-8960-96EDA604276D.jpeg
    90.8 KB · Views: 9
  • FCC3089B-A3EA-4985-AC44-F42202A09472.jpeg
    FCC3089B-A3EA-4985-AC44-F42202A09472.jpeg
    86.1 KB · Views: 9
Anyone performed the FKE fork upgrade at home? Im handy with the maintenance basics (I have heaps of tools/torque wrenches etc), and Ive done the evap delete and ECU reflash, but dont really want to mess around with the internals of a fork. Im assuming however, with this particular kit, it can be done without removing wheels, stanchions, oil etc? Just a simple pull out and drop in replacement? And as for rear shock replacement, is that the same story? Can I just unbolt the old and replace with the new, one side at a time?
Just upgraded my V9 with the Matris FKE fork kit and piggyback rear shocks from the store. A few notes, first if you're like me and never have a helper devise a way to secure the bike. DIY wheel chock plus 2x6 w/ eye bolts to strap down, ands using universal pin lift (27 mm pin). For the rear just put front wheel in chock and I use a trolly jack w/ short piece of wood bolted to it to lift at the frame crossmember.

IMG 2330
 
Using the pinch bolts as the vise, breakk the cap loose while on the bike and final tighten as well. Loosten caps and dump out as much oil as can pumping it. You'll need a high quality 8mm allen wrench to remove the bottom bolt which was the most difficult part, though I was gonna break a Craftsman allen wrench they were so tight. You will also need an extra wide cresent wrench unless you have a proper vise.
 

Attachments

  • IMG_2324 (1).JPG
    IMG_2324 (1).JPG
    125.8 KB · Views: 6
Once its apart use the original top out spring and both the new inside to bottom bolt. Then normal priming and measuring the oil. You will need a grabber tool and something to measure the oil. Pic shows everything on wood or white towel is going in, incl orig bolt , top out spring and a damper that stays in the stanchion, everything on the blue towel is coming out. 2n pic shows DIY grabber tool and fork oil measuring tool.
 

Attachments

  • IMG_2325.JPG
    IMG_2325.JPG
    119.2 KB · Views: 9
  • IMG_2323.JPG
    IMG_2323.JPG
    143.7 KB · Views: 8
You do not need a spring compressor, so I'd say this conversion isn't real difficult, but have lots of rags and prepare for a mess. Make sure you get the new spring bushing in the proper order( instrctions don't mention them burt they are made different, one for bottom and one for top of spring). Noticed OEM spec show oil height of 120mm and use 7.5w but this kit uses 5 w, included w/oil height of 130 mm, observed that the holes in internal are smaller than OEM. However the OEM use two washers on each end of a metal tube, one of mine was installed incorrectly at the factory having both washers on one end- the new internals have nylon spring bushing that prob take up the 10mm difference in oil height.


The rear piggyback shocks were on sale at the store, can't really tell any difference between them and the OHlins I have on my KTM and for roughly half the cost. As delivered showing about 5 threads preload only had 20mm sag, backed out preload all the way, jumping up and down can get 30mm total sag using a slacker tool. The front with default preload of 6 turns gave me 23mm static, 41-42 total, with 15 lb suited up iy will be 43. Very pleased with the results for this upgrade..
 
Thanks for your notes, pics and documenting all of this here for others to see.
Give them some time to bed in the seals. They get better in time.
Thanks for the business and enjoy!
 
I'm the third owner of my 2017 V9 Bobber - had about 3500 miles when I got it. This fork kit came with it, purchased by the original owner, but I don't know anything about it.

The two coil springs look a little fuzzy, like very light surface corrosion, but it's completely new, probably circa 2017 or 2018.

What do I have, what will they do for me if I install them? What's the value of something like this?

Matris2 Matris1 Matris3
 
Hello, please, and thank you… 😖

May I suggest you visit the STORE tab and look at the Matris suspension components for sale. The descriptions are rather extensive.

 
Last edited:
Wow, wasn't aware they were still available.

Switch it up then, who has a set installed and how do you like it? Did you do the work or send it to a shop?
 
Back
Top