• Ciao Guest - You’ve landed at the ultimate Guzzi site. NEW FORUM REGISTRATIONS REQUIRE EMAIL ACTIVATION - CHECK YOUR SPAM FOLDER - Use the CONTACT above if you need help. New to the forum? For all new members, we require ONE post in the Introductions section at the bottom, in order to post in most of the other sections. ALWAYS TRY A SEARCH BEFORE STARTING A NEW TOPIC - Most questions you may have, have likely been already answered. DON'T BE A DRIVE-BY POSTER: As a common courtesy, check back in and reply within 24 hours, or your post will be deleted. Note there's decades of heavily experienced Guzzi professionals on this site, all whom happily give endless amounts of their VALUABLE time for free; BE COURTEOUS AND RESPECTFUL!
  • There is ZERO tolerance on personal attacks and ANY HYPERLINKS to PRODUCT(S) or other competing website(s), including personal pages, social media or other Forums. This ALSO INCLUDES ECU DIAGnostic software, questions and mapping. We work very hard to offer commercially supported products and to keep info relevant here. First offense is a note, second is a warning, third time will get you banned from the site. We don't have the time to chase repeat (and ignorant) offenders. This is NOT a social media platform; It's an ad-free, privately funded website, in small help with user donations. Be sure to see the GTM STORE link above; ALL product purchases help support the site, or you can upgrade your Forum profile or DONATE via the link above.
  • Be sure to see the GTM STORE link also above for our 700+ product inventory, including OEM parts and many of our 100% Made-in-SoCal-USA GTM products and engine kits. In SoCal? Click the SERVICE tab above for the best in service, tires, tuning and installation of our products or custom work, and don't miss our GT MotoCycles® (not) art on the BUILDS tab above. WE'RE HERE ONLINE ONLY - NO PHONE CALLS MADE OR RECEIVED - DO NOT EMAIL AND ASK QUESTIONS OR ASK TO CALL YOU.
  • Like the new V100, GuzziTech is full throttle into the future! We're now running on an all-new server and we've updated our Forum software. The visual differences are obvious, but hopefully you'll notice the super-fast speed. If you notice any glitches or have any issues, please post on the Site Support section at the bottom. If you haven't yet, please upgrade your account which is covered in the Site Support section or via the DONATE tab above, which gives you full site access including the DOWNLOADS section. We really appreciate every $ and your support to keep this site ad-free. Create an account, sign in, upgrade your account, and enjoy. See you on the road in 2024.

Rebuilt VHB 29 Carbs don't run real well

JeffEldoPolice

Just got it firing!
Joined
Jun 12, 2022
Messages
8
Location
Tacoma
My 74 Eldo Police runs a little squirrely after I cleaned both VHB carbs and replaced all the gaskets. I did the initial adjustments with the idle speed screws and the mixture screws and It starts right up but doesn't feel like it has a lot of power at first. I get it out on the freeway and as the RPMs wrap out through the gears, it feels like it's sputtering for a moment then it gets really aggressive and feels great. My gut tells me the mixture is too rich because as the engine gains RPMs (requires more fuel) it seems to run better. Nobody really works on these old machines so I am hoping this forum allows me to tap into some Guzzi Guru knowledge.
 
Possibly the float level is incorrect, or the little rubber seals at the end of the enriching jet plunger ( the brass pieces that you lift with a cable as to "choke" on start) may be damaged and not closing off the enriching jet circuit.
 
It might help is you tell us how the bike is set up--------------what air filtration you're using and what exhaust, any mods to engine? For idle mixture I use a Colortune (glass bottom spark plug).
I started tuning those carbs in 1976 & can tell you what you need if I know more about your bike.
 
Once the points are set, and timing is accurate... (valve adjustment, and as long as yer in there torque the heads... :) )
I've found with my stock 74 Eldo that the float level is critical.
make sure there is a little play in cable.. so the cables aren't holding the carbs open.
Once warmed up, I screw in the small screw (idle mixture) in until the engine rpm starts to fall, then out to increased rpm. Usually about 1 1/2 turns out from seated. Then the big screw same thing.. then the little and back and forth until desired idle.
Once carbs are individually adjusted, I use the vac guage tool to balance the carbs at idle.
Also a dual l(or more) vacuum level tool makes balancing the carbs very quick... non-synched carbs cause all sorts of symptoms.
Fun with carbs!

-Alex
 
Carburetors are one of my true passions. I rebuild them in my shop about 100-150x a year. Rebuilt 2 yesterday…

I have not done your particular bike but V700Steve has and can be a massive resource for you.

This being said, understanding the circuits in a carburetor and how and why they do what they do, tells you precisely, what part of the carburetor is in need of attention.

Starting circuit, slow jet circuit, enriching circuit (if so equipped), fast (main jet) circuit. They all do different things at very specific points in time in the running of the engine.

Fuel bowl fuel height is critical for proper running. It cannot be “close”. It needs to be spot on. So setting correct float height is so very important for proper running.

Synchronization cannot be overemphasized here. It is the key to tying the whole thing coming together.

If your twin carburetors are not fully synchronized, then your engine will literally be fighting against itself, one cylinder negatively affecting the other.

My simple advice is to provide as detailed answers to Steve as possible.

If I notice anything specific, I will chime in.

I will tell you that unless you hand disassembled your carbs down to the empty housing, there are several places that you may have missed critical items. I hand ream out and meticulously clean every single orifice in every tube and jet. I use syringes to force cleaner through the internal passageways in the carburetor and compressed air to assist in cleaning. These take patience and careful work.

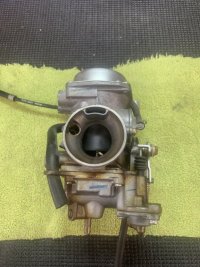
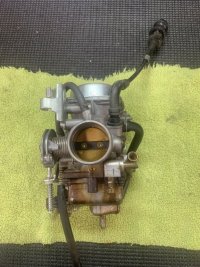
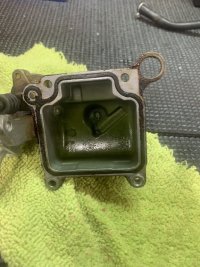
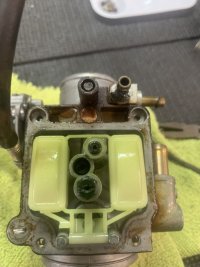
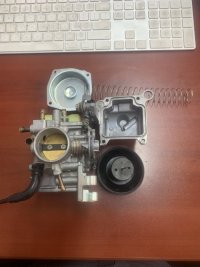
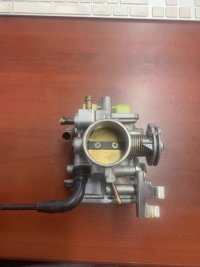
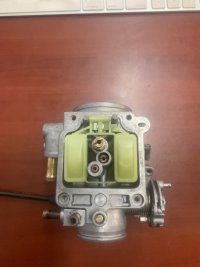
For example, in the last photo, the one of the carburetor floats and main and slow jets, at the 1o’clock position, is an oval orifice. That is where the accelerator pump on this particular carb, (11 o’clock position in the 3rd photo - where the gasket o-ring forms a circle around the accelerator pump output jet) mates up to squirt fuel directly into a tube located in the venturi (visible in the 1st photo coming into the venturi). That orifice is way too small for any reamer and must be cleared and cleaned with shots of cleaner, or syringes full of cleaner shot through the orifice, along with compressed air, until the fuel spray is correct and atomizes properly in the Venturi air flow.

I will say that pictures are always helpful in helping others to help you!

Helpful information:

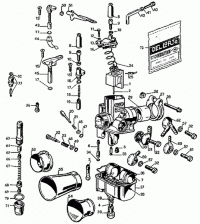
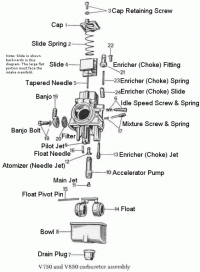
thisoldtractor.com/dellorto.html

EEF01D49 9AA3 4955 8710 898E710B500D

5016432B 96A3 42BC 9BBE 7708B2C3326C

LOL: I wasn’t bullshitting or kidding…this was just yesterday…before & after…


950B6F6B B4B2 4708 86CD EE520634DCE4 8D75E7BA 7782 49F7 8FCE 4185EF1A7D9A A03EBC5A 9D3E 40B3 8829 7E62B2631867 B4858468 9EDF 4CBC 8459 377D3661A449 D1E0171B EB27 4E67 B840 9FC5472463C7 30AB8E0E 8327 490A 823C 19A7648B1541 A4394259 042B 4D50 80B4 3DD466DA07BC
 
Last edited:
I have often found assembly issues to be the root cause of carburetion problems after folks have cleaned their carburetor/s.

Jason
 
Possibly the float level is incorrect, or the little rubber seals at the end of the enriching jet plunger ( the brass pieces that you lift with a cable as to "choke" on start) may be damaged and not closing off the enriching jet circuit.
John... I received feedback from some others regarding float levels. Something I'm goin to have to look at for sure. And regarding those rubber washers on the enricher jet plungers, those were part of my rebuild and I made sure they seated correctly into the body. Thanks for your response though. Really appreciate the feedback.
Jeff
 
It might help is you tell us how the bike is set up--------------what air filtration you're using and what exhaust, any mods to engine? For idle mixture I use a Colortune (glass bottom spark plug).
I started tuning those carbs in 1976 & can tell you what you need if I know more about your bike.
Steve... bike is a stock Eldo 850 Police but about 20 years ago or so I had the engine rebuilt and my buddy at Rootsman Restorations in Salt Lake City did an extensive rebuild and put a 1000 cc cylinder kit on it. The exhaust is just Franconi Frankfurter straight pipes which have been on this thing since 1997 when I bought it.
 
Once the points are set, and timing is accurate... (valve adjustment, and as long as yer in there torque the heads... :) )
I've found with my stock 74 Eldo that the float level is critical.
make sure there is a little play in cable.. so the cables aren't holding the carbs open.
Once warmed up, I screw in the small screw (idle mixture) in until the engine rpm starts to fall, then out to increased rpm. Usually about 1 1/2 turns out from seated. Then the big screw same thing.. then the little and back and forth until desired idle.
Once carbs are individually adjusted, I use the vac guage tool to balance the carbs at idle.
Also a dual l(or more) vacuum level tool makes balancing the carbs very quick... non-synched carbs cause all sorts of symptoms.
Fun with carbs!

-Alex
Alex... I believe points and timing could be part of my problem. The bike does not get a lot of miles in our limited season in western WA but still, it has been a long time since I've done anything with that. I'm probably in the market for a new cap, rotor, and points because I need to remove any and all variables that may be contributing to my problem. I've never timed this bike or adjusted then valves myself. What's the skill level required for an operation like that?
 
Carburetors are one of my true passions. I rebuild them in my shop about 100-150x a year. Rebuilt 2 yesterday…

I have not done your particular bike but V700Steve has and can be a massive resource for you.

This being said, understanding the circuits in a carburetor and how and why they do what they do, tells you precisely, what part of the carburetor is in need of attention.

Starting circuit, slow jet circuit, enriching circuit (if so equipped), fast (main jet) circuit. They all do different things at very specific points in time in the running of the engine.

Fuel bowl fuel height is critical for proper running. It cannot be “close”. It needs to be spot on. So setting correct float height is so very important for proper running.

Synchronization cannot be overemphasized here. It is the key to tying the whole thing coming together.

If your twin carburetors are not fully synchronized, then your engine will literally be fighting against itself, one cylinder negatively affecting the other.

My simple advice is to provide as detailed answers to Steve as possible.

If I notice anything specific, I will chime in.

I will tell you that unless you hand disassembled your carbs down to the empty housing, there are several places that you may have missed critical items. I hand ream out and meticulously clean every single orifice in every tube and jet. I use syringes to force cleaner through the internal passageways in the carburetor and compressed air to assist in cleaning. These take patience and careful work.

For example, in the last photo, the one of the carburetor floats and main and slow jets, at the 1o’clock position, is an oval orifice. That is where the accelerator pump on this particular carb, (11 o’clock position in the 3rd photo - where the gasket o-ring forms a circle around the accelerator pump output jet) mates up to squirt fuel directly into a tube located in the venturi (visible in the 1st photo coming into the venturi). That orifice is way too small for any reamer and must be cleared and cleaned with shots of cleaner, or syringes full of cleaner shot through the orifice, along with compressed air, until the fuel spray is correct and atomizes properly in the Venturi air flow.

I will say that pictures are always helpful in helping others to help you!

Helpful information:

thisoldtractor.com/dellorto.html

View attachment 25438

View attachment 25439

LOL: I wasn’t bullshitting or kidding…this was just yesterday…before & after…


View attachment 25431View attachment 25432View attachment 25433View attachment 25434View attachment 25435View attachment 25436View attachment 25437
Holy shit. I don't suppose you are anywhere close to western Washington. I have beer!
Jeff
 
Steve... bike is a stock Eldo 850 Police but about 20 years ago or so I had the engine rebuilt and my buddy at Rootsman Restorations in Salt Lake City did an extensive rebuild and put a 1000 cc cylinder kit on it. The exhaust is just Franconi Frankfurter straight pipes which have been on this thing since 1997 when I bought it.
Also... I have the original air filter housing still on the bike behind the carbs but no element in it. I run a Uni foam clamp-on POD filter on each carb.
 
Alex... I believe points and timing could be part of my problem. The bike does not get a lot of miles in our limited season in western WA but still, it has been a long time since I've done anything with that. I'm probably in the market for a new cap, rotor, and points because I need to remove any and all variables that may be contributing to my problem. I've never timed this bike or adjusted then valves myself. What's the skill level required for an operation like that?
Hey Jeff, ignition on the Eldo is very straight forward. Get a manual (maybe online at Benders), read it thru to get the idea, then go thru it again at the bike while performing the steps. You will need a couple tools (feeler gauge etc) but nothing extreme.
Doing the timing on that old Stufa (Italian for stove) is a very handy skill to have. And a relatively easy one to get.
Go for it!

Alex
 
Holy shit. I don't suppose you are anywhere close to western Washington. I have beer!
Jeff
Thank You Very Much!

I feel your pain and I do like beer!

If OH was closer, I’d be there to aid you. 😀

I will say that although I am not a technology wizbang, I have helped people via FaceTime / Skype/ NetMeeting software which I find to be really great as I can see and hear what is going on which often times makes for quick solutions. It also allows others to see me and I can show them things that they can see and hear.

(Technology, although a double edged sword, that cuts both ways, is cool in many ways!)

If anybody gets the need for something like that, just Private message me and I’ll do what I can to assist you.

👌👍🙏
 
John... I received feedback from some others regarding float levels. Something I'm goin to have to look at for sure. And regarding those rubber washers on the enricher jet plungers, those were part of my rebuild and I made sure they seated correctly into the body. Thanks for your response though. Really appreciate the feedback.
Jeff
By chance did you happen to change the position of the needle? That can change the transition point.
 
By chance did you happen to change the position of the needle? That can change the transition point.
Indeed, that is one of common mistakes made during re-assembly after cleaning that I referred to in my previous post.

Jason
 
Indeed, that is one of common mistakes made during re-assembly after cleaning that I referred to in my previous post.

Jason
Another mistake that is sometimes made during carburetor reassembly is not tightening the main jet and it ends up at the bottom of the float bowl. And the most common mistake is improper fitting of the diaphragm on a CV carburetor, but fortunately you do not have a CV carburetor.

Jason
 
Open exhaust & intake, 1000cc would be

Main jet---150
pilot-------60
choke-----60
Needle----3rd notch V9
Idle mix ---1 -1 1/2 turns out
Make sure choke closes & has play like John said.
Make sure the accelerator pumps work
Needle should be all the way up or slightly lowers, means shimming up from 2nd notch.
 
If these are the same 29mm carbs I had , there has been no mention of the spring used in the rudimentary
accelerator assembly in the main jet holder ( I think that's where it's located) . When water gets in there the
spring rusts and fails . I remember getting a rather weak spring from an auto parts place and cutting it to
a working length . Might explain some of the running issues . Peter
 
I have put springs from ballpoint pen cut down & stretched in there.
You remember correctly.
I used to work on rusty, crusty, leaking junk Guzzi's. No one else would, but it's good $.
I'd work on that before new Chinese Guzzi's(that's where their engine parts come from)
 
I'd work on that before new Chinese Guzzi's(that's where their engine parts come from)

Chinese Guzzis---are you saying that currently some Guzzi parts are being manufactured in China? And if so, what parts are Chinese made?

Jason
 
Back
Top