I'm not a fan of carb work either. Everything has to be just right for them to perform well. After year of FI work, I seem to have lost the knack!!
Navigation
Install the app
How to install the app on iOS
Follow along with the video below to see how to install our site as a web app on your home screen.
Note: This feature may not be available in some browsers.
More options
-
Ciao Guest - You’ve landed at the ultimate Guzzi site. NEW FORUM REGISTRATIONS REQUIRE EMAIL ACTIVATION - CHECK YOUR SPAM FOLDER - Use the CONTACT above if you need help. New to the forum? For all new members, we require ONE post in the Introductions section at the bottom, in order to post in most of the other sections. ALWAYS TRY A SEARCH BEFORE STARTING A NEW TOPIC - Most questions you may have, have likely been already answered. DON'T BE A DRIVE-BY POSTER: As a common courtesy, check back in and reply within 24 hours, or your post will be deleted. Note there's decades of heavily experienced Guzzi professionals on this site, all whom happily give endless amounts of their VALUABLE time for free; BE COURTEOUS AND RESPECTFUL!
-
There is ZERO tolerance on personal attacks and ANY HYPERLINKS to PRODUCT(S) or other competing website(s), including personal pages, social media or other Forums. This ALSO INCLUDES ECU DIAGnostic software, questions and mapping. We work very hard to offer commercially supported products and to keep info relevant here. First offense is a note, second is a warning, third time will get you banned from the site. We don't have the time to chase repeat (and ignorant) offenders. This is NOT a social media platform; It's an ad-free, privately funded website, in small help with user donations. Be sure to see the GTM STORE link above; ALL product purchases help support the site, or you can upgrade your Forum profile or DONATE via the link above.
-
Be sure to see the GTM STORE link also above for our 700+ product inventory, including OEM parts and many of our 100% Made-in-SoCal-USA GTM products and engine kits. In SoCal? Click the SERVICE tab above for the best in service, tires, tuning and installation of our products or custom work, and don't miss our GT MotoCycles® (not) art on the BUILDS tab above. WE'RE HERE ONLINE ONLY - NO PHONE CALLS MADE OR RECEIVED - DO NOT EMAIL AND ASK QUESTIONS OR ASK TO CALL YOU.
-
Like the new V100, GuzziTech is full throttle into the future! We're now running on an all-new server and we've updated our Forum software. The visual differences are obvious, but hopefully you'll notice the super-fast speed. If you notice any glitches or have any issues, please post on the Site Support section at the bottom. If you haven't yet, please upgrade your account which is covered in the Site Support section or via the DONATE tab above, which gives you full site access including the DOWNLOADS section. We really appreciate every $ and your support to keep this site ad-free. Create an account, sign in, upgrade your account, and enjoy. See you on the road in 2024.
You are using an out of date browser. It may not display this or other websites correctly.
You should upgrade or use an alternative browser.
You should upgrade or use an alternative browser.
Rebuilt VHB 29 Carbs don't run real well
- Thread starter JeffEldoPolice
- Start date
Moto-Uno
High Miler
Actually I really enjoyed carb rebuilding , especially with the same customers year after year  .
.
Every year warned them to drain the carb float bowls at the end of the season and come spring,
they wouldn't start . Even suggested fuel stabilizer if they couldn't be bothered with draining ! By
the third time I saw some of them we both just smiled , it was only money ! Peter
Every year warned them to drain the carb float bowls at the end of the season and come spring,
they wouldn't start . Even suggested fuel stabilizer if they couldn't be bothered with draining ! By
the third time I saw some of them we both just smiled , it was only money ! Peter
No John & Peter,
You misunderstand. I actually really love carb work. I enjoy the bench work in teardown, restoration and replacement and setup.
I do hundreds of carburetors per year and I have a whole dedicated side of my workshop to just it with specialized bench tools and equipment dedicated just to this aspect of my business. Actually thinking about advertising nationally for this type of work.
So much better than repair jobs. That is the work I actually hate. Make runs…
Invariably there are 2, 3, 4, sometimes 6 or 7 other problems showing themselves 1 at a time, taking forever to resolve.
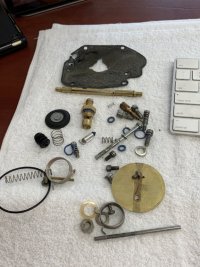
With carbs, it’s just tear out, tear down, restore/rebuild, install back in motorcycle or just ship back to customer. 24-48 hours tops.
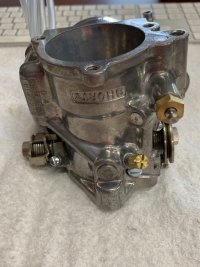
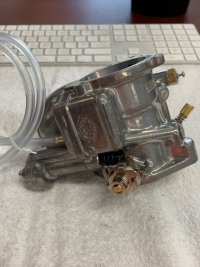
Funniest one was this nearly 40 year old carburetor that the customer mailed me. It was a God awful mess. When I returned it to him, he wrote back “Do I put it on the mantel to enjoy looking at, or back on the motorcycle “. He texts me every year now for 2 years to tell me that his motorcycle still starts first kick or crank and not a single drop of fuel leaks out of this complete rebuild job.
That makes me smile always!
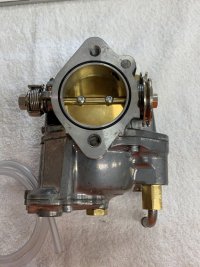
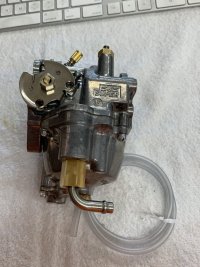
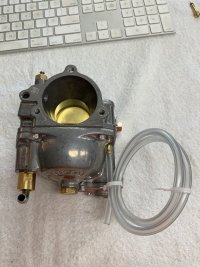


Last edited:
Moto-Uno
High Miler
OMG , you work on HD's also 

 . Spent most of my adult life working on them , going to the
HD school when it was held in Milwaukee (seems like centuries ago ) and working at dealerships across
the Great White North ! Peter
HD school when it was held in Milwaukee (seems like centuries ago ) and working at dealerships across
the Great White North ! Peter
I work on everything! Pistons are pistons after all! 
F
Former User robertx901
Guest
Hey guys, I still have the 'crank but no start' issue on my Guzzi. I figure it's either something obvious that I'm missing, or the carb jets aren't allowing fuel to enter the carb body. Here is what I know:
--The spark plug gaps are good and they give out good spark
--The valves are gapped properly as are the points
--I didn't time the engine
--The battery is fully charged -- about 12.6
--The K&N air pods are on tight
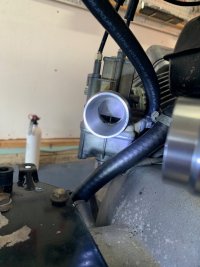
--The slides open at the same time (see first picture showing the height of the slides with no throttle applied)
--There's about 2 gallons of fuel in the tank, petcocks on reserve setting
--Fuel is flowing through the fuel lines from the petcocks to the carbs
--Both float bowls both have fuel in them
--I loosened the idle screw about 1.5 turns out from the base setting (base is about 1.5 turns out for left, 2 turns out for right carb)
--I don't smell gas around the carbs, so I don't think the engine is flooded
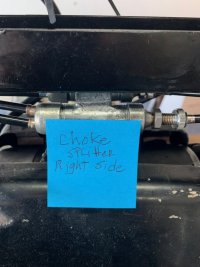
--The choke freeplay is about 1/4" at the carb (seems a little sloppy to me?) I have the nut almost completely out at the splitter (see picture), can't reduce freeplay, not sure if that's the way it should be?
--The throttle freeplay at the carbs are about 1/16th" but seems a little tight. I don't have any more adjustment at the splitter or the carb to get more freeplay, not sure if that's an issue
So, do you guys have anything you can think of that I'm missing? If not, I'll pull the carbs out, take them apart and go through them again (will send pictures).
The good news, I guess, is that I'll know a crapload more about carbs than I did when I started .
.
Thanks for you input, I appreciate your help!
--The spark plug gaps are good and they give out good spark
--The valves are gapped properly as are the points
--I didn't time the engine
--The battery is fully charged -- about 12.6
--The K&N air pods are on tight
--The slides open at the same time (see first picture showing the height of the slides with no throttle applied)
--There's about 2 gallons of fuel in the tank, petcocks on reserve setting
--Fuel is flowing through the fuel lines from the petcocks to the carbs
--Both float bowls both have fuel in them
--I loosened the idle screw about 1.5 turns out from the base setting (base is about 1.5 turns out for left, 2 turns out for right carb)
--I don't smell gas around the carbs, so I don't think the engine is flooded
--The choke freeplay is about 1/4" at the carb (seems a little sloppy to me?) I have the nut almost completely out at the splitter (see picture), can't reduce freeplay, not sure if that's the way it should be?
--The throttle freeplay at the carbs are about 1/16th" but seems a little tight. I don't have any more adjustment at the splitter or the carb to get more freeplay, not sure if that's an issue
So, do you guys have anything you can think of that I'm missing? If not, I'll pull the carbs out, take them apart and go through them again (will send pictures).
The good news, I guess, is that I'll know a crapload more about carbs than I did when I started
Thanks for you input, I appreciate your help!
Attachments
F
Former User robertx901
Guest
Oh yeah, one more thing: I completley rewired the bike before I installed the VHB carbs. I don't think that should be an issue since I get good spark at the spark plugs?
Moto-Uno
High Miler
Holy crap , if that's the position of your throttle slides with the twist grip in the closed position
you have an incorrect set of cables ! With a flash light shining through from the engine side of the
carb , there should be a 'sliver' of light coming from the bottom of the slide , easy to check with the carbs off .
You can also see if that sliver of light decreases as you unscrew the idle speed screw . Peter
I was going to say the same thing. Your opening is way massively open for the starting position.
Amboman
Cruisin' Guzzisti
With #60 slides, a good "base line" setting for the slide opening is 9/32", measured by slipping a drill bit of that size under the filter side of the slide.
F
Former User robertx901
Guest
Hey guys,
I lowered the slides to 9/32". Looks like I would need to raise them a tiny bit to have a slight opening at the intake manifold side of the carbs. If I do that, the throttle cables have zero freeplay The upper cable adjuster at the splitter is all the way in and the adjuster at the carbs is also all the way in, so no more adjustment available to get more freeplay. The lower cables are from MG Cycle #12117501 and are 11" long. The upper cable is #12607500 and is about 26.5" long. Do you think I have the wrong upper or lower cables?
I lowered the slides to 9/32". Looks like I would need to raise them a tiny bit to have a slight opening at the intake manifold side of the carbs. If I do that, the throttle cables have zero freeplay The upper cable adjuster at the splitter is all the way in and the adjuster at the carbs is also all the way in, so no more adjustment available to get more freeplay. The lower cables are from MG Cycle #12117501 and are 11" long. The upper cable is #12607500 and is about 26.5" long. Do you think I have the wrong upper or lower cables?
If you have standard bars, those are the correct cables. If you have police/touring bars the upper is incorrect. On the lower cables, carefully remove some of the outer sheathing so you have more free play. Make sure you don't nick the inner cable. I've had to do that a few times on these bikes to get the necessary 2-3mm of free play at the carb.
F
Former User robertx901
Guest
Thanks John Zibell, I'll give that a try.
F
Former User robertx901
Guest
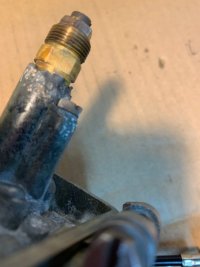
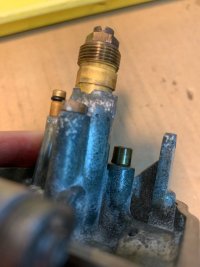
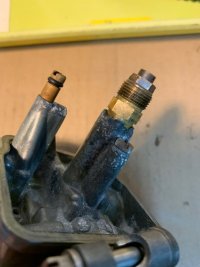
I took the VHB's off -- see pictures of left carb. The main jet passageway (where the accelerator pump/main jet assembly gets inserted into) looks pretty corroded and pieces broken off.....do you guys think that's causing a problem?
Attachments
Moto-Uno
High Miler
Well the body doesn't look too stellar , but if the jets and passage ways are clean , I wouldn't worry too much .
However , having said that if that corrosion is easily rubbed of , then they should get a more thorough scrubbing !
Peter
However , having said that if that corrosion is easily rubbed of , then they should get a more thorough scrubbing !
Peter
Moto-Uno
High Miler
If after all this and it's still a problem starting , I might suggest removing the rubber boots from the carb
mouth to the air filter and giving it a shot of quick start into each carb throat . That should at least get it running
and maybe allow you to see if something else is the problem . Sometimes you just need to hear it run for a
moment or so to keep your interest up . Good luck , Peter
mouth to the air filter and giving it a shot of quick start into each carb throat . That should at least get it running
and maybe allow you to see if something else is the problem . Sometimes you just need to hear it run for a
moment or so to keep your interest up
I'd recommend looking for carbs in better condition. If that area is that bad, the internals may be as well.I took the VHB's off -- see pictures of left carb. The main jet passageway (where the accelerator pump/main jet assembly gets inserted into) looks pretty corroded and pieces broken off.....do you guys think that's causing a problem?
Well now this is a first for me!
I’ve never played “how corroded can the inside of a carburetor body be, and still run correctly?”.
I’ve never attempted to run a carburetor with that kind of damage before.
Also, all of your jets and your accelerator pump look bad to me from this angle. Did you remove them and physically clean and ream them? They should be soaked in pure white vinegar and cleaned thoroughly. You can use table salt, vinegar and an old toothbrush.
The business end (the tiny orifice holes) need to be reamed and blown out. I don’t get the feeling any of this was done.
Also, did you check your fuel float height in the bowls?
Although this is a different carburetor I’m working on at the moment, I am looking to see a complete teardown like this:
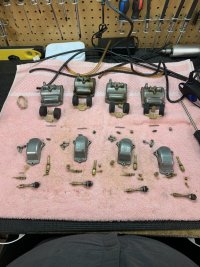
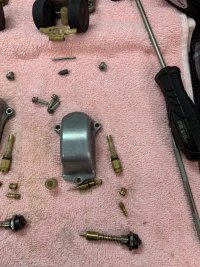
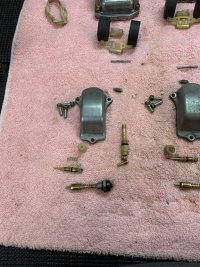
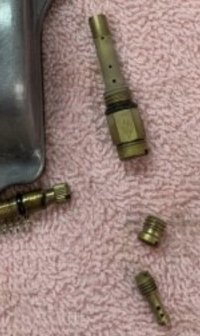
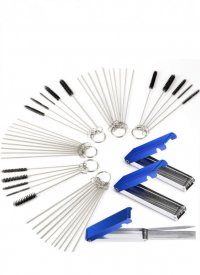
This photo shows the tiny holes in the jets tubes but not the center holes. See all of the greenish looking scale? That same stuff is inside the center holes of the jets, and needs to be removed by vinegar soaking and physically reaming out of the holes with a carburetor cleaning tool. I’m sure you won’t spend the $$$ for true professional precision reamers but an inexpensive set of cleaning wires and brushes is readily available on the internet.
Just spraying carburetor cleaner in and on them will not do the job.
I’ve never played “how corroded can the inside of a carburetor body be, and still run correctly?”.
I’ve never attempted to run a carburetor with that kind of damage before.
Also, all of your jets and your accelerator pump look bad to me from this angle. Did you remove them and physically clean and ream them? They should be soaked in pure white vinegar and cleaned thoroughly. You can use table salt, vinegar and an old toothbrush.
The business end (the tiny orifice holes) need to be reamed and blown out. I don’t get the feeling any of this was done.
Also, did you check your fuel float height in the bowls?
Although this is a different carburetor I’m working on at the moment, I am looking to see a complete teardown like this:


This photo shows the tiny holes in the jets tubes but not the center holes. See all of the greenish looking scale? That same stuff is inside the center holes of the jets, and needs to be removed by vinegar soaking and physically reaming out of the holes with a carburetor cleaning tool. I’m sure you won’t spend the $$$ for true professional precision reamers but an inexpensive set of cleaning wires and brushes is readily available on the internet.
Just spraying carburetor cleaner in and on them will not do the job.


Last edited:
F
Former User robertx901
Guest
Thanks very much for your input. I did take the carbs apart, soaked them in carb cleaner, blew compressed air through the carb orifices and tried, minimally, to get the corrosion off. Looks like that wasn't nearly good enough. So I'll go back and do a more thorough cleaning like you recommend. Couple of questions:
*Can I use a dremel tool with a brass brush to clean the corrosion off? If not, what else could I do?
*I do have some doubts about them having internal damage.....if they still don't work after I do that work, any recommendations about where I could buy a better set? I bought these on ebay from someone I don't know.
*If they don't work I could, maybe, reinstall my SS1 carbs (the bike did start with them on). I had trouble with the float bowls leaking but I think I solved that. Do you guys have an opinion about using them instead of VHBs?
Thanks again for you input, I'm enyoying learning a new skill -- awesome fun, even though it is frustrating
Go to the store and use the contact tab. Todd may have a source for decent used units.

